03-iOS架構設計|iOS元件化開發-依賴包管理工具Cocoapods常用實踐:元件庫(本地庫、遠端庫(公有、私有))建立、模板工程、劃分、資源管理、優化等
前言
在先前的一篇文章,圍繞 “移動客戶端架構設計"這個大話題展開討論的過程中,我們做了基本的綜述,並且針對 架構設計 的大話題簡扼地劃分為五個部分:
- 模組化開發
- 元件化開發
- 二進位制化處理
- 設計模式
- 架構設計與架構演進
我們將在本篇文章,在展開 元件化開發 這個話題之前,先認識一下 元件化開發的依賴包管理工具Cocoapods
一、什麼是Cocoapods?
CocoaPods是Swift和Objective-CCocoa 專案的依賴管理器 - 它擁有超過 94,000 個庫,用於超過 300 萬個應用程式。 - 利用Cocoapods,可以定義庫自身的依賴關係(簡稱Pods),以及在整個開發環境中對第三方庫的版本管理非常方便。
CocoaPods開發者 創造該工具的理念主要體現在兩個方面: - 首先,在工程中引入第三方程式碼會涉及到許多內容。 - 針對Objective-C初級開發者來說,工程檔案的配置會讓人很沮喪 - 在配置build phases和linker flags過程中,會引起許多人為因素的錯誤。
-CocoaPods簡化了這一切,它能夠自動配置編譯選項
- 其次,通過CocoaPods,可以很方便的查詢到新的第三方庫。
- 當然,這並不是說你可以簡單的將別人提供的庫拿來拼湊成一個應用程式。 - 它的真正作用是讓你能夠找到真正好用的庫,以此來縮短我們的開發週期和提升軟體的質量
二、Cocoapods工作流及管理開發包的幾種方式
引入一張圖,快速認識 CocoaPods 工作流程:
相關名詞介紹
2.1 遠端索引庫
遠端索引庫 裡存放的是各種框架的描述資訊,這個庫託管在 Github 上,地址如下:
github.com/CocoaPods/Specs
- 每個框架下有數個版本,每個版本有一個 json 格式的描述資訊,如下:
shell
{
"name": "CAIStatusBar",
"version": "0.0.1",
"summary": "A simple indicator",
"homepage": "http://github.com/apple5566/CAIStatusBar.git",
"license": "MIT",
"authors": {
"apple5566": "[email protected]"
},
"platforms": {
"ios": "6.0"
},
"source": {
"git": "http://github.com/apple5566/CAIStatusBar.git",
"tag": "0.0.1"
},
"source_files": "CAIStatusBar/**/*.{h,m}",
"resources": "CAIStatusBar/CAIStatusBar.bundle",
"requires_arc": true
}
- 其中 git 欄位表示該框架的託管地址,也就是上面時序圖中的 遠端框架庫。
2.2 本地索引庫
在 install cocoapods 命令後,需要執行 pod setup 這個命令,pod setup 命令就是將遠端索引庫克隆到本地來,本地索引庫的路徑如下:
shell
~/.cocoapods/repos/master
本地索引庫和遠端索引庫的目錄一致,結構如下:
2.3 本地索引檔案
當執行 pod search 命令時,如果本地索引檔案不存在,會建立這個檔案。
shell
pod search afn
Creating search index for spec repo 'master'..
如果這個檔案存在,則會在此檔案中進行索引,確認所需要的框架是否存在,本地索引檔案的路徑如下:
shell
~/Library/Caches/CocoaPods
我們在前面的綜述部分,已經簡扼地介紹了庫的幾種劃分,我們在這裡用一個表格來進一步直觀描述:
本地庫與遠端庫
| |本地庫|遠端庫| |---|---|---| |私有庫|開發者本地存放|git伺服器是私有云| |公有庫| 無 |git伺服器是公有云|
閉源庫與開源庫
| |閉源庫|開源庫| |---|---|---| |公有庫/私有庫| 程式碼二進位制化處理(.a/.framework/.xcframework) |原始碼、資原始檔全部公開|
三、在Mac上搭載Cocoapods環境
3.1 在Intel晶片的Mac上安裝
1. 安裝好
Ruby環境/升級ruby環境 - 1.1 安裝RVM:RVM是一個便捷的多版本Ruby環境的管理和切換工具 官網:http://rvm.io/ - 在Mac中安裝Ruby需要先安裝好RVM- 安裝RVM:shell curl -ssl http://get.rvm.io | bash -s stable- 載入RVM環境:shell source ~/.rvm/scripts/rvm- 修改RVM下載 Ruby 的源 為Ruby China映象:shell echo "ruby_url=<http://cache.ruby-china.com/pub/ruby>" > ~/.rvm/user/db- 檢查安裝結果(如果能顯示版本號,則安裝成功 ):shell rvm -v ##列印以下結果,代表安裝成功: rvm 1.29.9 (latest) by Michal Papis, Piotr Kuczynski, Wayne E. Seguin [<http://rvm.io/]>
- 1.2 如果之前安裝過RVM, 則進行RVM 更新:shell rvm get stable- 1.3 安裝Ruby- 1.3.1 列出Ruby可安裝的版本資訊:shell rvm list known- 1.3.2 安裝一個Ruby版本shell rvm install 2.6.0- 1.3.3 如果想設定為預設版本,可以用這條命令來完成:shell rvm use 2.6.0 --default- 1.3.4 檢測一下Ruby:shell ruby -v
- 2. 使用
ruby-china的Ruby映象源 - 2.1 檢視當前Ruby源shell gem sources -l- 2.2 移除舊的Ruby源shell gem sources --remove http://rubygems.org/- 2.2 新增新的Ruby源shell gem sources -a http://gems.ruby-china.com/- 2.3 驗證Ruby源是不是Ruby-chinashell gem sources -l- 3. 安裝CocoaPodsshell sudo gem install -n /usr/local/bin cocoapods- 4. 如果安裝了多個Xcode使用下面的命令選擇(一般需要選擇較新的Xcode版本)shell sudo xcode-select -switch /Applications/Xcode.app/Contents/Developer- 5. 安裝本地庫
shell pod setup- 該步驟是在下載Cocoapods官方團隊管理的所有遠端庫索引檔案到本地 - 庫託管在 Github 上,地址如下: github.com/CocoaPods/Specs - 若是能夠有索引檔案的國內映象庫或者現成的索引檔案庫檔案包,可以直接拷貝放到本地的資料夾 - 資料夾地址查詢命令列:pod repo- 查詢安裝進度命令列 -cd ~/.cocoapods-du -sh *
3.2 在M系列(M1、M1 Pro、M2......)晶片的Mac上安裝
- Cocoapods
- 安裝Cocoapods
shell
sudo gem install -n /usr/local/bin cocoapods
- 選擇
Xcode版本 (如果安裝了多個Xcode版本,使用下面的命令選擇(推薦選擇最近的Xcode版本))shell sudo xcode-select -switch /Applications/Xcode.app/Contents/Developer -
安裝本地\ 從
Mac OS Catalina開始,終端執行上面命令後就直接結束了\ 我們需要手動安裝本地庫: ```shell // 國外地址,如果你能科學上網的話,可以使用這個方法 git clone http://github.com/CocoaPods/Specs.git ~/.cocoapods/repos/trunk// 清華大學映象,速度槓槓的,推薦使用 git clone http://mirrors.tuna.tsinghua.edu.cn/git/CocoaPods/Specs.git ~/.cocoapods/repos/trunk ```
- 安裝Cocoapods
四、Cocoapods的具體使用
- 作為
開發包管理工具:- 用於 管理 【二方庫、三方庫(SDK)】依賴包
- 用於 公司 專案團隊內部 元件化開發 管理 公司移動開發套件的【私有庫】
- 對
開發包的 管理 除了 庫 本身的 程式碼整合外,還包括【版本控制、編譯依賴設定】等
- 可以 與
Fastlane+Jenkins等工具組合 成 簡易的 持續整合平臺 - ......
五、製作Cocoapods庫
在介紹製作Cocoapods庫之前,我們先回顧一下 CocoaPods 工作流程:
上面的流程清楚以後,製作
CocoaPods 庫相信應該不會太難了,大致分為以下幾步:
1. 託管框架原始碼到 Git;
2. 建立框架描述資訊XXX.podspec;
3. 上傳框架描述資訊到 http://github.com/CocoaPods/Specs;
4. 命令列 pod setup , 建立本地索引庫;
5. 命令列 pod install ,將框架整合到專案中;
現在開始動手吧!
- 首先,在桌面新建一個 NKTestLib 目錄,在該目錄下新建一個 Classes 目錄,用來存放框架原始碼;(可以給 Classes 目錄任意的命名,Classes 只是一種約定俗稱的命名)
- 然後,將 NKTestLib 託管到 Git
5.1 進一步瞭解.podspec 檔案約定俗成
pod spec命令用於建立框架的描述檔案,文件如下: guides.cocoapods.org/syntax/podspec
現在在 NKTestLib 目錄下執行:
shell
pod spec create NKTestLib
創建出來的描述檔案: ```shell
Be sure to run `pod spec lint NKTestLib.podspec' to ensure this is a
valid spec and to remove all comments including this before submitting the spec.
To learn more about Podspec attributes see http://guides.cocoapods.org/syntax/podspec.html
To see working Podspecs in the CocoaPods repo see http://github.com/CocoaPods/Specs/
Pod::Spec.new do |spec| # ――― Spec Metadata ―――――――――――――――――――――――――――――――――――――――――――――――――――――――――― # # # These will help people to find your library, and whilst it # can feel like a chore to fill in it's definitely to your advantage. The # summary should be tweet-length, and the description more in depth. # spec.name = "NKTestLib" spec.version = "0.0.1" spec.summary = "This is a Pod Lib Demo for blog." # This description is used to generate tags and improve search results. # * Think: What does it do? Why did you write it? What is the focus? # * Try to keep it short, snappy and to the point. # * Write the description between the DESC delimiters below. # * Finally, don't worry about the indent, CocoaPods strips it! spec.description = "一般描述庫的用途、主要功能等" spec.homepage = "http://github.com/VanZhang-CN-SZ-SN9037/NKTestLib" # spec.screenshots = "www.example.com/screenshots_1.gif", "www.example.com/screenshots_2.gif" # ――― Spec License ――――――――――――――――――――――――――――――――――――――――――――――――――――――――――― # # # Licensing your code is important. See http://choosealicense.com for more info. # CocoaPods will detect a license file if there is a named LICENSE # Popular ones are 'MIT', 'BSD' and 'Apache License, Version 2.0'. # spec.license = { :type => "MIT", :file => "./LICENSE" } # ――― Author Metadata ――――――――――――――――――――――――――――――――――――――――――――――――――――――――― # # # Specify the authors of the library, with email addresses. Email addresses # of the authors are extracted from the SCM log. E.g. $ git log. CocoaPods also # accepts just a name if you'd rather not provide an email address. # # Specify a social_media_url where others can refer to, for example a twitter # profile URL. # spec.author = { "Van Zhang" => "[email protected]" } # Or just: spec.author = "Van Zhang" # spec.authors = { "Van Zhang" => "[email protected]" } # spec.social_media_url = "http://twitter.com/Van Zhang" # ――― Platform Specifics ――――――――――――――――――――――――――――――――――――――――――――――――――――――― # # # If this Pod runs only on iOS or OS X, then specify the platform and # the deployment target. You can optionally include the target after the platform. # spec.platform = :ios, "14.0" # spec.platform = :ios, "5.0" # When using multiple platforms spec.ios.deployment_target = "14.0" # spec.osx.deployment_target = "10.7" # spec.watchos.deployment_target = "2.0" # spec.tvos.deployment_target = "9.0" spec.swift_version = "5.4" # ――― Source Location ―――――――――――――――――――――――――――――――――――――――――――――――――――――――――― # # # Specify the location from where the source should be retrieved. # Supports git, hg, bzr, svn and HTTP. # spec.source = { :git => "[email protected]:VanZhang-CN-SZ-SN9037/NKTestLib.git", :tag => "#{spec.version}" } # ――― Source Code ―――――――――――――――――――――――――――――――――――――――――――――――――――――――――――――― # # # CocoaPods is smart about how it includes source code. For source files # giving a folder will include any swift, h, m, mm, c & cpp files. # For header files it will include any header in the folder. # Not including the public_header_files will make all headers public. # spec.source_files = "Classes", ".//Classes/.{c,h,m,mm,swift}" spec.exclude_files = "Classes/Exclude" spec.public_header_files = "Classes//.h" # ――― Resources ―――――――――――――――――――――――――――――――――――――――――――――――――――――――――――――――― # # # A list of resources included with the Pod. These are copied into the # target bundle with a build phase script. Anything else will be cleaned. # You can preserve files from being cleaned, please don't preserve # non-essential files like tests, examples and documentation. # # spec.resource = "icon.png" spec.resources = "Classes/Resources/" # spec.preserve_paths = "FilesToSave", "MoreFilesToSave" # ――― Project Linking ―――――――――――――――――――――――――――――――――――――――――――――――――――――――――― # # # Link your library with frameworks, or libraries. Libraries do not include # the lib prefix of their name. # # spec.framework = "SomeFramework" spec.frameworks = ['CoreTelephony','CoreFoundation','AdSupport','AppTrackingTransparency']
# spec.library = "iconv" spec.libraries = ['c++', 'resolv.9'] # ――― Project Settings ――――――――――――――――――――――――――――――――――――――――――――――――――――――――― # # # If your library depends on compiler flags you can set them in the xcconfig hash # where they will only apply to your library. If you depend on other Podspecs # you can include multiple dependencies to ensure it works. # spec.requires_arc = true
# spec.xcconfig = { "HEADER_SEARCH_PATHS" => "$(SDKROOT)/usr/include/libxml2" }
spec.static_framework = true
spec.vendored_frameworks = 'Classes/Vendor/AliTigerTally_IDFA.xcframework'
spec.dependency "Alamofire", "~>5"
end ```
目錄下會建立一個 NKTestLib.podspec 檔案,然後編輯這個檔案,主要有以下幾個欄位:
- version: 這個 spec 對映的版本,保證 Git 的 releases 與此對應;
- homepage: 專案主頁;
- source: 框架原始碼的託管地址;
- tag:與 version 對應;
- source_files: 框架原始碼的目錄、檔案、檔案型別等規則;
在 開發Pod庫 過程中,需要用到的
描述檔案欄位: -ios.deployment_target: 整合本庫,執行使用,要求的系統和最低系統版本 -swift_version: 限制編譯庫的Swift版本; -resources: 圖片等檔案資源存放路徑 -frameworks: 需要依賴的系統.framework庫 -libraries: 需要依賴的系統.tbd庫 -static_framework: 傳佈爾值,描述本Pod庫是不是要建立一個資料夾用於存放.framework靜態庫 -vendored_frameworks: 傳入第三方庫(xxx.framework/xxx.xcframework)的存放路徑,整合的時候,會拷貝該路徑下的庫到framework這個資料夾內 -vendored_library:傳入第三方庫(xxx.a)的存放路徑,整合的時候,會拷貝該路徑下的庫到framework這個資料夾內 -dependency: 依賴庫(一般寫遠端依賴庫名稱即可) -compiler_flags:編譯設定(如警告忽略,巨集設定)shell ·spec.compiler_flags = '-Wno-format', '-DOS_OBJECT_USE_OBJC=0'-prefix_header_contents:pch預編譯標頭檔案內容shell spec.prefix_header_contents = '#import <UIKit/UIKit.h>'-prefix_header_filepch預編譯標頭檔案路徑
shell
spec.prefix_header_file = 'iphone/include/prefix.pch'
5.2 CocoaPods本地庫(只有一個主庫)
本地庫:\ 在當前裝置建立一個倉庫,原始碼以及相關的資原始檔儲存在當前電腦,用本地路徑匯入相關的工程,進行整合使用
shell
~/Desktop/NKTestLib
接著建立一個殼工程,現在你的目標是使用 pod 的方式,將 NKTestLib 這個庫整合到殼工程中。
1.建立庫描述檔案
和公開庫一樣,我們需要先建立一個 spec 檔案,命令如下:
shell
pod spec create NKTestLib
編輯 NKTestLib.podspec 檔案,修改成下面這樣:
```shell
Be sure to run `pod spec lint NKTestLib.podspec' to ensure this is a
valid spec and to remove all comments including this before submitting the spec.
To learn more about Podspec attributes see http://guides.cocoapods.org/syntax/podspec.html
To see working Podspecs in the CocoaPods repo see http://github.com/CocoaPods/Specs/
Pod::Spec.new do |spec| # ――― Spec Metadata ―――――――――――――――――――――――――――――――――――――――――――――――――――――――――― # # # These will help people to find your library, and whilst it # can feel like a chore to fill in it's definitely to your advantage. The # summary should be tweet-length, and the description more in depth. # spec.name = "NKTestLib" spec.version = "0.0.1" spec.summary = "This is a Pod Lib Demo for blog." # This description is used to generate tags and improve search results. # * Think: What does it do? Why did you write it? What is the focus? # * Try to keep it short, snappy and to the point. # * Write the description between the DESC delimiters below. # * Finally, don't worry about the indent, CocoaPods strips it! spec.description = "一般描述庫的用途、主要功能等" spec.homepage = "http://github.com/VanZhang-CN-SZ-SN9037/NKTestLib" # spec.screenshots = "www.example.com/screenshots_1.gif", "www.example.com/screenshots_2.gif" # ――― Spec License ――――――――――――――――――――――――――――――――――――――――――――――――――――――――――― # # # Licensing your code is important. See http://choosealicense.com for more info. # CocoaPods will detect a license file if there is a named LICENSE # Popular ones are 'MIT', 'BSD' and 'Apache License, Version 2.0'. # spec.license = { :type => "MIT", :file => "./LICENSE" } # ――― Author Metadata ――――――――――――――――――――――――――――――――――――――――――――――――――――――――― # # # Specify the authors of the library, with email addresses. Email addresses # of the authors are extracted from the SCM log. E.g. $ git log. CocoaPods also # accepts just a name if you'd rather not provide an email address. # # Specify a social_media_url where others can refer to, for example a twitter # profile URL. # spec.author = { "Van Zhang" => "[email protected]" } # Or just: spec.author = "Van Zhang" # spec.authors = { "Van Zhang" => "[email protected]" } # spec.social_media_url = "http://twitter.com/Van Zhang" # ――― Platform Specifics ――――――――――――――――――――――――――――――――――――――――――――――――――――――― # # # If this Pod runs only on iOS or OS X, then specify the platform and # the deployment target. You can optionally include the target after the platform. # spec.platform = :ios, "14.0" # spec.platform = :ios, "5.0" # When using multiple platforms spec.ios.deployment_target = "14.0" # spec.osx.deployment_target = "10.7" # spec.watchos.deployment_target = "2.0" # spec.tvos.deployment_target = "9.0" spec.swift_version = "5.4" # ――― Source Location ―――――――――――――――――――――――――――――――――――――――――――――――――――――――――― # # # Specify the location from where the source should be retrieved. # Supports git, hg, bzr, svn and HTTP. # spec.source = { :git => "[email protected]:VanZhang-CN-SZ-SN9037/NKTestLib.git", :tag => "#{spec.version}" } # ――― Source Code ―――――――――――――――――――――――――――――――――――――――――――――――――――――――――――――― # # # CocoaPods is smart about how it includes source code. For source files # giving a folder will include any swift, h, m, mm, c & cpp files. # For header files it will include any header in the folder. # Not including the public_header_files will make all headers public. # spec.source_files = "Classes", ".//Classes/.{c,h,m,mm,swift}" spec.exclude_files = "Classes/Exclude" spec.public_header_files = "Classes//.h" # ――― Resources ―――――――――――――――――――――――――――――――――――――――――――――――――――――――――――――――― # # # A list of resources included with the Pod. These are copied into the # target bundle with a build phase script. Anything else will be cleaned. # You can preserve files from being cleaned, please don't preserve # non-essential files like tests, examples and documentation. # # spec.resource = "icon.png" spec.resources = "Classes/Resources/" # spec.preserve_paths = "FilesToSave", "MoreFilesToSave" # ――― Project Linking ―――――――――――――――――――――――――――――――――――――――――――――――――――――――――― # # # Link your library with frameworks, or libraries. Libraries do not include # the lib prefix of their name. # # spec.framework = "SomeFramework" spec.frameworks = ['CoreTelephony','CoreFoundation','AdSupport','AppTrackingTransparency']
# spec.library = "iconv" spec.libraries = ['c++', 'resolv.9'] # ――― Project Settings ――――――――――――――――――――――――――――――――――――――――――――――――――――――――― # # # If your library depends on compiler flags you can set them in the xcconfig hash # where they will only apply to your library. If you depend on other Podspecs # you can include multiple dependencies to ensure it works. # spec.requires_arc = true
# spec.xcconfig = { "HEADER_SEARCH_PATHS" => "$(SDKROOT)/usr/include/libxml2" }
spec.static_framework = true
spec.vendored_frameworks = 'Classes/Vendor/AliTigerTally_IDFA.xcframework'
spec.dependency "Alamofire", "~>5"
end ```
現在你的本地庫已經準備完畢了,下面就可以使用這個庫了。
2. 匯入本地私有庫
現在進入到殼工程目錄下,執行命令:
shell
pod init
編輯 Podfile 檔案,如下:
```shell
Uncomment the next line to define a global platform for your project
platform :ios, '9.0'
target 'TempDemo' do
# Comment the next line if you don't want to use dynamic frameworks
use_frameworks!
pod 'NKTestLib',:path=>"/Users/VZha33/Desktop/NKTestLib/NKTestLib.podspec"
# Pods for TempDemo
end ```
這裡有一個 path 關鍵字,它表示在 pod install 執行時,在指定的路徑下尋找 NetWork.podspec 檔案。
下面執行 pod install 命令,提示資訊如下:
shell
pod install
Analyzing dependencies
Downloading dependencies
Installing Alamofire (5.6.4)
Installing NKTestLib (0.0.1)
Generating Pods project
Integrating client project
Pod installation complete! There is 1 dependency from the Podfile and 2 total pods installed.
現在
NKTestLib 這個庫就整合到了殼工程中。
與使用遠端庫不同,本地庫的原始檔會在 Development Pods 這個目錄下,而不是 Pods 目錄,順便一提,CocoaPods 的庫開發,一般也是這樣搭建環境的,開發完成後再修改 spec 檔案,將其 pull request 到遠端索引庫。
5.3 CocoaPods本地庫 (主庫+子庫)
若在專案中,我們並不需要整合 一個 Pod庫的所有功能,只需用到其中一部分功能,我們可以將主庫按照不同的功能職責,進一步細化為若干子庫,並在目標專案中按需整合。
將主庫劃分為若干子庫:
我們將前面的示例,使用的NKTestLib進一步劃分為不同的子庫:
- 修改NKTestLib的.podspec檔案(為了簡潔便於閱讀,刪掉檔案中的部分註釋):
```shell
Pod::Spec.new do |spec|
# ――― Spec Metadata ―――――――――――――――――――――――――――――――――――――――――――――――――――――――――― #
spec.name = "NKTestLib"
spec.version = "0.0.1"
spec.summary = "This is a Pod Lib Demo for blog."
spec.description = "一般描述庫的用途、主要功能等"
spec.homepage = "http://github.com/VanZhang-CN-SZ-SN9037/NKTestLib"
  # ―――  Spec License  ――――――――――――――――――――――――――――――――――――――――――――――――――――――――――― #
  spec.license      = { :type => "MIT", :file => "./LICENSE" }

  # ――― Author Metadata  ――――――――――――――――――――――――――――――――――――――――――――――――――――――――― #
  spec.author             = { "Van Zhang" => "[email protected]" }

  # ――― Platform Specifics ――――――――――――――――――――――――――――――――――――――――――――――――――――――― #
  spec.platform     = :ios, "14.0"
  spec.swift_version = "5.4"

  # ――― Source Location ―――――――――――――――――――――――――――――――――――――――――――――――――――――――――― #
  spec.source       = { :git => "[email protected]:VanZhang-CN-SZ-SN9037/NKTestLib.git", :tag => "#{spec.version}" }

  # ――― Source Code ―――――――――――――――――――――――――――――――――――――――――――――――――――――――――――――― #
  #spec.source_files  = "Classes", ".//Classes/*.{c,h,m,mm,swift}"
  #spec.exclude_files = "Classes/Exclude"
  spec.public_header_files = "Classes/**/*.h"

  # ――― Resources ―――――――――――――――――――――――――――――――――――――――――――――――――――――――――――――――― #
  spec.resources = "Assets/*"

  # ――― Project Linking ―――――――――――――――――――――――――――――――――――――――――――――――――――――――――― #
  spec.frameworks = ['CoreTelephony','CoreFoundation','AdSupport','AppTrackingTransparency']
  spec.libraries = ['c++', 'resolv.9']

  # ――― Project Settings ――――――――――――――――――――――――――――――――――――――――――――――――――――――――― #
  spec.static_framework = true
  spec.vendored_frameworks = 'Classes/Vendor/AliTigerTally_IDFA.xcframework'

  #spec.dependency "Alamofire", "~>5"

  # ――― Sub Spec Settings ――――――――――――――――――――――――――――――――――――――――――――――――――――――――― #
  spec.subspec 'Network' do |n|
    n.source_files = 'Classes/Network/**/*'
    n.dependency 'Alamofire'
    n.dependency 'SDWebImage'
  end

  spec.subspec 'Extension' do |e|
    e.source_files = 'Classes/Extension/**/*'
  end

  spec.subspec 'Plugin' do |p|
    p.source_files = 'Classes/Plugin/**/*'
  end

  spec.subspec 'CommerceUI' do |c|
    c.source_files = 'Classes/CommerceUI/**/*'
  end

end
```
- 注意子庫的劃分語法(子庫中所有配置項與主庫`無差異`,只需要將配置項前面的Spec命名替換為子庫的即可):
```shell
  主庫Spec命名.subspec '子庫名稱' do |子庫Spec命名|
    ##示例: 子庫的原始碼路徑
    子庫Spec命名.source_files = '資源路徑'
    ...
  end
```
再 - 在本次示例中,將主庫進一步劃分為4個子庫:Network、Extension、Plugin、CommerceUI
- 在需要 整合 Pod庫的專案中,按需整合:
- 全部整合:
- 整合其中任一子庫:
- 整合子庫的pod指令寫法:
shell
pod '主庫/子庫',:path=>"XXX.podspec的本地路徑"
#或者
pod '主庫',:path=>"XXX.podspec的本地路徑",:subspecs => ['子庫的Spec名稱']
- 若是我們有很多個Pod主庫,且其中若干個Pod主庫內部都有相同的功能,比如
網路處理功能,我們還可以把網路處理功能獨立出來做一個主庫,提供給其它庫作為依賴項
- 若是我們的開發套件比較完善,同一套業務方案,共用同一套變成介面,但會根據不同的需求使用不同的實現方案,我們常常會把庫的Interface程式設計介面和Implement業務實現,分別作為一個主庫
- 需要根據不同的需求,使用不同廠商的SDK服務:
- 一個 專案裡面有國際化要求 ,同一類服務在不同的國家地區使用符合法律法規的第三方SDK依賴包進行實現(如電商業務、物流業務,有國內與海外服務)
- 在同一個業務領域,針對不同的供應商的使用者群,類似的業務需求 有一定的定製化業務需求 (如金融領域的銀行業務,其金融產品:保險、貸款、信用卡等)
- ...
5.4 CocoaPods本地庫(本地庫+Demo工程)
pod spec create指令
我們前面建立本地庫的方式是通過:
- 建立一個資料夾
- 在資料夾內部放置庫程式碼
- 通過pod spec create指令給pod庫生成描述檔案,並根據當前資料夾存放資源的路徑修改.podspec
但這種編寫pod庫的方式,是沒有附帶Demo工程的且沒有單元測試
pod lib create指令
我們還有 另一個 pod 指令:pod lib create 可以用於建立Pod庫,該建立方式可以順便建立Demo工程和單元測試::
shell
pod lib create XXXXX(你的庫名)
- 示例:
``shell
❯ pod lib create NKTestPodLib
Cloninghttp://github.com/CocoaPods/pod-template.gitintoNKTestPodLib`.
Configuring NKTestPodLib template.
security: SecKeychainSearchCopyNext: The specified item could not be found in the keychain.
------------------------------

To get you started we need to ask a few questions, this should only take a minute.

If this is your first time we recommend running through with the guide:
 - http://guides.cocoapods.org/making/using-pod-lib-create.html
 ( hold cmd and click links to open in a browser. )


What platform do you want to use?? [ iOS / macOS ]
 > iOS

What language do you want to use?? [ Swift / ObjC ]
 > ObjC

Would you like to include a demo application with your library? [ Yes / No ]
 > Yes

Which testing frameworks will you use? [ Specta / Kiwi / None ]
 > None

Would you like to do view based testing? [ Yes / No ]
 > No

What is your class prefix?
 > NK
security: SecKeychainSearchCopyNext: The specified item could not be found in the keychain.
security: SecKeychainSearchCopyNext: The specified item could not be found in the keychain.
security: SecKeychainSearchCopyNext: The specified item could not be found in the keychain.
security: SecKeychainSearchCopyNext: The specified item could not be found in the keychain.
security: SecKeychainSearchCopyNext: The specified item could not be found in the keychain.
security: SecKeychainSearchCopyNext: The specified item could not be found in the keychain.
hint: Using 'master' as the name for the initial branch. This default branch name
hint: is subject to change. To configure the initial branch name to use in all
hint: of your new repositories, which will suppress this warning, call:
hint:
hint:   git config --global init.defaultBranch <name>
hint:
hint: Names commonly chosen instead of 'master' are 'main', 'trunk' and
hint: 'development'. The just-created branch can be renamed via this command:
hint:
hint:   git branch -m <name>

Running pod install on your new library.

Analyzing dependencies
Downloading dependencies
Installing NKTestPodLib (0.1.0)
Generating Pods project
Integrating client project

[!] Please close any current Xcode sessions and use `NKTestPodLib.xcworkspace` for this project from now on.
Pod installation complete! There is 1 dependency from the Podfile and 1 total pod installed.

 Ace! you're ready to go!
 We will start you off by opening your project in Xcode
  open 'NKTestPodLib/Example/NKTestPodLib.xcworkspace'

To learn more about the template see `http://github.com/CocoaPods/pod-template.git`.
To learn more about creating a new pod, see `http://guides.cocoapods.org/making/making-a-cocoapod`.
```
pod lib create指令 + 自定義 Pod庫模板
我們 前面通過 pod lib create指令 建立 Pod庫,它預設會去根據 Cocoapods官方的Pod庫模板進行建立。且這需要不斷提問很多個小問題,這步驟很多顯得流程相對繁瑣;
為了直接一步到位,我們可以根據自定義 Pod庫模板,並按照相應的建立方式,一條指令建立pod庫:\
此處使用的是我個人的 Pod庫模板 pod-template
- Swift Pod 庫:
shell pod lib create Pod庫名稱 Swift --template-url="http://github.com/VanZhang-CN-SZ-SN9037/pod-template" - OC Pod 庫:
shell
pod lib create  Pod庫名稱 Objc --template-url="http://github.com/VanZhang-CN-SZ-SN9037/pod-template"
5.5 CocoaPods 遠端庫
私有庫遠端庫與公有庫遠端庫
當我們把本地庫開發好一個版本之後,若我們需要把ta上傳到雲伺服器,為外部提供一個Pod庫,我們則需要把本地庫上傳到雲伺服器:
- 公有庫: 若是想將開發好的本地Pod庫公佈出去,提供一個選擇給廣大開發者,我們需要再開源社群Git,建立一個 程式碼倉庫,一般選擇 github
- 私有庫: 若是剛開發好的本地Pod庫 僅在 作為 公司 移動開發套件的一部分,在公司內部團隊公佈,則 需要 在公司部署了Git服務的私有云,建立一個 程式碼倉庫,用於儲存
- 無論是 公有庫 還是 私有庫, 他們 除了儲存的 git倉庫 地址不同,還有幾點不同:
- .podspec檔案儲存不同:
- 公有庫推送到Cocoapods的Podspec
- 私有庫需要在私有云的git另建一個倉庫,用於儲存私有Pod庫的Podspec檔案(多個庫的Pocspec檔案可以儲存到同一個Podspec倉裡面,其Pod庫程式碼各佔一個git倉)
生成一個本地庫很容易,但是本地庫在管理和使用上有一定的侷限性,例如:
- 需要在 Podfile 檔案中主動指明路徑;
- 版本升級不容易維護;
- 多人開發時,不方便進行合作;
遠端庫就可以方便的解決以上的問題,製作遠端私有庫分為以下幾個步驟:
1. 建立 Git 遠端倉庫;
- 遠端庫(私有庫):
- 在git雲平臺,建立私有程式碼倉,用於儲存Pod庫;/在私有云 git 平臺中建立程式碼倉,用於儲存Pod庫;
- 遠端庫(公有庫):
- 在公有云git平臺,建立公有程式碼倉,用於儲存Pod庫;
2. 建立 Pod 所需要的專案工程檔案,並上傳到 Git 程式碼倉;
3. 驗證 podspec 描述檔案;
4. 提交 podspec 描述檔案;
- 遠端庫(私有庫): 提交到 Cocoapods 官方的 Spec儲存程式碼倉
- 遠端庫(公有庫): 提交到 個人 建立的 專門儲存 私有庫 描述檔案 Spec的私有倉
5. 使用 Pod 庫;
5.6 CocoaPods 遠端庫(公有庫)
建立
公有庫遠端庫
根據前面的步驟,現在你需要將生成的 NKTestLib.podspec 檔案上傳到遠端索引庫,在此之前,你需要註冊一個 Trunk 賬號,文件如下:
guides.cocoapods.org/making/getting-setup-with-trunk
註冊 Trunk 賬號
現在執行下面的命令,記得修改郵箱、暱稱、描述等:
- pod trunk register 郵箱地址 ‘名稱’ --description=‘MacBook’
shell
pod trunk register [email protected] 'VanZhang' --description='Macbook Pro'
- 列印[!] Please verify the session by clicking the link in the verification email that has been sent to [email protected]意味著 郵件傳送成功,要去郵箱檢查
- 點選郵箱裡的確認連結🔗,你才算真正註冊 Trunk 賬號成功
檢查
xxx.podspec的合法性
開啟郵件裡面的連結後,會有類似 you can back to your termainal 的提示,意味著我們可以進行下一步了:
- cd 到 xxx.podspec 同一目錄下
- pod lib lint 檢查 xxx.podspec 的合法性
shell
pod lib lint --allow-warnings
- 若報錯,根據錯誤提示修復問題
- 當顯示 passed validation 後,說明 xxx.podspec合法,則我們需要把我們本地的xxx.podspec 推送到 Cocoapods儲存Specs檔案的庫
把 合法的
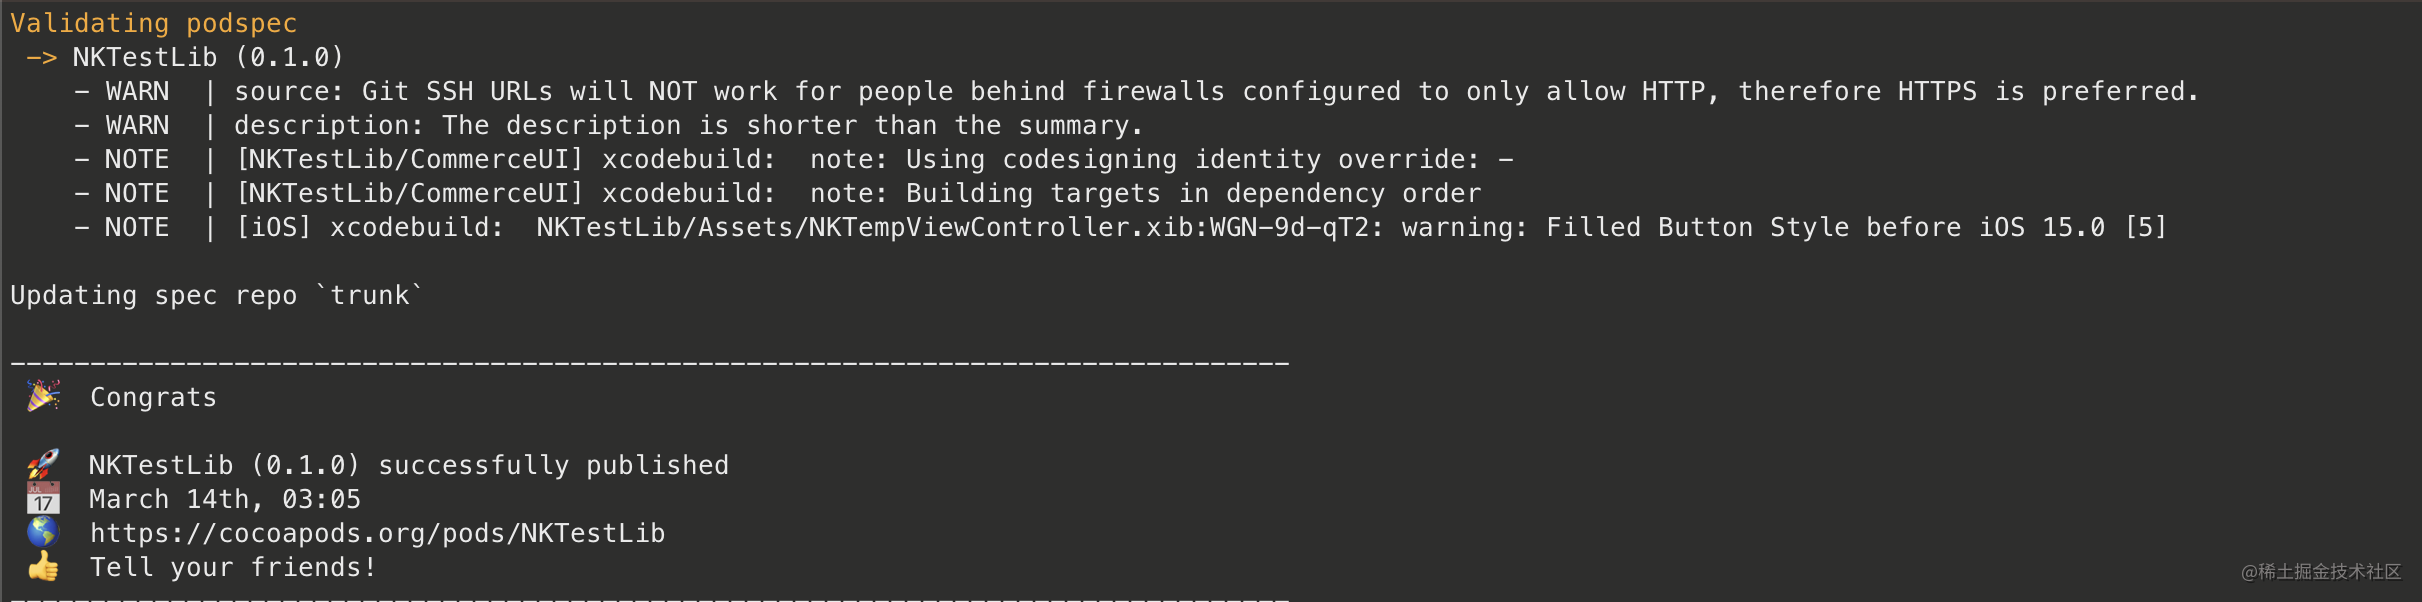
xxx.podspec推送到 Cocoapods儲存Specs檔案的庫 -pod trunk push推送xxx.podspec推送到 Cocoapods儲存Specs檔案的庫shell pod trunk push NKTestLib.podspec- 推送成功的標識: 提示資訊如下:
```shell
Validating podspec
-> NKTestLib (0.1.0)
- WARN | source: Git SSH URLs will NOT work for people behind firewalls configured to only allow HTTP, therefore HTTPS is preferred.
- WARN | description: The description is shorter than the summary.
- NOTE | [NKTestLib/CommerceUI] xcodebuild: note: Using codesigning identity override: -
- NOTE | [NKTestLib/CommerceUI] xcodebuild: note: Building targets in dependency order
- NOTE | [iOS] xcodebuild: NKTestLib/Assets/NKTempViewController.xib:WGN-9d-qT2: warning: Filled Button Style before iOS 15.0 [5]
Updating spec repo `trunk`
--------------------------------------------------------------------------------
🎉 Congrats
🚀 NKTestLib (0.1.0) successfully published
📅 March 14th, 03:05
🌎 http://cocoapods.org/pods/NKTestLib
👍 Tell your friends!
--------------------------------------------------------------------------------
```
- 稽核\
此時你的
xxx.podspec就會pull request到遠端索引庫,CocoaPods 官方稽核通過後,就可以出現在遠端索引庫中,當遠端索引庫收錄後:shell pod setup - 刪除本地索引檔案\
這時你的本地索引庫,會新加入 你的
xxx.podspec這條記錄,但是本地索引檔案還未更新,因此刪除掉以下路徑的本地索引檔案:shell ~/Library/Caches/CocoaPods/search_index.json pod search\ 執行pod search NKTestLib命令,當search_index.json檔案重建完畢後,就可以在使用這個遠端框架庫了。pod install --repo-update匯入公有云的庫
5.7 CocoaPods 遠端庫(私有庫)
建立
公有庫遠端庫
| 遠端私有庫工作流程 |
| ------------------------------------------------------------------------------------------------------------------------------------------------------------------------ |
| |
5.7.1 SSH 授權
此次建立私有庫,我使用的git平臺是 碼雲\
新增私有索引庫需要使用 SSH 授權,也是和 Git 倉庫一樣的,瞭解的同學可以跳過這一步驟,首先建立公鑰:
shell
ssh-keygen
然後找到下面的檔案:
shell
~/.ssh/id_rsa.pub
裡面存放的字元就是公鑰了,然後將公鑰新增碼市,連結如下:
shell
http://gitee.com/profile/sshkeys
5.7.2 新增私有遠端索引庫
- 新增 pod repo庫 用於儲存私有庫的
Spec檔案: -
執行
pod repo,可以看到當前本地的repo庫個數和相關的資訊下面的資訊: ```shell ## 輸入終端指令: pod repo ## 列印: brightcove-brightcovespecs- Type: git (master)
- URL: http://github.com/brightcove/BrightcoveSpecs.git
- Path: /Users/VZha33/.cocoapods/repos/brightcove-brightcovespecs
nike-internal-mpe.tool.specs - Type: git (main) - URL: [email protected]:nike-internal/mpe.tool.specs.git - Path: /Users/VZha33/.cocoapods/repos/nike-internal-mpe.tool.specs
trunk - Type: CDN - URL: http://cdn.cocoapods.org/ - Path: /Users/VZha33/.cocoapods/repos/trunk
- 執行 `pod repo add` 新增 儲存我們私有庫的 `Specs` 的 `repo`shell ## 語法: ## pod repo add 期望儲存在本地的Repo名稱 Pod私有庫儲存Specs的Repo git地址(一般直接用ssh授權的地址) ## 示例: pod repo add NKMobilePaaSSpecs [email protected]:LuckyVan_admin/nkmobile-paa-sspecs.git ``` -
執行
pod repo add新增 儲存我們私有庫的Specs的reposhell ## 語法: ## pod repo add 期望儲存在本地的Repo名稱 Pod私有庫儲存Specs的Repo git地址(一般直接用ssh授權的地址) ## 示例: pod repo add NKMobilePaaSSpecs [email protected]:LuckyVan_admin/nkmobile-paa-sspecs.git -
再次執行
pod repo,檢查: ```shell ## 輸入終端指令: pod repo ## 列印:brightcove-brightcovespecs - Type: git (master) - URL: http://github.com/brightcove/BrightcoveSpecs.git - Path: /Users/VZha33/.cocoapods/repos/brightcove-brightcovespecs
nike-internal-mpe.tool.specs - Type: git (main) - URL: [email protected]:nike-internal/mpe.tool.specs.git - Path: /Users/VZha33/.cocoapods/repos/nike-internal-mpe.tool.specs
NKMobilePaaSSpecs - Type: git (master) - URL: [email protected]:LuckyVan_admin/nkmobile-paa-sspecs.git - Path: /Users/VZha33/.cocoapods/repos/NKMobilePaaSSpecs
trunk - Type: CDN - URL: http://cdn.cocoapods.org/ - Path: /Users/VZha33/.cocoapods/repos/trunk
4 repos
此時我們的 CocoaPods 遠端索引庫就安裝好了。我們也可以到下面的路徑去看一下:shell ~/.cocoapods/repos ```
5.7.3 上傳原始碼到 Git
為了快速完成實踐,我們直接把前面建立的本地庫,修改一下名稱和配置,上傳到私有git倉,進行實踐:
- 修改資料夾名稱(NKTestLib->NKTestLibPrivacyLib)
- 修改podspec名稱(NKTestLib->NKTestLibPrivacyLib)
- 修改podspec配置
- 名稱:NKTestLib->NKTestLibPrivacyLib
- git倉庫地址:換位私有git倉地址
- 其餘保留原樣
- 修改後的podspec:
```shell
Be sure to run `pod spec lint NKTestLib.podspec' to ensure this is a
valid spec and to remove all comments including this before submitting the spec.
To learn more about Podspec attributes see http://guides.cocoapods.org/syntax/podspec.html
To see working Podspecs in the CocoaPods repo see http://github.com/CocoaPods/Specs/
Pod::Spec.new do |spec|
# ――― Spec Metadata ―――――――――――――――――――――――――――――――――――――――――――――――――――――――――― # # # These will help people to find your library, and whilst it # can feel like a chore to fill in it's definitely to your advantage. The # summary should be tweet-length, and the description more in depth. #
spec.name = "NKTestLibPrivacyLib" spec.version = "0.1.0" spec.summary = "This is a Pod Lib Demo for blog."
# This description is used to generate tags and improve search results. # * Think: What does it do? Why did you write it? What is the focus? # * Try to keep it short, snappy and to the point. # * Write the description between the DESC delimiters below. # * Finally, don't worry about the indent, CocoaPods strips it! spec.description = "一般描述庫的用途、主要功能等"
spec.homepage = "http://github.com/VanZhang-CN-SZ-SN9037/NKTestLib" # spec.screenshots = "www.example.com/screenshots_1.gif", "www.example.com/screenshots_2.gif"
# ――― Spec License ――――――――――――――――――――――――――――――――――――――――――――――――――――――――――― # # # Licensing your code is important. See http://choosealicense.com for more info. # CocoaPods will detect a license file if there is a named LICENSE* # Popular ones are 'MIT', 'BSD' and 'Apache License, Version 2.0'. #
spec.license = { :type => "MIT", :file => "./LICENSE" }
# ――― Author Metadata ――――――――――――――――――――――――――――――――――――――――――――――――――――――――― # # # Specify the authors of the library, with email addresses. Email addresses # of the authors are extracted from the SCM log. E.g. $ git log. CocoaPods also # accepts just a name if you'd rather not provide an email address. # # Specify a social_media_url where others can refer to, for example a twitter # profile URL. #
spec.author = { "Van Zhang" => "[email protected]" } # Or just: spec.author = "Van Zhang" # spec.authors = { "Van Zhang" => "[email protected]" } # spec.social_media_url = "http://twitter.com/Van Zhang"
# ――― Platform Specifics ――――――――――――――――――――――――――――――――――――――――――――――――――――――― # # # If this Pod runs only on iOS or OS X, then specify the platform and # the deployment target. You can optionally include the target after the platform. #
spec.platform = :ios, "14.0" # spec.platform = :ios, "5.0"
# When using multiple platforms spec.ios.deployment_target = "14.0" # spec.osx.deployment_target = "10.7" # spec.watchos.deployment_target = "2.0" # spec.tvos.deployment_target = "9.0" spec.swift_version = "5.4"
# ――― Source Location ―――――――――――――――――――――――――――――――――――――――――――――――――――――――――― # # # Specify the location from where the source should be retrieved. # Supports git, hg, bzr, svn and HTTP. #
spec.source = { :git => "[email protected]:LuckyVan_admin/nktest-lib-privacy-lib.git", :tag => "#{spec.version}" }
# ――― Source Code ―――――――――――――――――――――――――――――――――――――――――――――――――――――――――――――― # # # CocoaPods is smart about how it includes source code. For source files # giving a folder will include any swift, h, m, mm, c & cpp files. # For header files it will include any header in the folder. # Not including the public_header_files will make all headers public. #
#spec.source_files = "Classes", ".//Classes/*.{c,h,m,mm,swift}"
#spec.exclude_files = "Classes/Exclude"
spec.prefix_header_contents = '#import
# ――― Resources ―――――――――――――――――――――――――――――――――――――――――――――――――――――――――――――――― # # # A list of resources included with the Pod. These are copied into the # target bundle with a build phase script. Anything else will be cleaned. # You can preserve files from being cleaned, please don't preserve # non-essential files like tests, examples and documentation. #
# spec.resource = "icon.png" # spec.resources = "Sources/Assets/*"
# spec.preserve_paths = "FilesToSave", "MoreFilesToSave"
# ――― Project Linking ―――――――――――――――――――――――――――――――――――――――――――――――――――――――――― # # # Link your library with frameworks, or libraries. Libraries do not include # the lib prefix of their name. #
# spec.framework = "SomeFramework" spec.frameworks = ['CoreTelephony','CoreFoundation','AdSupport','AppTrackingTransparency']
# spec.library = "iconv" spec.libraries = ['c++', 'resolv.9']
# ――― Project Settings ――――――――――――――――――――――――――――――――――――――――――――――――――――――――― # # # If your library depends on compiler flags you can set them in the xcconfig hash # where they will only apply to your library. If you depend on other Podspecs # you can include multiple dependencies to ensure it works.
# spec.requires_arc = true
# spec.xcconfig = { "HEADER_SEARCH_PATHS" => "$(SDKROOT)/usr/include/libxml2" }
spec.static_framework = true #spec.vendored_frameworks = 'Sources/Classes/Vendor/AliTigerTally_IDFA.xcframework' #spec.dependency "Alamofire", "~>5"
# ――― Sub Spec Settings ――――――――――――――――――――――――――――――――――――――――――――――――――――――――― #
spec.subspec 'CommerceUI' do |c|
c.source_files = 'Sources/Classes/CommerceUI/*/'
end
end
- 使用 pod lib create + 模板url,快速建立一個帶 整合Demo的模板工程shell
pod lib create NKTestLibPrivacyLib Swift --template-url="http://github.com/VanZhang-CN-SZ-SN9037/pod-template"
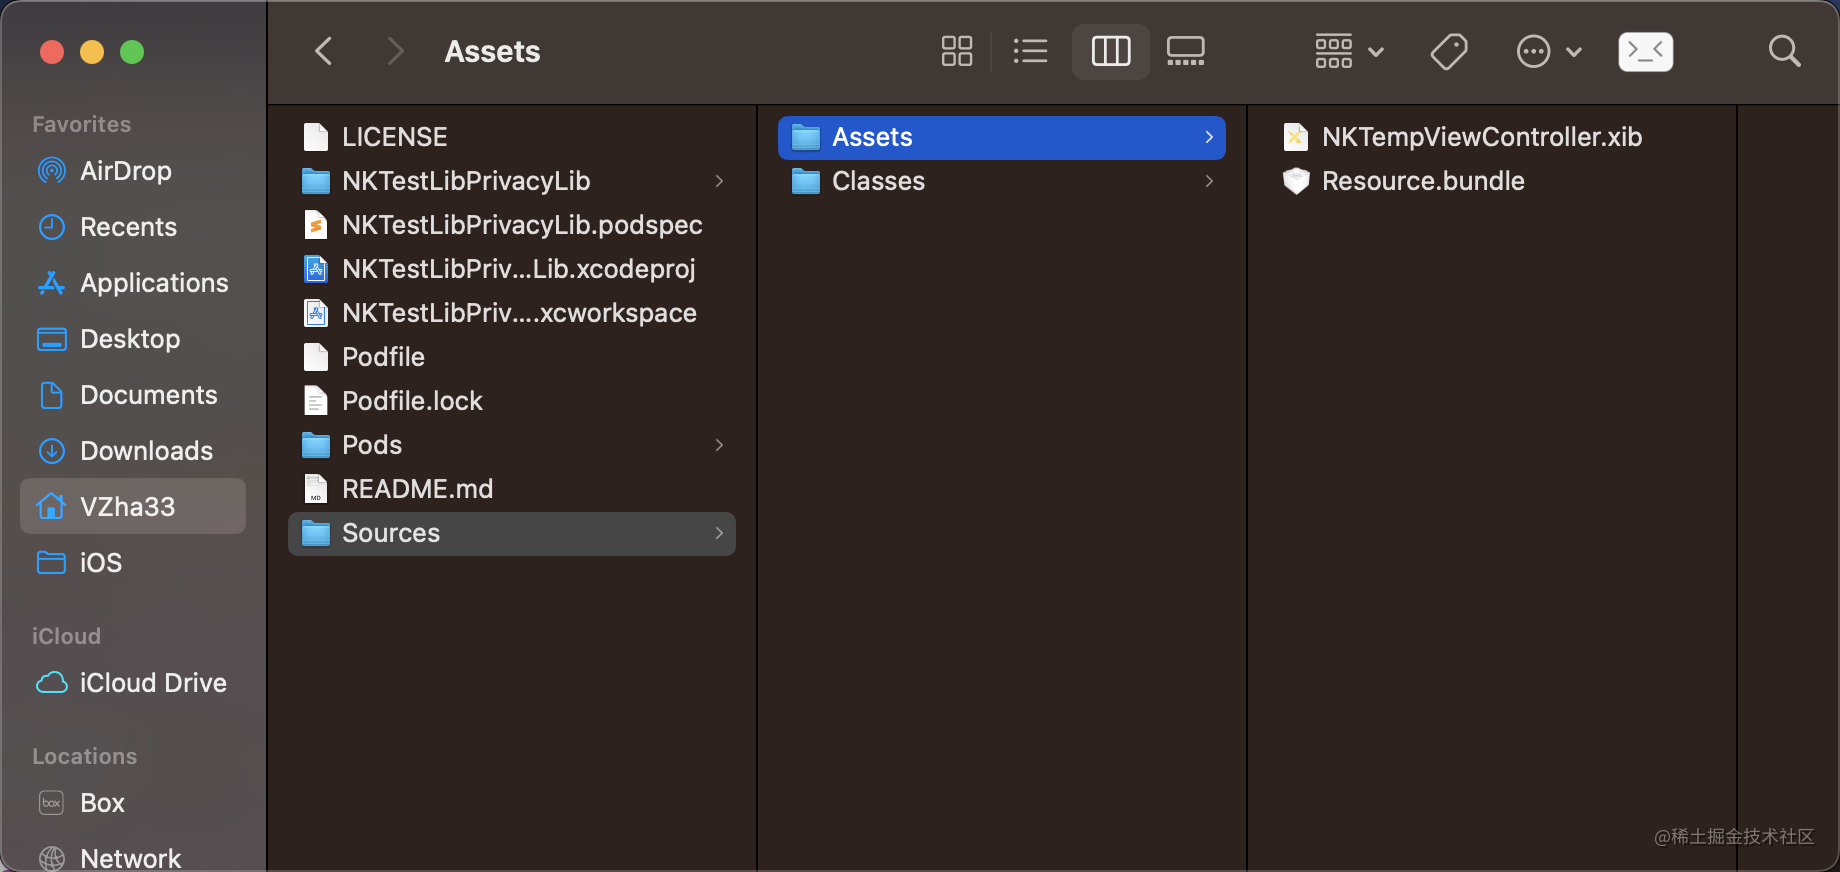
- 原始碼拖到 `Sources/Classes` 的目錄:
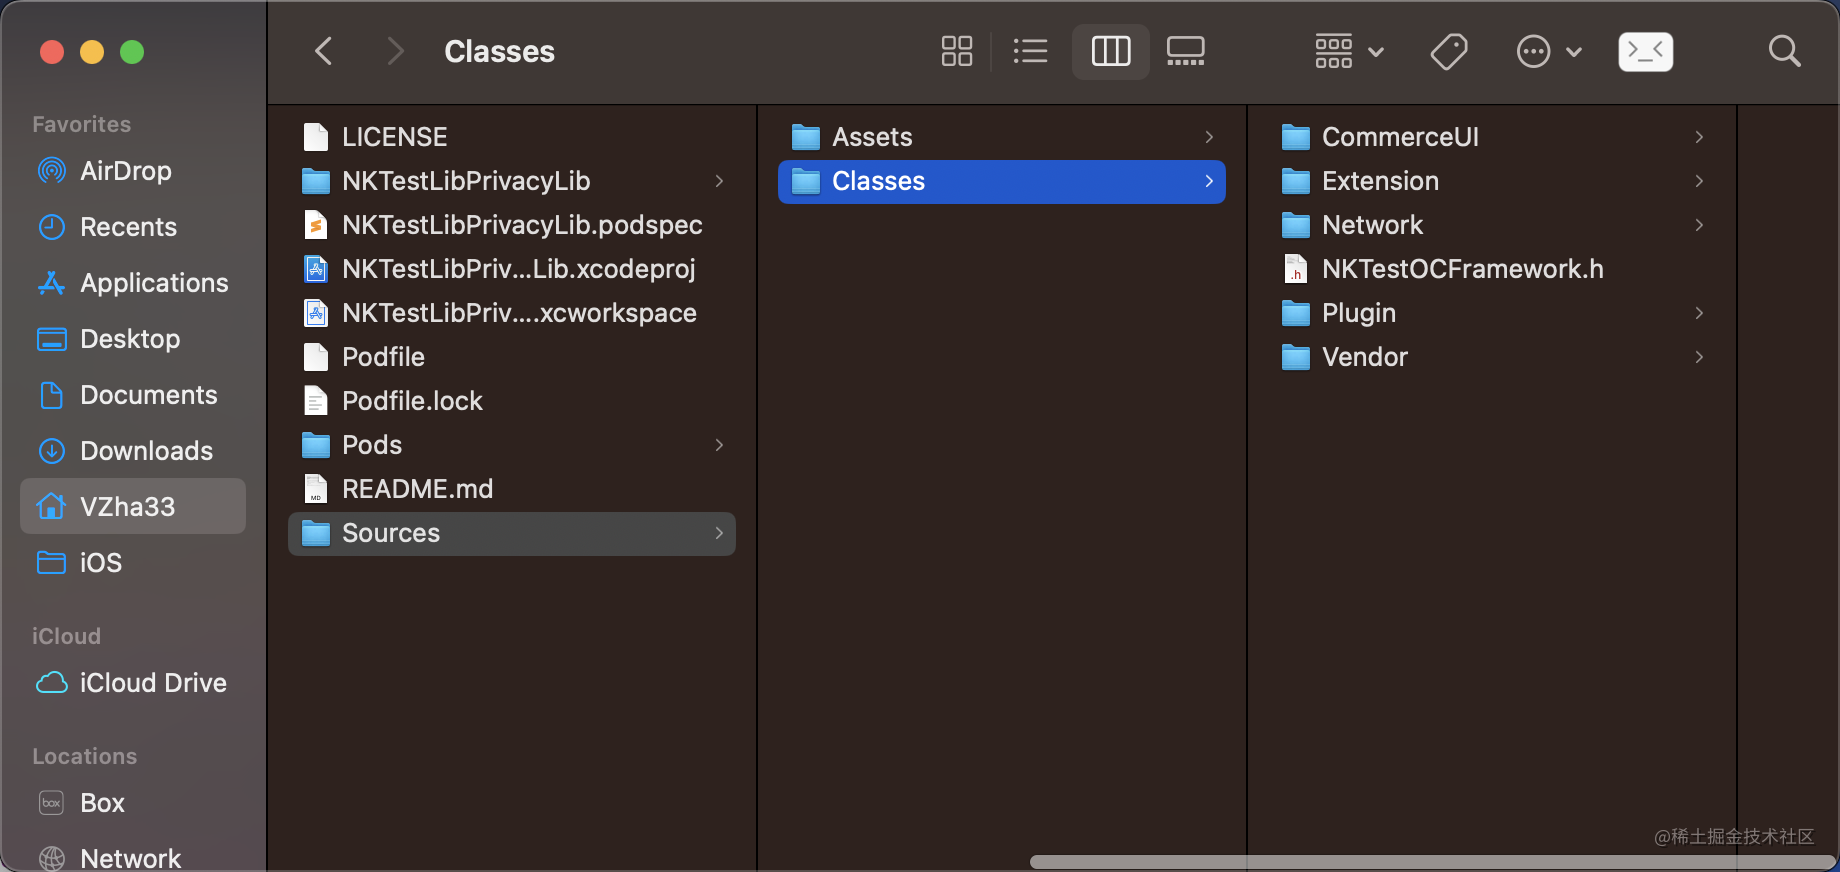
- 圖片的資原始檔拖到 `Sources/Assets` 的目錄:
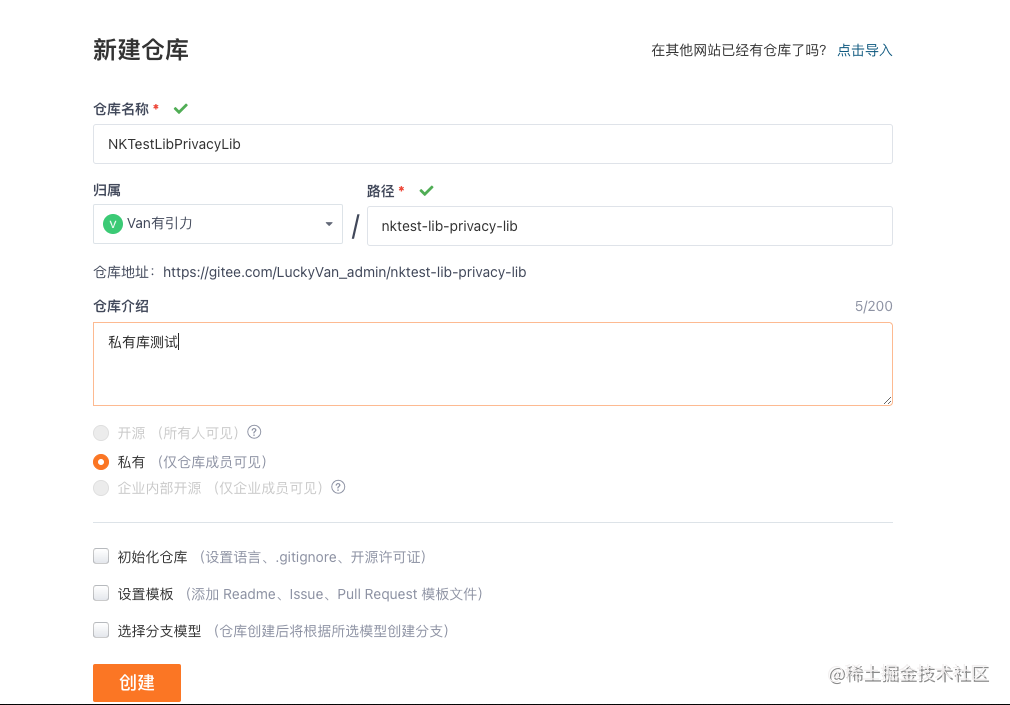
- 建立私有git倉:
- 提交git日誌,打tag,上傳程式碼(注意Tag的版本號,要和Podspec裡面的版本號保持一致)shell
git tag '0.1.0'
git push --tags
```
5.7.4 上傳 Spec 到遠端索引庫
檢驗通過後,提示如下:
- 把
podspec檔案推到前面建立的遠端私有索引庫(NKMobilePaaSSpecs):shell pod repo push NKMobilePaaSSpecs NKTestLibPrivacyLib.podspec --allow-warnings - 推送成功的標誌:
- 更新本地的
NKMobilePaaSSpecsreposhell pod repo update NKMobilePaaSSpecs - 更新成功後,修改
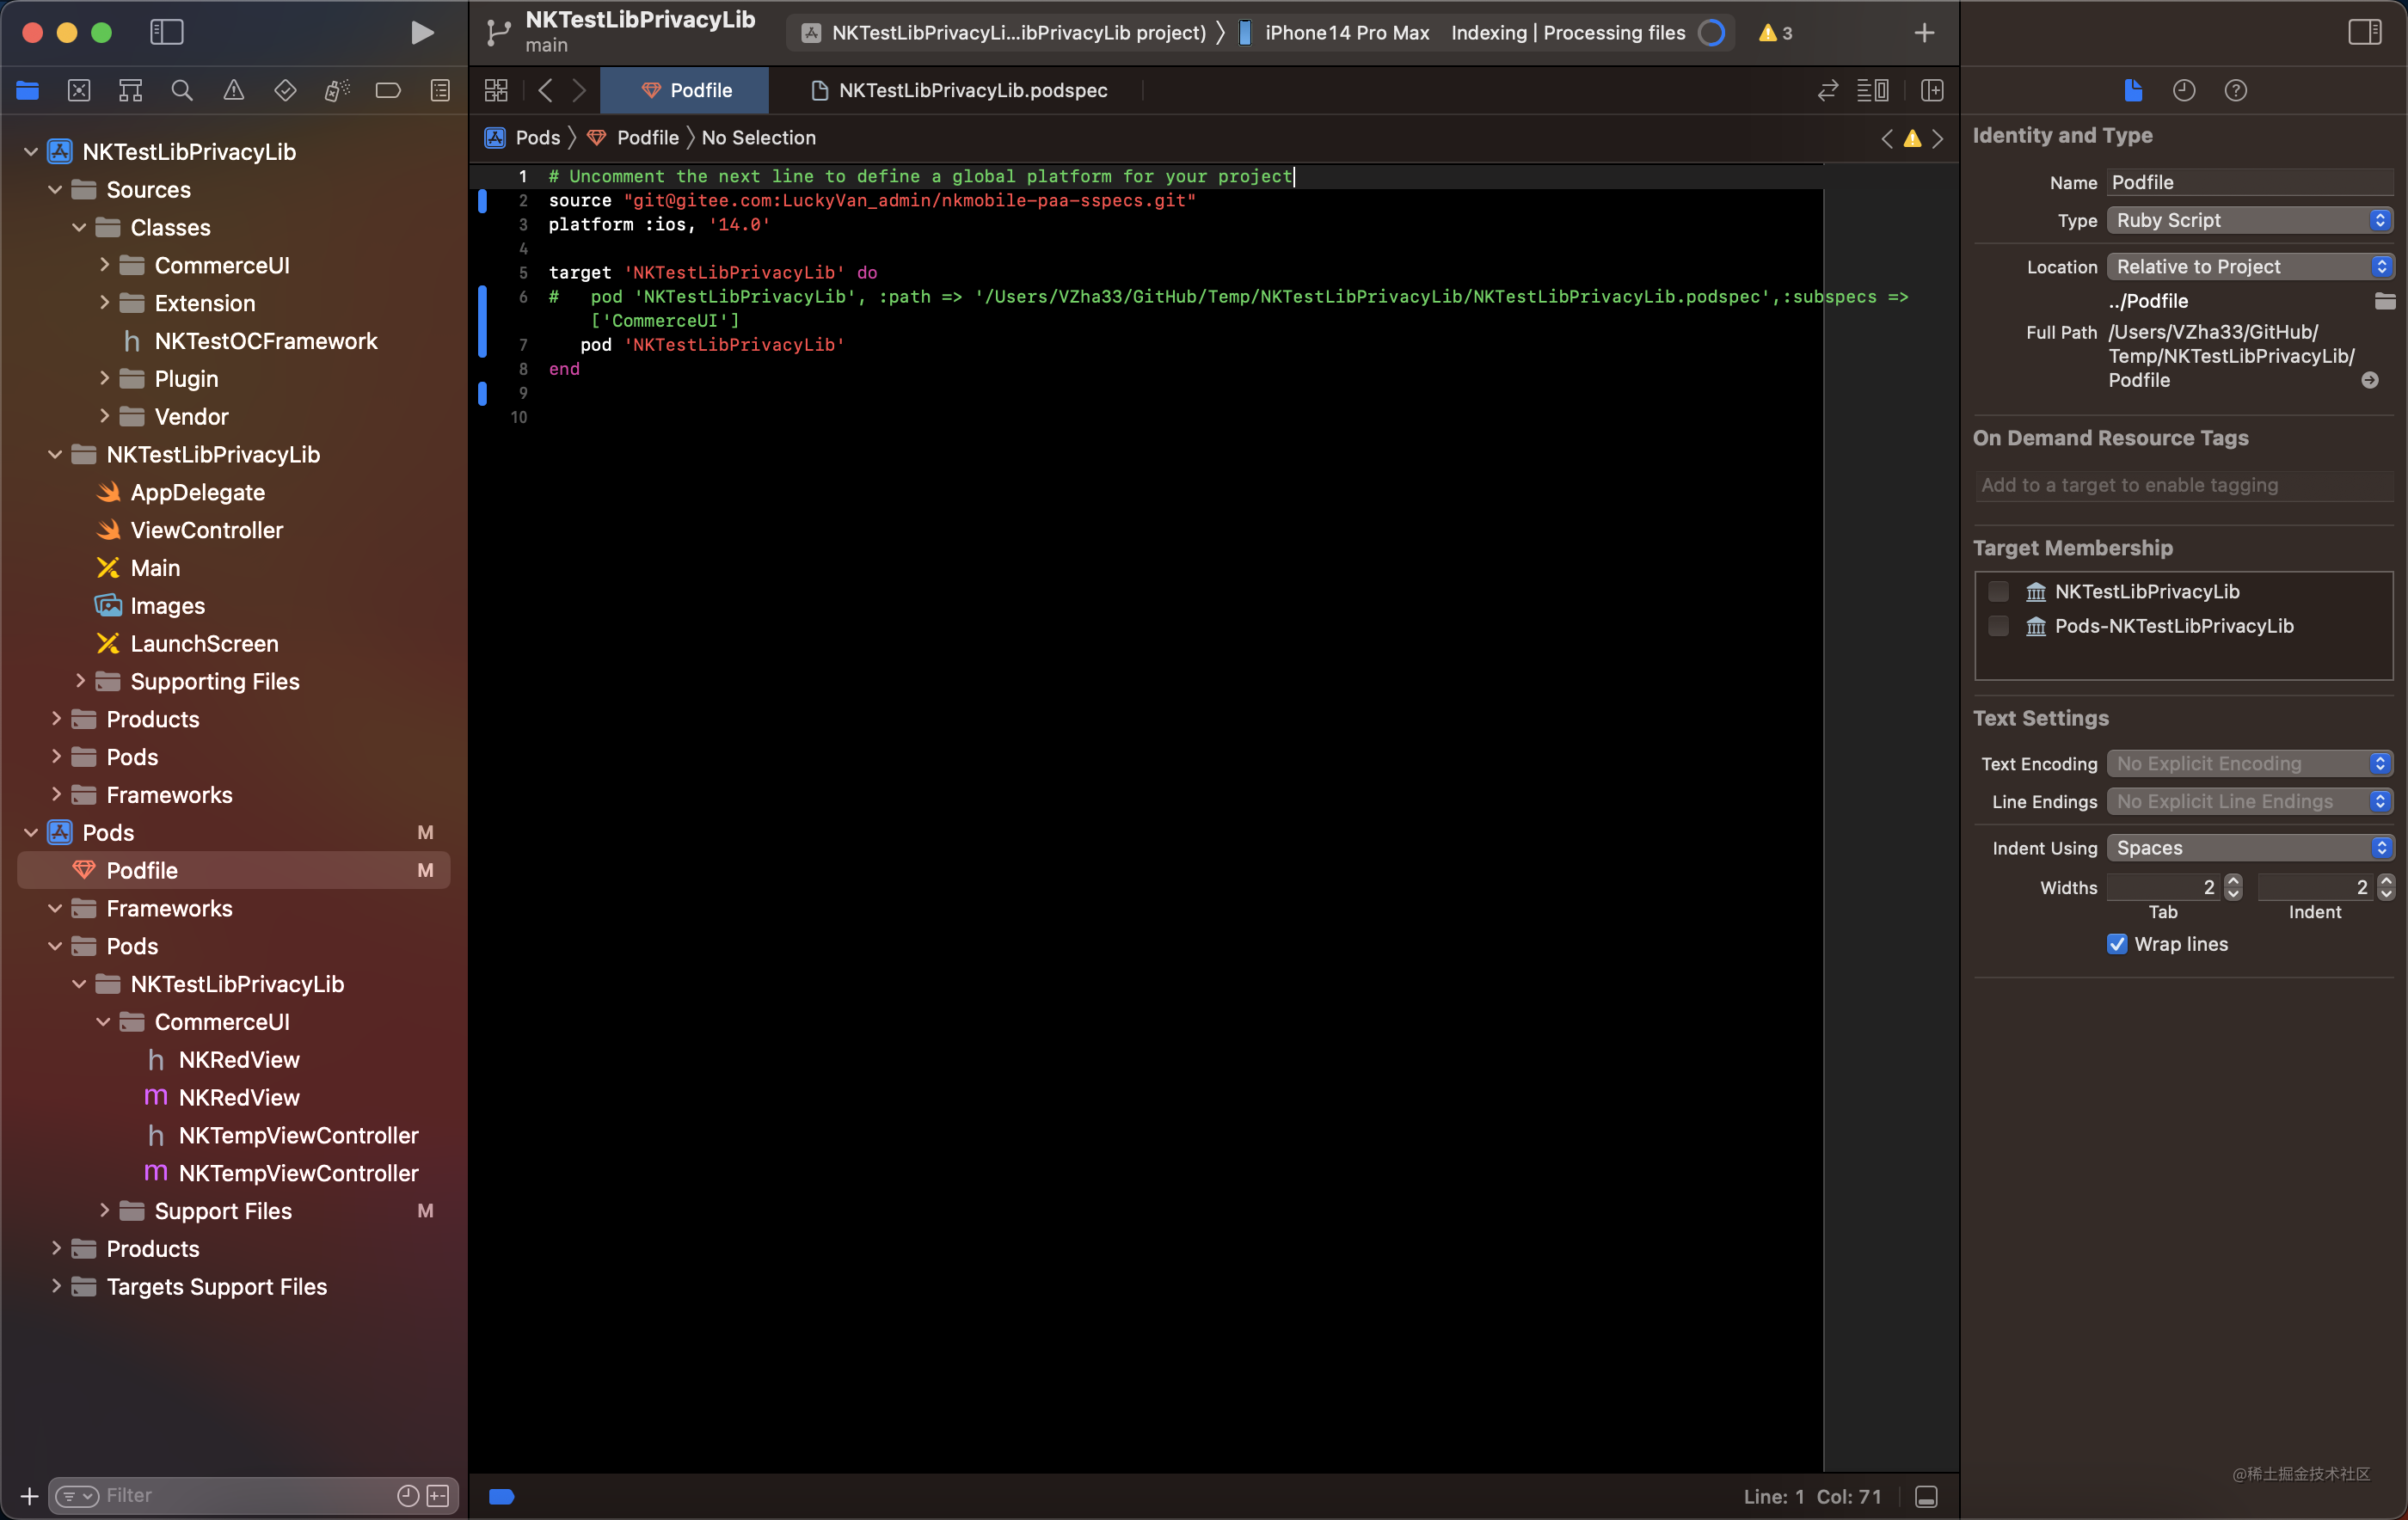
Podfile檔案
```shell
Uncomment the next line to define a global platform for your project
source "[email protected]:LuckyVan_admin/nkmobile-paa-sspecs.git"
platform :ios, '14.0'
target 'NKTestLibPrivacyLib' do
pod 'NKTestLibPrivacyLib', :path => '/Users/VZha33/GitHub/Temp/NKTestLibPrivacyLib/NKTestLibPrivacyLib.podspec',:subspecs => ['CommerceUI']
pod 'NKTestLibPrivacyLib'
end
- 執行 `pod install`,整個遠端私有庫的搭建和使用就完成了
- 我們前面在建立本地庫的時候,單獨配置庫與庫的資原始檔資訊,也可以把庫整合到其它工程中進行使用:
- 我們此次在建立遠端庫的時候,使用了`Cocoapods管理`+`個人Pod庫模板`+`私有git倉`的模式。這樣做的好處:
- 使用Cocoapods的模板庫建立模式,同時建立了一個庫檔案包+Example工程,
- 單獨測試:可以對本庫單獨整合,進行功能測試、單元測試
- 使用了`個人Pod庫模板`而不是官方模板,避免了繁瑣的建立流程
- 使用官方模板的建立指令:shell
pod lib create XXX你的庫名
////////////////////////////////////////////////////////////////////////
What language do you want to use?? [ Swift / ObjC ]
> Swift
        Would you like to include a demo application with your library? [ Yes / No ]
         > Yes

        Which testing frameworks will you use? [ Quick / None ]
         > None

        Would you like to do view based testing? [ Yes / No ]
         > Yes
        ```
    - 使用個人模板的建立指令:
        ```shell
        OC庫工程: pod lib create  XXX你的庫名 Objc --template-url="http://github.com/VanZhang-CN-SZ-SN9037/pod-template"
        Swift庫工程:pod lib create  XXX你的庫名 Swift --template-url="http://github.com/VanZhang-CN-SZ-SN9037/pod-template"
        ```
5.8 Pod庫的其它管理
5.8.1 Pods庫 迭代升級
我們在搭建公司的移動開發套件的時候,隨著業務的豐富以及專案功能版本的迭代,總會有對元件升級的時候。
我們現在來嘗試一下,Cocoapods元件庫升級的管理:\
現在我們沿著前面的測試例子,給 NKTestLibPrivacyLib 進行升級,給它再增加一些功能:
- 升級前的podspec(subspec只有CommerceUI一個子倉):
``shell
#
# Be sure to run
pod spec lint NKTestLib.podspec' to ensure this is a
# valid spec and to remove all comments including this before submitting the spec.
#
# To learn more about Podspec attributes see http://guides.cocoapods.org/syntax/podspec.html
# To see working Podspecs in the CocoaPods repo see http://github.com/CocoaPods/Specs/
#
Pod::Spec.new do |spec|
# ――― Spec Metadata ―――――――――――――――――――――――――――――――――――――――――――――――――――――――――― #
#
# These will help people to find your library, and whilst it
# can feel like a chore to fill in it's definitely to your advantage. The
# summary should be tweet-length, and the description more in depth.
#
spec.name = "NKTestLibPrivacyLib"
spec.version = "0.1.0"
spec.summary = "This is a Pod Lib Demo for blog."
# This description is used to generate tags and improve search results.
# * Think: What does it do? Why did you write it? What is the focus?
# * Try to keep it short, snappy and to the point.
# * Write the description between the DESC delimiters below.
# * Finally, don't worry about the indent, CocoaPods strips it!
spec.description = "一般描述庫的用途、主要功能等"
spec.homepage = "http://github.com/VanZhang-CN-SZ-SN9037/NKTestLib"
# spec.screenshots = "www.example.com/screenshots_1.gif", "www.example.com/screenshots_2.gif"
# ――― Spec License ――――――――――――――――――――――――――――――――――――――――――――――――――――――――――― #
#
# Licensing your code is important. See http://choosealicense.com for more info.
# CocoaPods will detect a license file if there is a named LICENSE*
# Popular ones are 'MIT', 'BSD' and 'Apache License, Version 2.0'.
#
spec.license = { :type => "MIT", :file => "./LICENSE" }
# ――― Author Metadata ――――――――――――――――――――――――――――――――――――――――――――――――――――――――― #
#
# Specify the authors of the library, with email addresses. Email addresses
# of the authors are extracted from the SCM log. E.g. $ git log. CocoaPods also
# accepts just a name if you'd rather not provide an email address.
#
# Specify a social_media_url where others can refer to, for example a twitter
# profile URL.
#
spec.author = { "Van Zhang" => "[email protected]" }
# Or just: spec.author = "Van Zhang"
# spec.authors = { "Van Zhang" => "[email protected]" }
# spec.social_media_url = "http://twitter.com/Van Zhang"
# ――― Platform Specifics ――――――――――――――――――――――――――――――――――――――――――――――――――――――― #
#
# If this Pod runs only on iOS or OS X, then specify the platform and
# the deployment target. You can optionally include the target after the platform.
#
spec.platform = :ios, "14.0"
# spec.platform = :ios, "5.0"
# When using multiple platforms
spec.ios.deployment_target = "14.0"
# spec.osx.deployment_target = "10.7"
# spec.watchos.deployment_target = "2.0"
# spec.tvos.deployment_target = "9.0"
spec.swift_version = "5.4"
# ――― Source Location ―――――――――――――――――――――――――――――――――――――――――――――――――――――――――― #
#
# Specify the location from where the source should be retrieved.
# Supports git, hg, bzr, svn and HTTP.
#
spec.source = { :git => "[email protected]:LuckyVan_admin/nktest-lib-privacy-lib.git", :tag => "#{spec.version}" }
# ――― Source Code ―――――――――――――――――――――――――――――――――――――――――――――――――――――――――――――― #
#
# CocoaPods is smart about how it includes source code. For source files
# giving a folder will include any swift, h, m, mm, c & cpp files.
# For header files it will include any header in the folder.
# Not including the public_header_files will make all headers public.
#
#spec.source_files = "Classes", ".//Classes/*.{c,h,m,mm,swift}"
#spec.exclude_files = "Classes/Exclude"
spec.prefix_header_contents = '#import <UIKit/UIKit.h>'
# ――― Resources ―――――――――――――――――――――――――――――――――――――――――――――――――――――――――――――――― #
#
# A list of resources included with the Pod. These are copied into the
# target bundle with a build phase script. Anything else will be cleaned.
# You can preserve files from being cleaned, please don't preserve
# non-essential files like tests, examples and documentation.
#
# spec.resource = "icon.png"
# spec.resources = "Sources/Assets/*"
# spec.preserve_paths = "FilesToSave", "MoreFilesToSave"
# ――― Project Linking ―――――――――――――――――――――――――――――――――――――――――――――――――――――――――― #
#
# Link your library with frameworks, or libraries. Libraries do not include
# the lib prefix of their name.
#
# spec.framework = "SomeFramework"
spec.frameworks = ['CoreTelephony','CoreFoundation','AdSupport','AppTrackingTransparency']
# spec.library = "iconv"
spec.libraries = ['c++', 'resolv.9']
# ――― Project Settings ――――――――――――――――――――――――――――――――――――――――――――――――――――――――― #
#
# If your library depends on compiler flags you can set them in the xcconfig hash
# where they will only apply to your library. If you depend on other Podspecs
# you can include multiple dependencies to ensure it works.
# spec.requires_arc = true
# spec.xcconfig = { "HEADER_SEARCH_PATHS" => "$(SDKROOT)/usr/include/libxml2" }
spec.static_framework = true
#spec.vendored_frameworks = 'Sources/Classes/Vendor/AliTigerTally_IDFA.xcframework'
#spec.dependency "Alamofire", "~>5"
# ――― Sub Spec Settings ――――――――――――――――――――――――――――――――――――――――――――――――――――――――― #
spec.subspec 'CommerceUI' do |c|
c.source_files = 'Sources/Classes/CommerceUI/**/*'
end
end
```
-
升級後的podspec(
subspec加了Extension一個子倉):``shell # # Be sure to runpod spec lint NKTestLib.podspec' to ensure this is a # valid spec and to remove all comments including this before submitting the spec. # # To learn more about Podspec attributes see http://guides.cocoapods.org/syntax/podspec.html # To see working Podspecs in the CocoaPods repo see http://github.com/CocoaPods/Specs/ #Pod::Spec.new do |spec| # ――― Spec Metadata ―――――――――――――――――――――――――――――――――――――――――――――――――――――――――― # # # These will help people to find your library, and whilst it # can feel like a chore to fill in it's definitely to your advantage. The # summary should be tweet-length, and the description more in depth. #
spec.name = "NKTestLibPrivacyLib" spec.version = "0.1.0" spec.summary = "This is a Pod Lib Demo for blog."
# This description is used to generate tags and improve search results. # * Think: What does it do? Why did you write it? What is the focus? # * Try to keep it short, snappy and to the point. # * Write the description between the DESC delimiters below. # * Finally, don't worry about the indent, CocoaPods strips it! spec.description = "一般描述庫的用途、主要功能等" spec.homepage = "http://github.com/VanZhang-CN-SZ-SN9037/NKTestLib" # spec.screenshots = "www.example.com/screenshots_1.gif", "www.example.com/screenshots_2.gif"
# ――― Spec License ――――――――――――――――――――――――――――――――――――――――――――――――――――――――――― # # # Licensing your code is important. See http://choosealicense.com for more info. # CocoaPods will detect a license file if there is a named LICENSE* # Popular ones are 'MIT', 'BSD' and 'Apache License, Version 2.0'. #
spec.license = { :type => "MIT", :file => "./LICENSE" } # ――― Author Metadata ――――――――――――――――――――――――――――――――――――――――――――――――――――――――― # # # Specify the authors of the library, with email addresses. Email addresses # of the authors are extracted from the SCM log. E.g. $ git log. CocoaPods also # accepts just a name if you'd rather not provide an email address. # # Specify a social_media_url where others can refer to, for example a twitter # profile URL. #
spec.author = { "Van Zhang" => "[email protected]" } # Or just: spec.author = "Van Zhang" # spec.authors = { "Van Zhang" => "[email protected]" } # spec.social_media_url = "http://twitter.com/Van Zhang" # ――― Platform Specifics ――――――――――――――――――――――――――――――――――――――――――――――――――――――― # # # If this Pod runs only on iOS or OS X, then specify the platform and # the deployment target. You can optionally include the target after the platform. # spec.platform = :ios, "14.0" # spec.platform = :ios, "5.0" # When using multiple platforms
spec.ios.deployment_target = "14.0" # spec.osx.deployment_target = "10.7" # spec.watchos.deployment_target = "2.0" # spec.tvos.deployment_target = "9.0" spec.swift_version = "5.4" # ――― Source Location ―――――――――――――――――――――――――――――――――――――――――――――――――――――――――― # # # Specify the location from where the source should be retrieved. # Supports git, hg, bzr, svn and HTTP. # spec.source = { :git => "[email protected]:LuckyVan_admin/nktest-lib-privacy-lib.git", :tag => "#{spec.version}" }
# ――― Source Code ―――――――――――――――――――――――――――――――――――――――――――――――――――――――――――――― # # # CocoaPods is smart about how it includes source code. For source files # giving a folder will include any swift, h, m, mm, c & cpp files. # For header files it will include any header in the folder. # Not including the public_header_files will make all headers public. # #spec.source_files = "Classes", ".//Classes/.{c,h,m,mm,swift}" #spec.exclude_files = "Classes/Exclude" spec.prefix_header_contents = '#import
' # ――― Resources ―――――――――――――――――――――――――――――――――――――――――――――――――――――――――――――――― # # # A list of resources included with the Pod. These are copied into the # target bundle with a build phase script. Anything else will be cleaned. # You can preserve files from being cleaned, please don't preserve # non-essential files like tests, examples and documentation. # # spec.resource = "icon.png" # spec.resources = "Sources/Assets/ " # spec.preserve_paths = "FilesToSave", "MoreFilesToSave"# ――― Project Linking ―――――――――――――――――――――――――――――――――――――――――――――――――――――――――― # # # Link your library with frameworks, or libraries. Libraries do not include # the lib prefix of their name. # # spec.framework = "SomeFramework" spec.frameworks = ['CoreTelephony','CoreFoundation','AdSupport','AppTrackingTransparency'] # spec.library = "iconv" spec.libraries = ['c++', 'resolv.9']
# ――― Project Settings ――――――――――――――――――――――――――――――――――――――――――――――――――――――――― # # # If your library depends on compiler flags you can set them in the xcconfig hash # where they will only apply to your library. If you depend on other Podspecs # you can include multiple dependencies to ensure it works. # spec.requires_arc = true # spec.xcconfig = { "HEADER_SEARCH_PATHS" => "$(SDKROOT)/usr/include/libxml2" } spec.static_framework = true #spec.vendored_frameworks = 'Sources/Classes/Vendor/AliTigerTally_IDFA.xcframework'
#spec.dependency "Alamofire", "~>5"
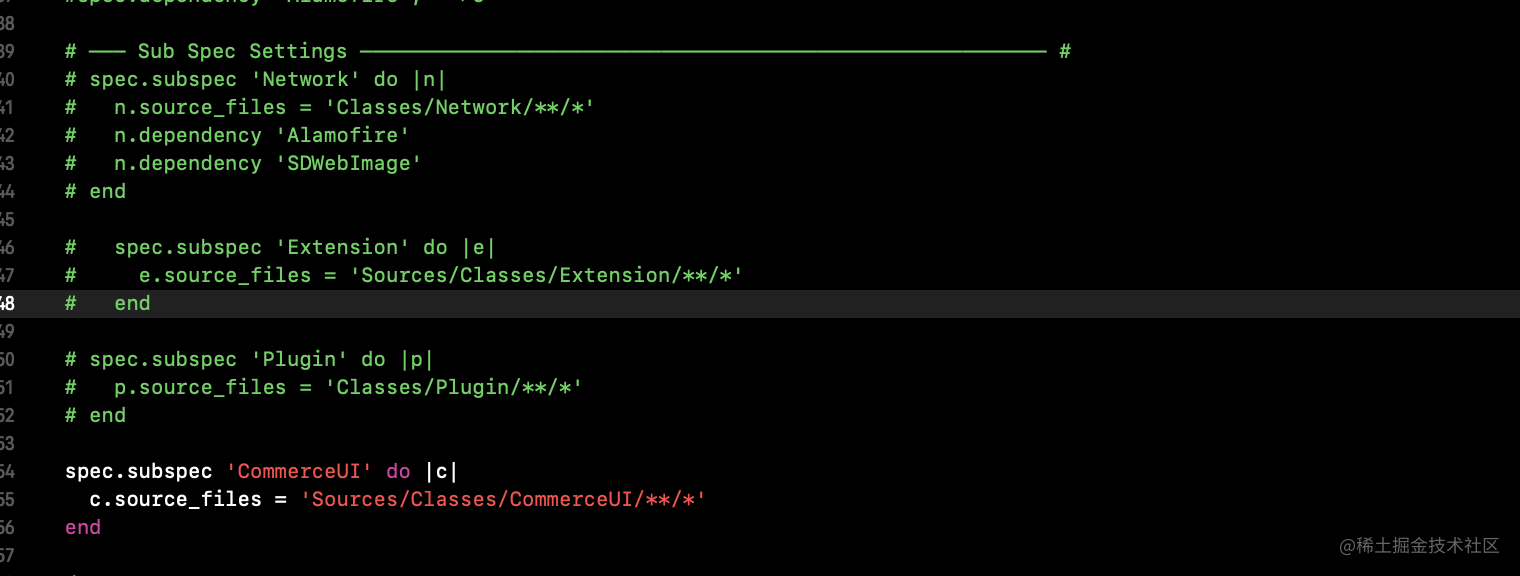
# ――― Sub Spec Settings ――――――――――――――――――――――――――――――――――――――――――――――――――――――――― # spec.subspec 'Extension' do |e| e.source_files = 'Sources/Classes/Extension/*/' end spec.subspec 'CommerceUI' do |c|
c.source_files = 'Sources/Classes/CommerceUI/**/*'end end
 - 檢查一下私有庫`spec`是否有錯誤:shell pod lib lint --allow-warnings - 檢查通過後,修改`podspec`中的庫版本號為`0.2.0`,提交本地git日誌,打就可以將 `NKTestLibPrivacyLib` 的 `0.2.0` 版本推到遠端私有庫中,同時建立 `0.2.0` 的 Tag - 推送新版本的`podspec`到私有庫`Spec`檔案的儲存倉`NKMobilePaaSSpecs` 檢查通過後,執行:shell pod repo push NKMobilePaaSSpecs NKTestLibPrivacyLib.podspec --allow-warnings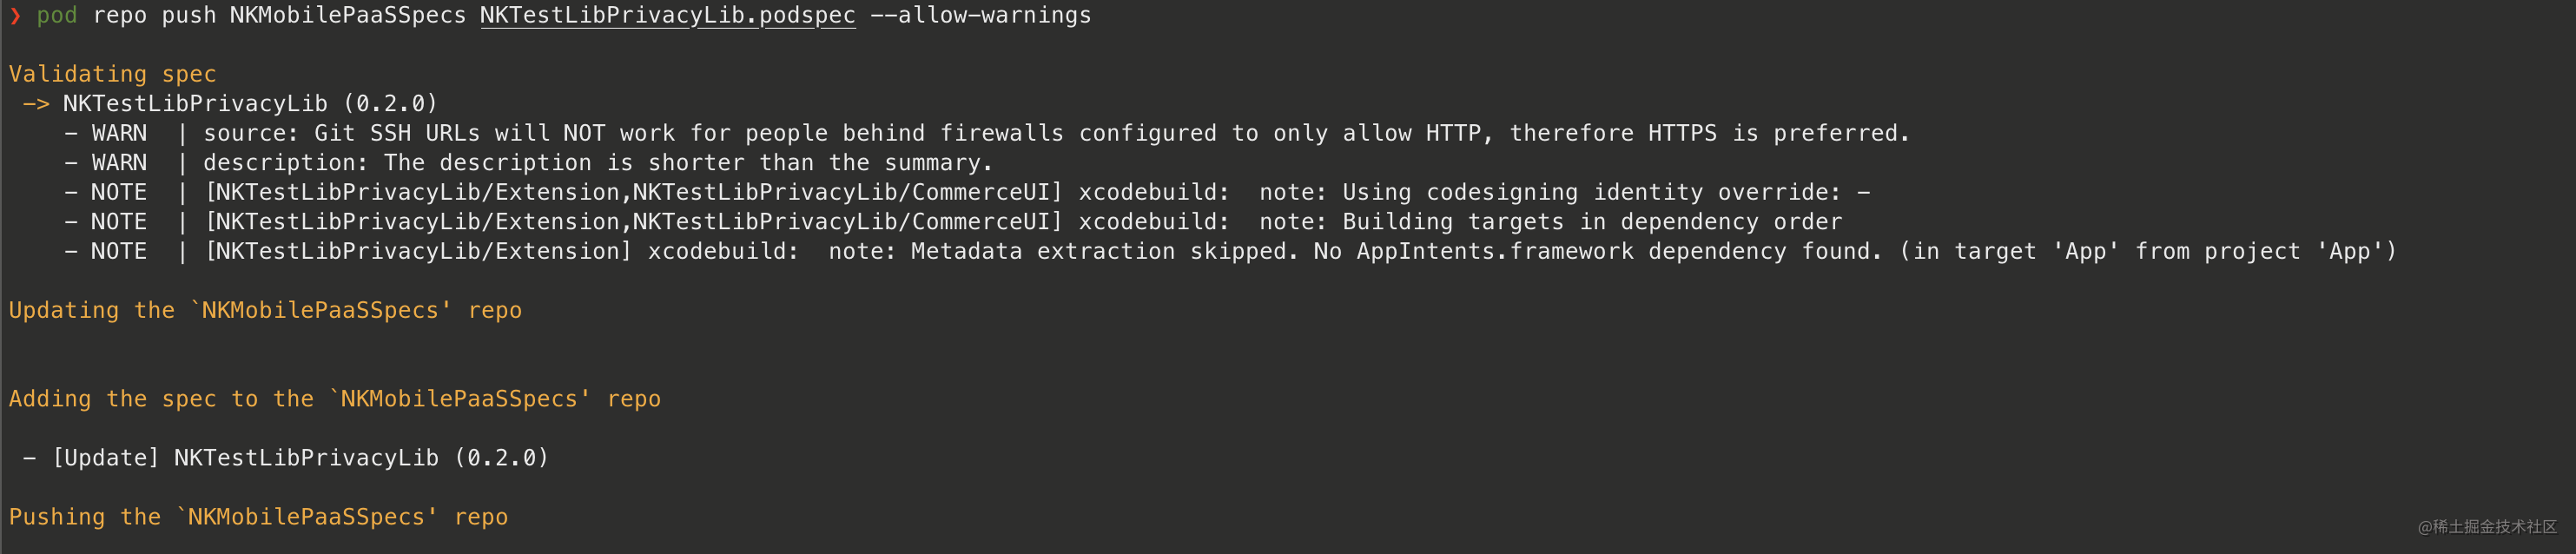 - 更新本地的 `NKMobilePaaSSpecs` 倉shell pod repo update NKMobilePaaSSpecs``  - 重新 在 工程中pod install, 整合新版本的NKTestLibPrivacyLib`:
5.8.2 Pod庫 資源管理
我們在 建立 pod庫的時候注意設定好資原始檔路徑的管理規則,再載入Pod庫的資源儲存的bundle路徑+檔名稱即可正常載入資源。\
現在來演示一遍:
- 檢查.podspec對資原始檔管理的設定:
shell
## 採用 resource_bundles 欄位管理,會預設給pod庫創造一個指定名稱的bundle檔案,將指定的資源全部儲存在bundle裡面,在整合工程完成Build的時候,會把該bundle儲存在整合工程內部
## 此處 案例中 NKTestLibPrivacyLibResources 為 bundle的名稱
## => 只想的括號內部,分別是資原始檔在原本的Pod庫中的儲存路徑
spec.resource_bundles = {
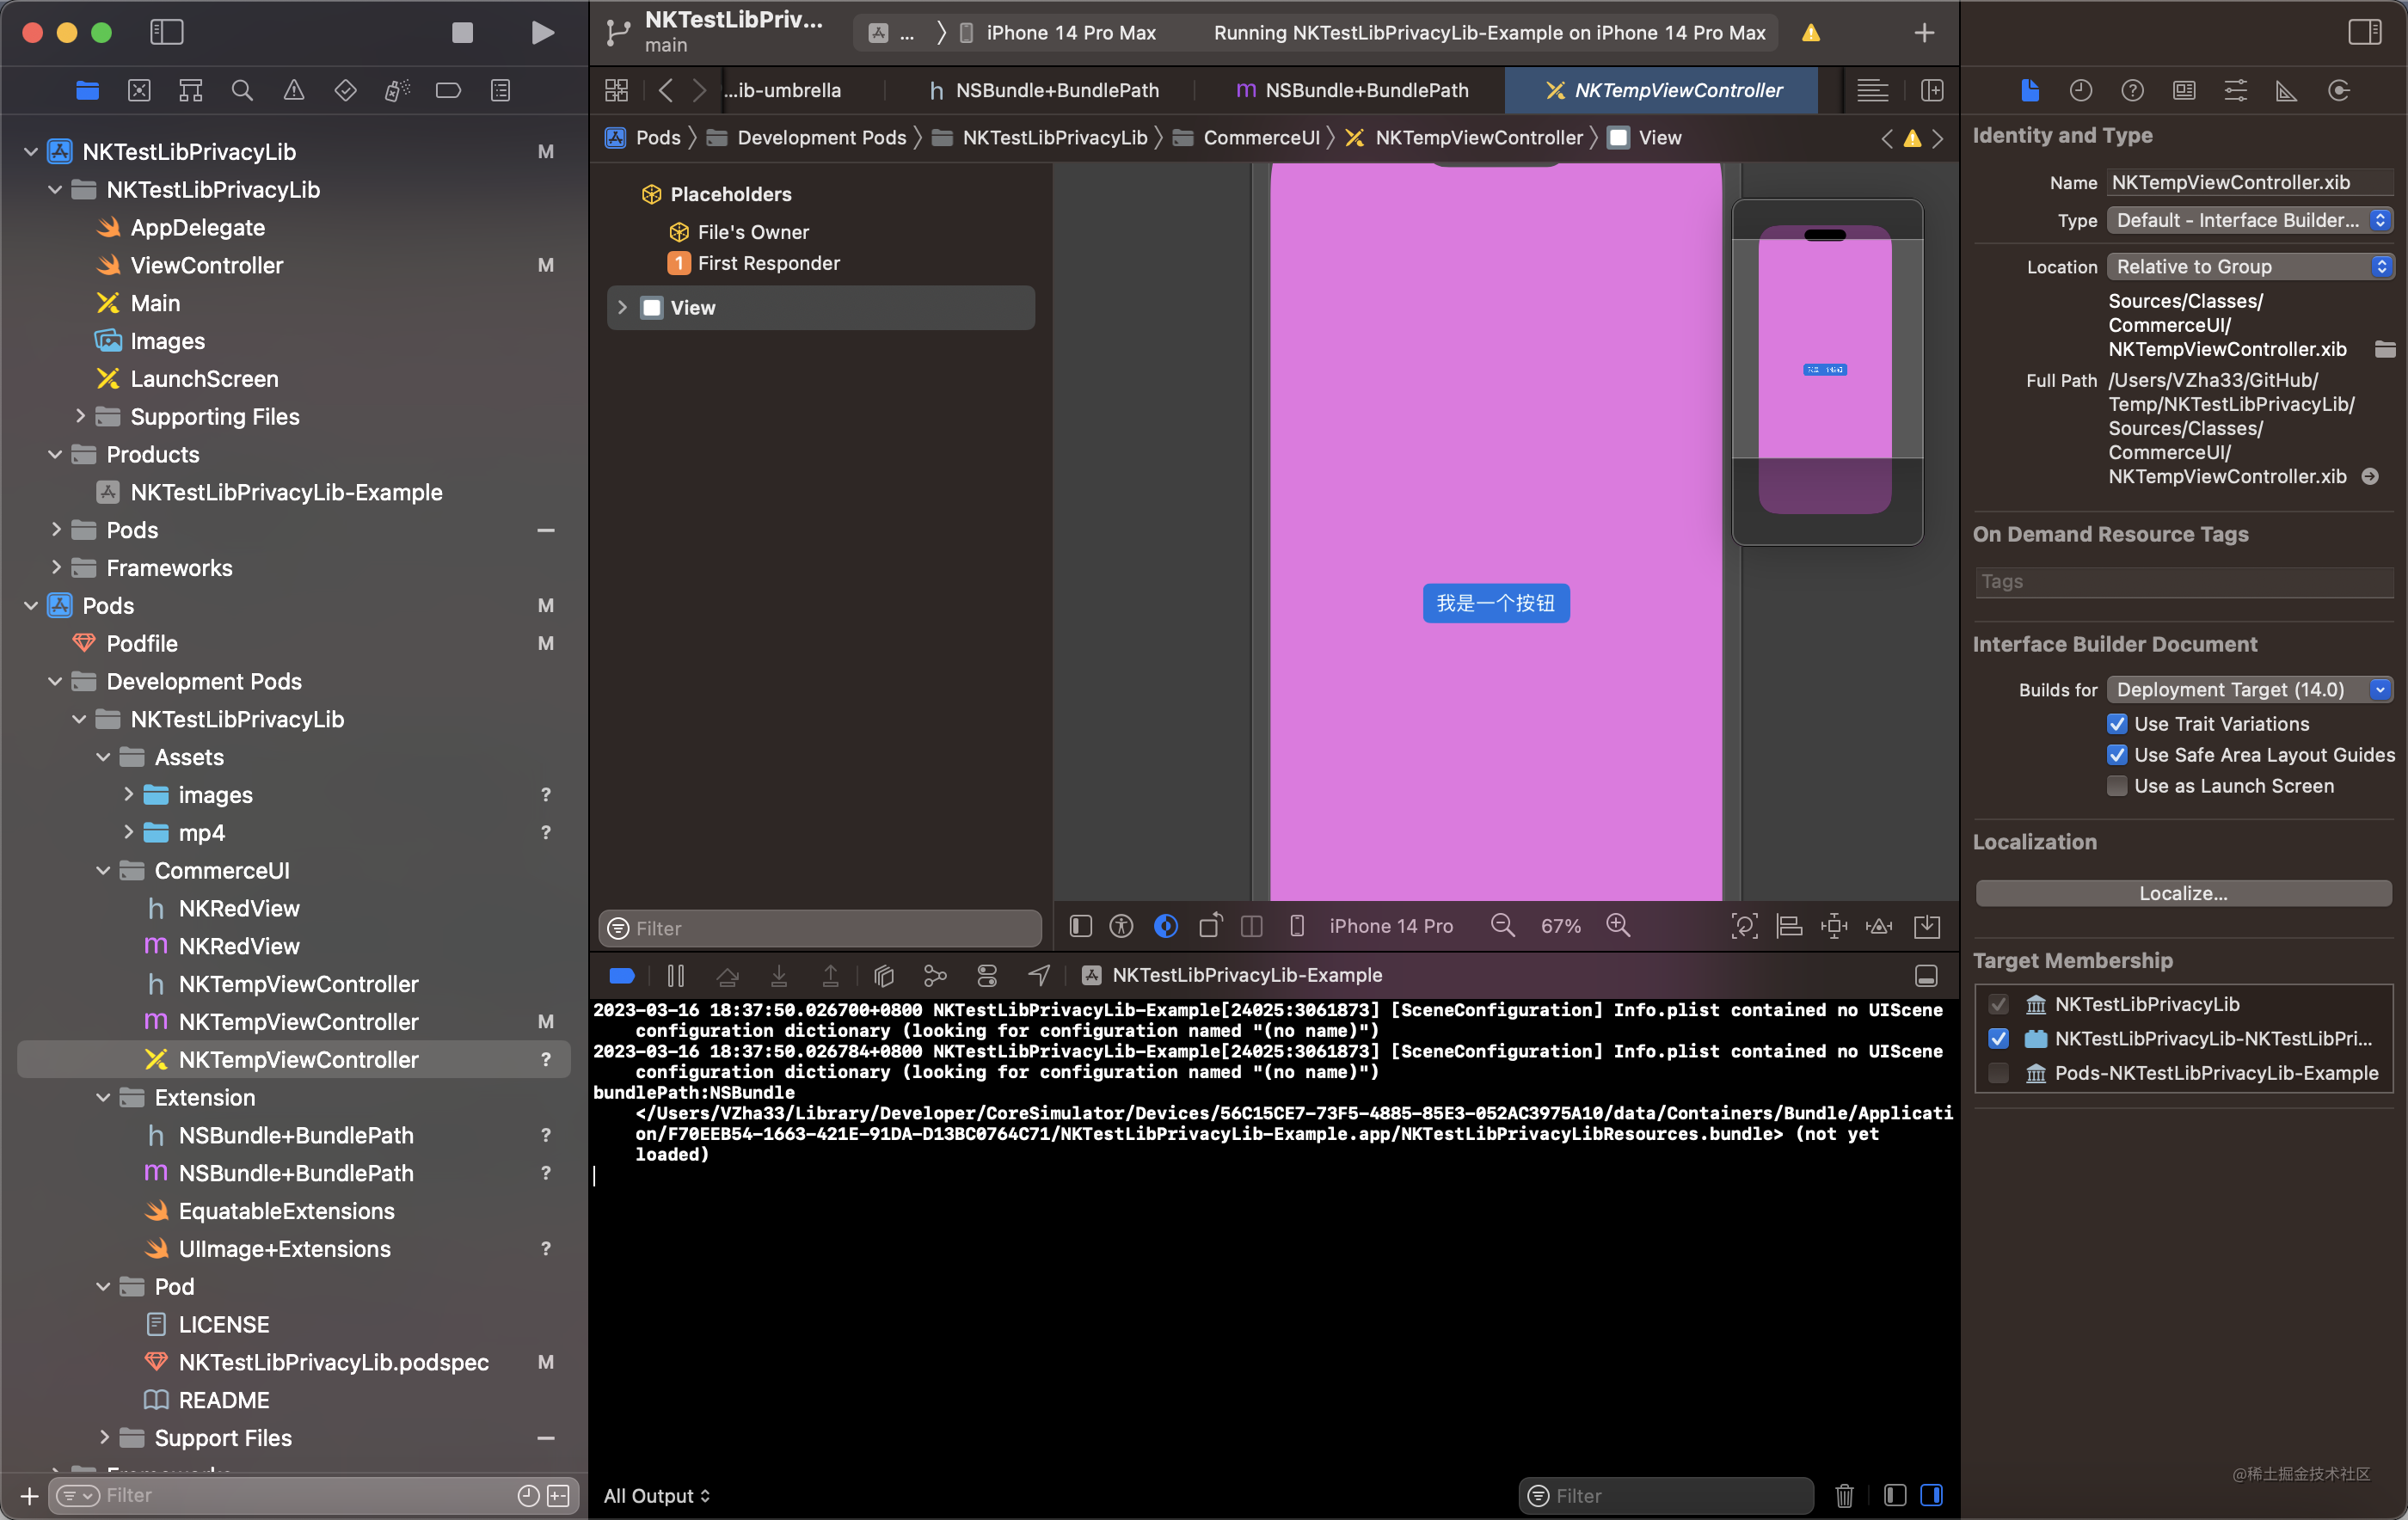
'NKTestLibPrivacyLibResources' => ['Sources/Classes/**/*.xib', 'Sources/Assets/*']
}
- 按command+B,build一下專案,找到工程內部的Product資料夾,show in finder,檢查一下生成的bundle的結果:
- 我寫了一個
Extension幫助我們快速獲取資原始檔的路徑,僅供參考:
- NSBundle+BundlePath.h
```objc
//
// NSString+BundlePath.h
// NKTestLibPrivacyLib
//
// Created by Van Zhang on 2023/3/16.
//
#import <Foundation/Foundation.h>
NS_ASSUME_NONNULL_BEGIN
@interface NSBundle (BundlePath)
+ (NSBundle*)currentLibraryBundle;
+ (NSBundle*)resourceBundleWith:(NSString*)bundleName;
+ (NSString*)pathWithBundleName:(NSString*)bundle;
@end
NS_ASSUME_NONNULL_END
```
- `NSBundle+BundlePath.m` (Tips:大家若是要使用,記得針對你當前的pod庫修改`currentLibraryBundle`內部的bundle名稱(把前面`.podspec`中`spec.resource_bundles`欄位的bundle名稱拷過來即可)
```objc
//
// NSBundle+BundlePath.m
// NKTestLibPrivacyLib
//
// Created by Van Zhang on 2023/3/16.
//
#import "NSBundle+BundlePath.h"
@implementation NSBundle (BundlePath)
static NSBundle *resourceBundle = nil;
static dispatch_once_t onceToken;
+ (NSBundle*)currentLibraryBundle{
dispatch_once(&onceToken, ^{
resourceBundle = [NSBundle resourceBundleWith:@"NKTestLibPrivacyLibResources"];
});
return resourceBundle;
}
+ (NSString *)pathWithBundleName:(NSString *)bundle{
NSString *bundleName = [self checkBundleNamePathExtension:bundle];
NSString *bundlePath = nil;
for (bundle in [NSBundle allBundles]) {
if ([[(NSBundle*)bundle bundlePath].lastPathComponent isEqualToString:bundleName]){
bundlePath = [(NSBundle*)bundle bundlePath];
break
}
}
return bundlePath;
}
+ (NSBundle*)resourceBundleWith:(NSString*)bundleName{
return [NSBundle bundleWithPath:[NSBundle pathWithBundleName:bundleName]];
}
+ (NSString*)checkBundleNamePathExtension:(NSString*)bundleName{
NSString *bundlePathExtension = @"bundle";
return [bundleName stringByAppendingPathExtension:[bundleName.pathExtension isEqualToString:@"bundle"]?@"":bundlePathExtension];
}
@end
```
- 我們 修改一下 工程 載入資源的 程式碼:
- pod 庫內部 的程式碼載入資源:
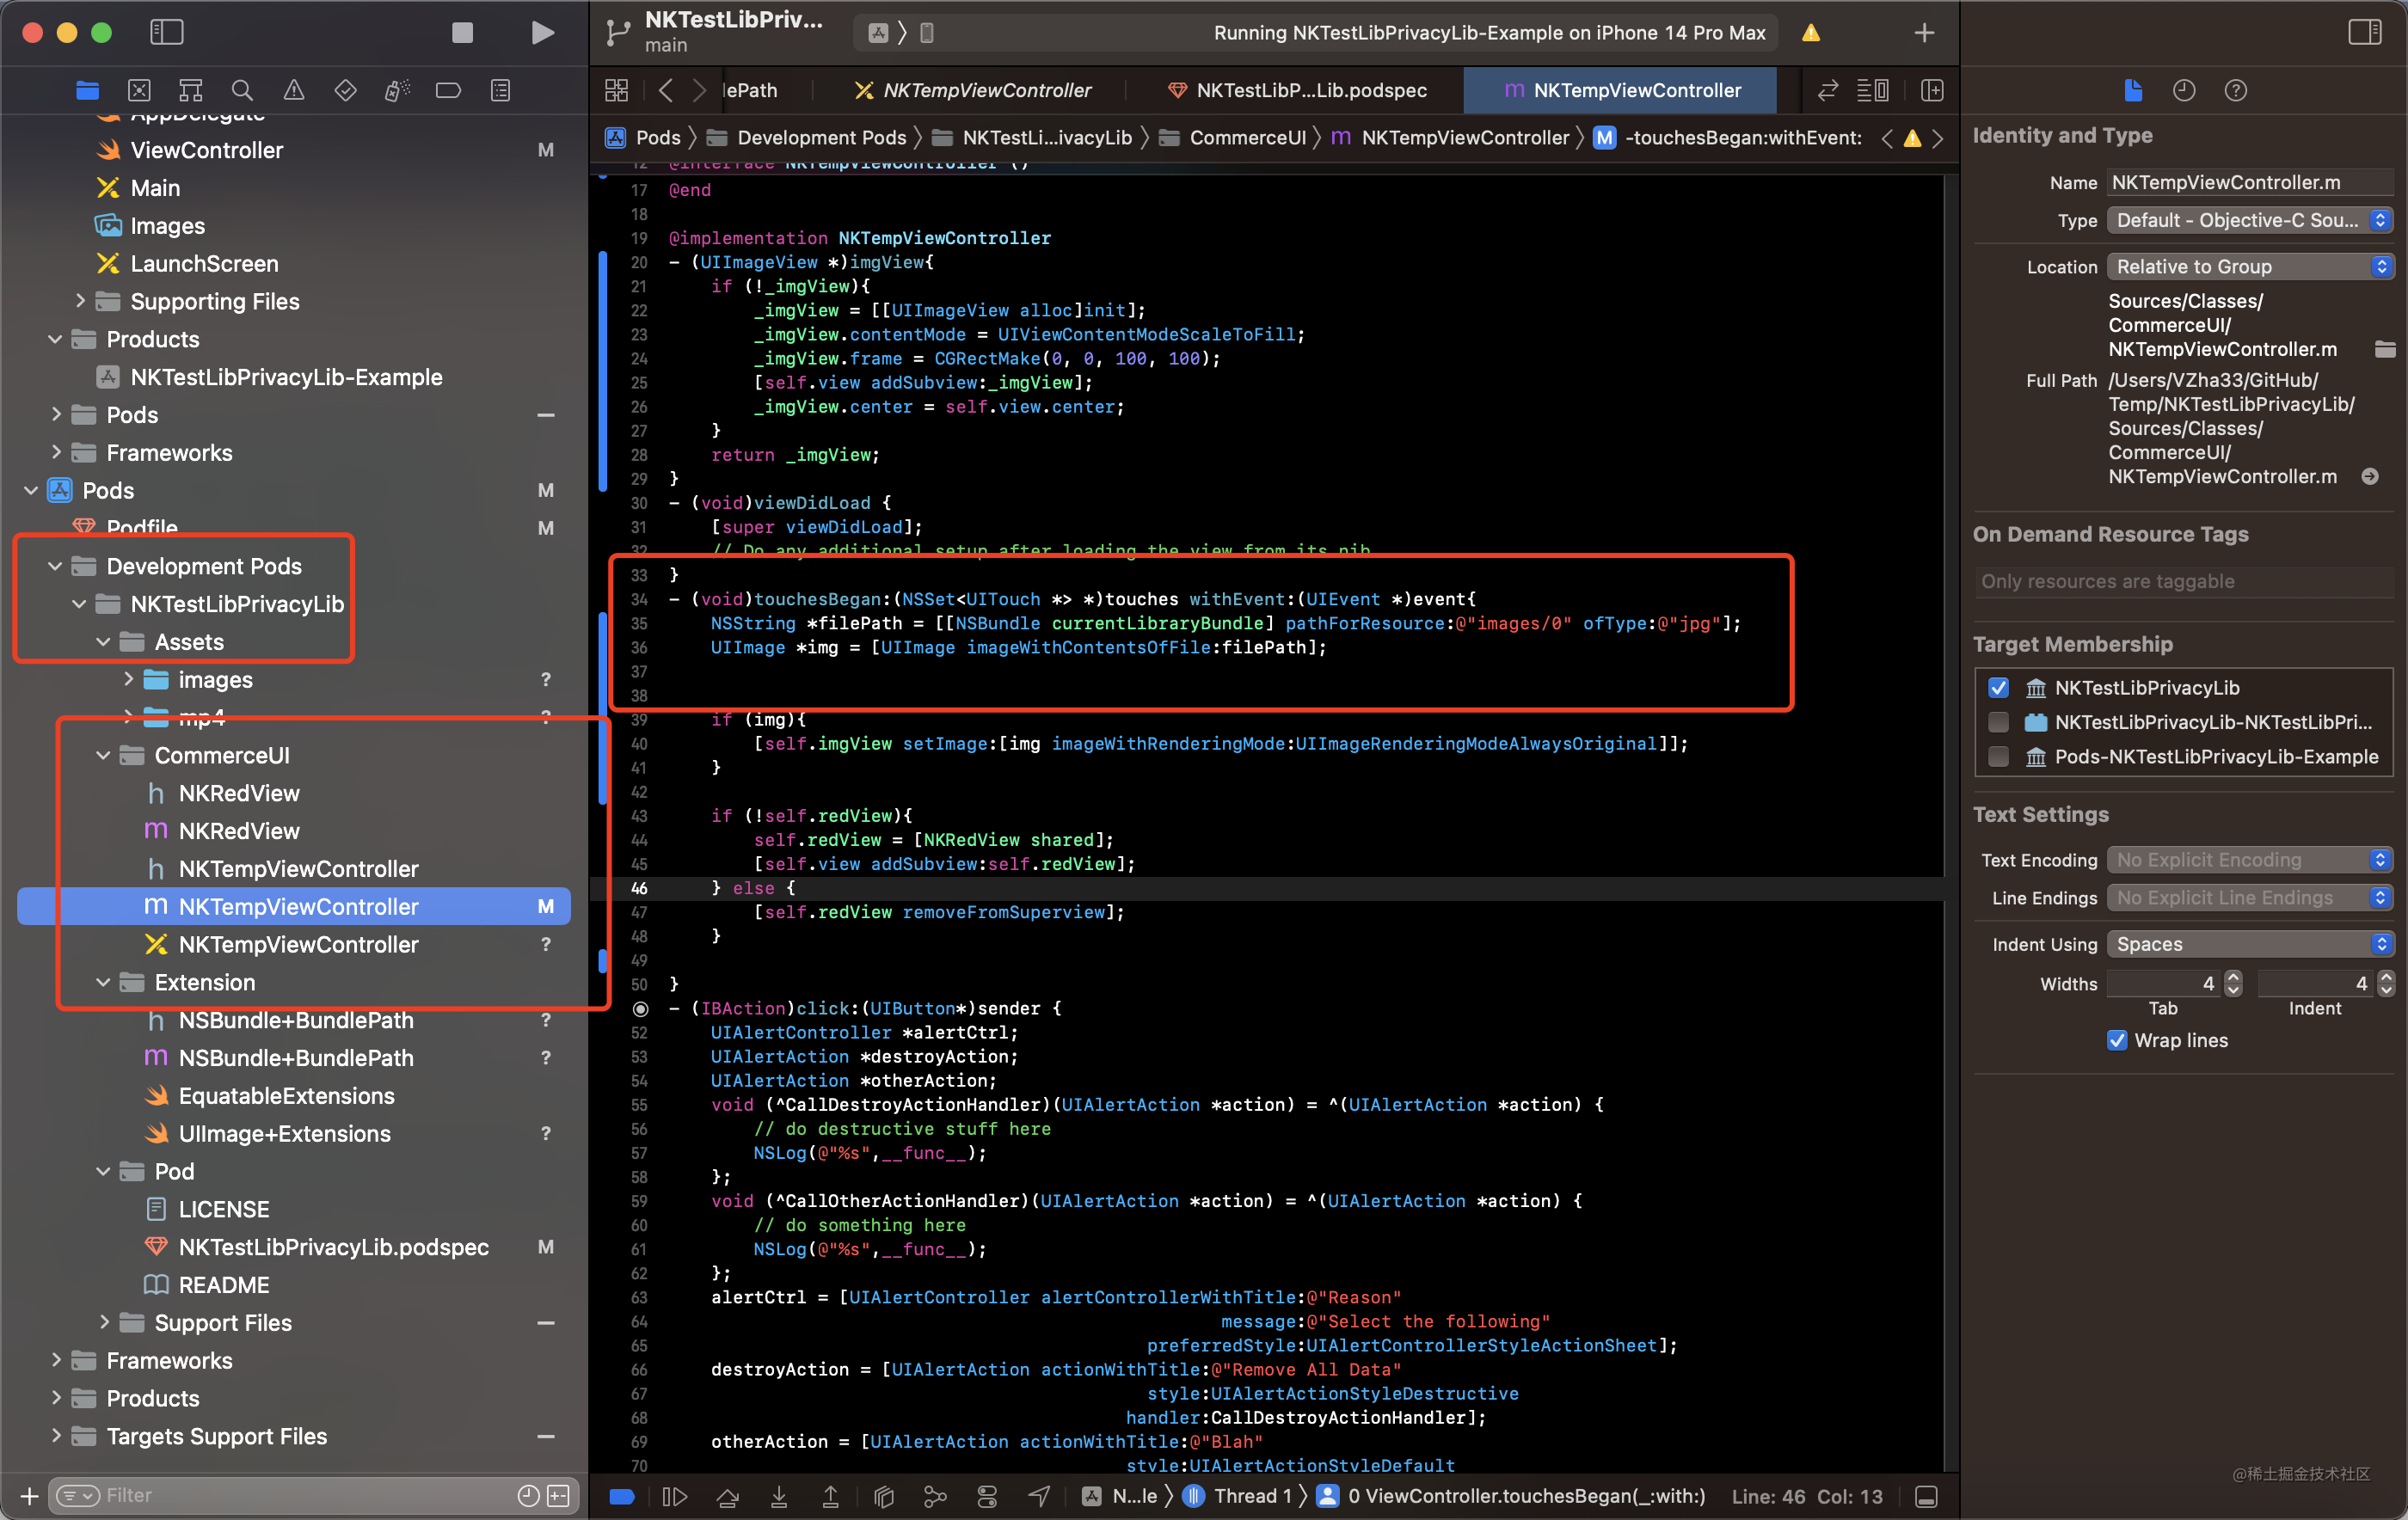
```objc
NSString *filePath = [[NSBundle currentLibraryBundle] pathForResource:@"images/0" ofType:@"jpg"];
UIImage *img = [UIImage imageWithContentsOfFile:filePath];
```
- 整合pod庫的專案內部 的程式碼載入資源:
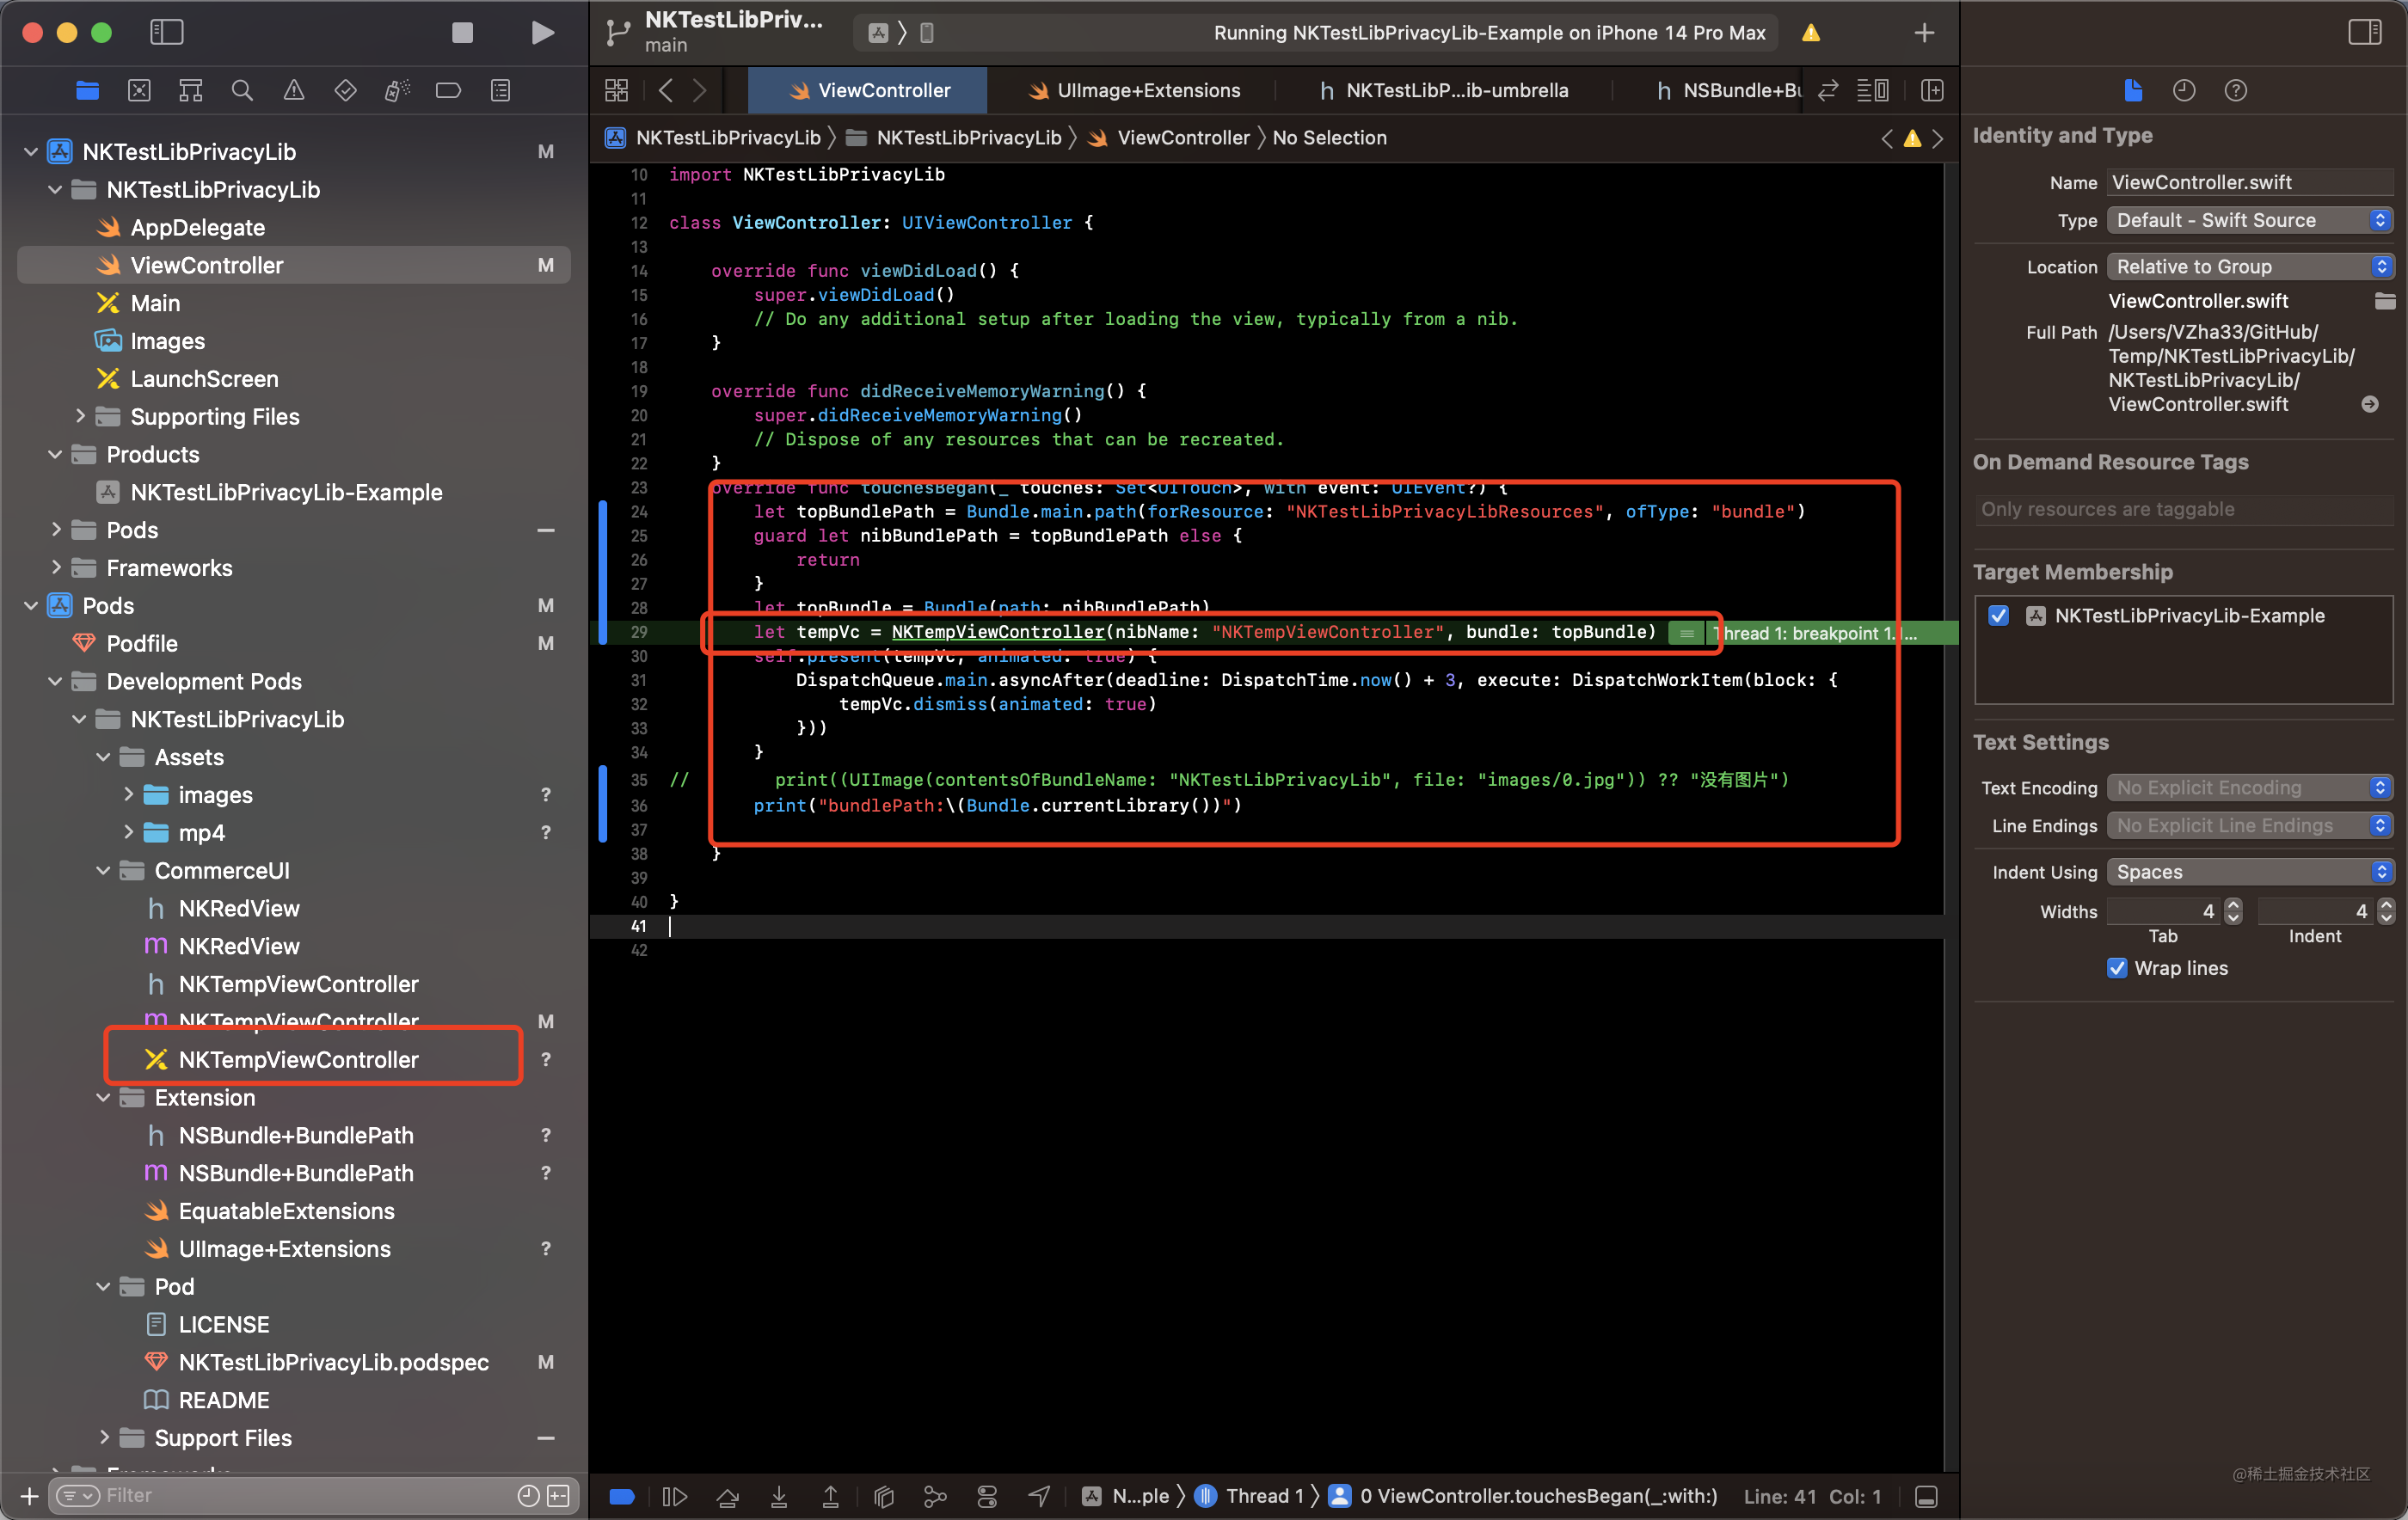
```swift
let topBundlePath = Bundle.main.path(forResource: "NKTestLibPrivacyLibResources", ofType: "bundle")
guard let nibBundlePath = topBundlePath else {
return
}
let topBundle = Bundle(path: nibBundlePath)
let tempVc = NKTempViewController(nibName: "NKTempViewController", bundle: topBundle)
self.present(tempVc, animated: true) {
DispatchQueue.main.asyncAfter(deadline: DispatchTime.now() + 3, execute: DispatchWorkItem(block: {
tempVc.dismiss(animated: true)
}))
}
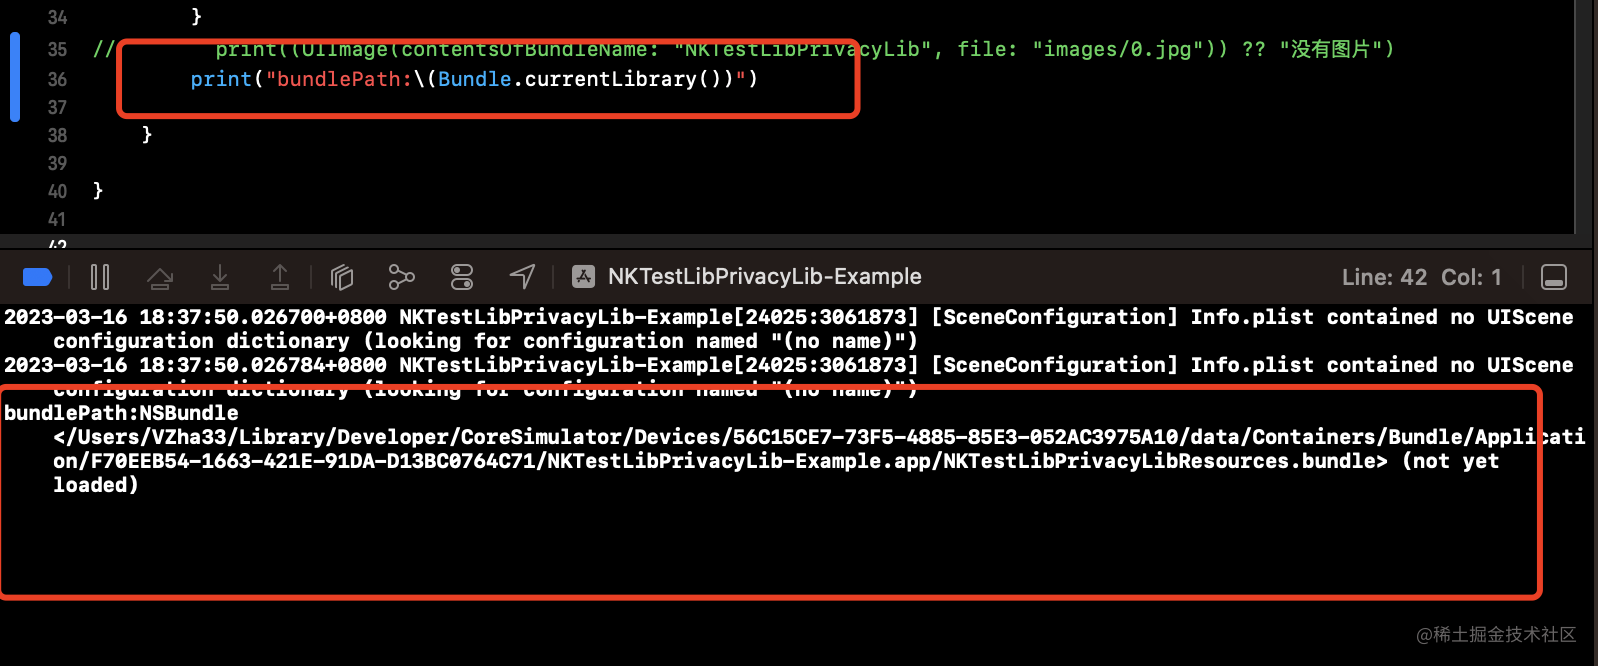
// print((UIImage(contentsOfBundleName: "NKTestLibPrivacyLib", file: "images/0.jpg")) ?? "沒有圖片")
print("bundlePath:\(Bundle.currentLibrary())")
```
- run 一下工程 檢查一下 載入 效果:
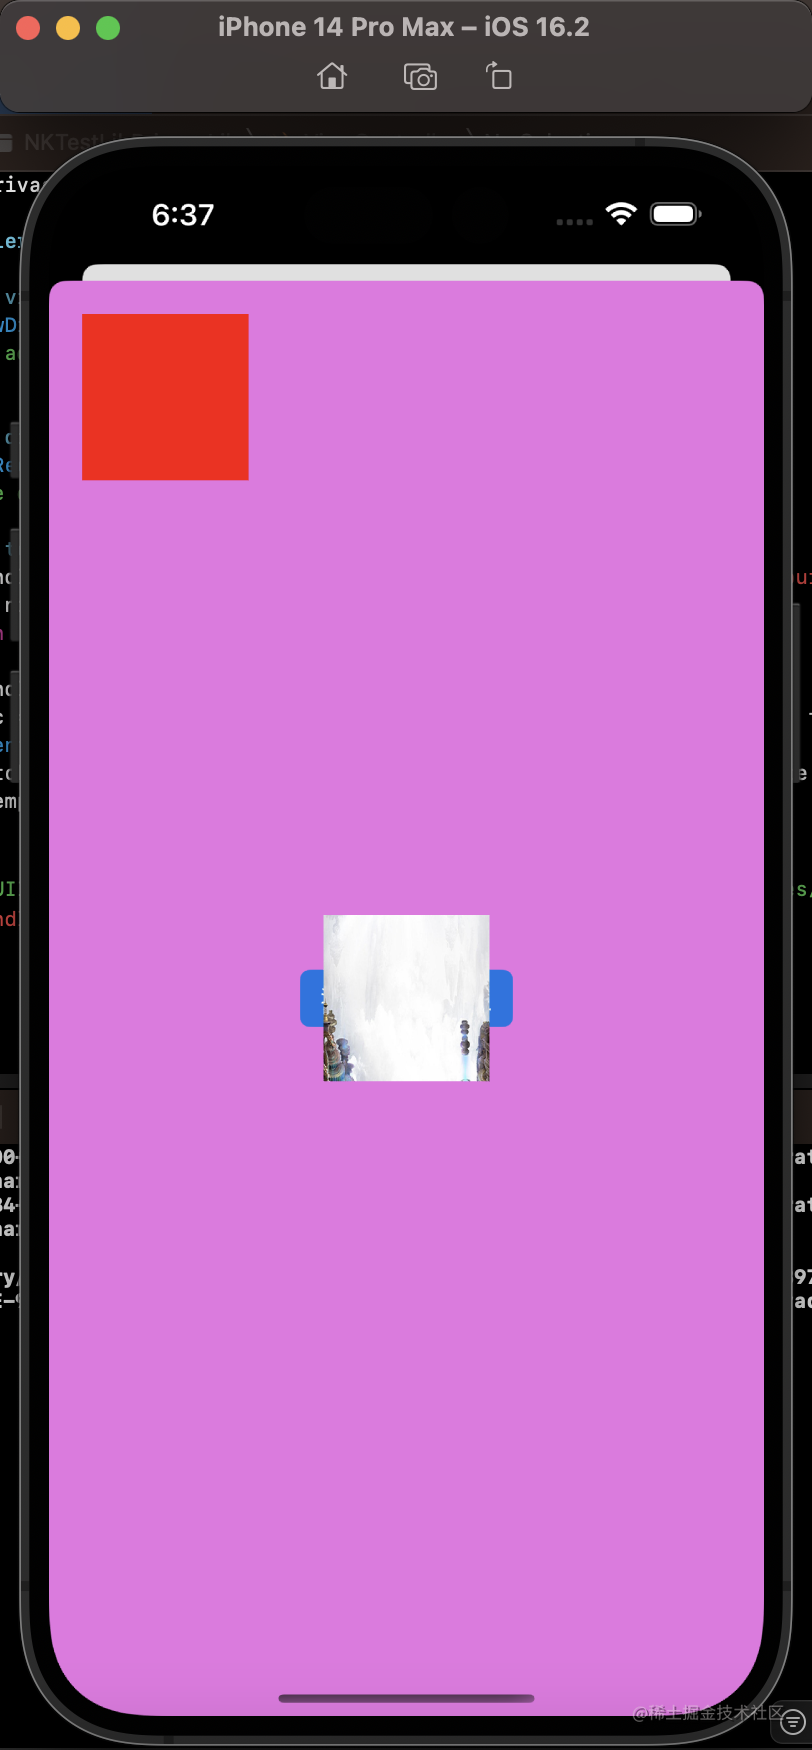
至此,當前針對Cocoapods的資源管理調整與實踐基本完成
5.9 Podfile檔案的優化
我們可以在Podfile中加入這一段程式碼:
```objc
install! 'cocoapods',
:deterministic_uuids => false,
:lock_pod_sources => false,
:disable_input_output_paths => true,
:generate_multiple_pod_projects => true,
:preserve_pod_file_structure => true
inhibit_all_warnings!
post_install do | installer | installer.pods_project.targets.each do |target| target.build_configurations.each do |config| puts target.name end end
aggregate_target = installer.aggregate_targets[0] aggregate_build_settings_by_config = aggregate_target.xcconfigs.collect { |k, v| [k, v.to_hash] }.to_h puts aggregate_build_settings_by_config installer.pod_target_subprojects.each do |pod_subproject| pod_subproject.native_targets.each do |pod_native_target| puts pod_native_target pod_native_target.build_configurations.each do |build_configuration| aggregate_build_settings = aggregate_build_settings_by_config[build_configuration.name] build_configuration.build_settings['HEADER_SEARCH_PATHS'] = "${PODS_ROOT}/Headers/Public" build_configuration.build_settings['FRAMEWORK_SEARCH_PATHS'] = aggregate_build_settings['FRAMEWORK_SEARCH_PATHS'] build_configuration.build_settings['LIBRARY_SEARCH_PATHS'] = aggregate_build_settings['LIBRARY_SEARCH_PATHS'] end end end end ``` 這段程式碼的功能是把每一個pod庫在匯入的時候,都編譯成一個靜態庫Framework,在打包專案包體積的同時,還可以適當提高平時開發的編譯速度。
-
新增之前的
Podfile```objc # Uncomment the next line to define a global platform for your projectsource "[email protected]:LuckyVan_admin/nkmobile-paa-sspecs.git"
use_frameworks! :linkage => :static
use_modular_headers!
platform :ios, '14.0'
target 'NKTestLibPrivacyLib-Example' do pod 'NKTestLibPrivacyLib', :path => '/Users/VZha33/GitHub/Temp/NKTestLibPrivacyLib/NKTestLibPrivacyLib.podspec'
,:subspecs => ['CommerceUI']
pod 'NKTestLibPrivacyLib'
end
- 新增之後的`Podfile`objc # Uncomment the next line to define a global platform for your projectsource "[email protected]:LuckyVan_admin/nkmobile-paa-sspecs.git" #use_frameworks! :linkage => :static #use_modular_headers! platform :ios, '14.0' install! 'cocoapods', :deterministic_uuids => false, :lock_pod_sources => false, :disable_input_output_paths => true, :generate_multiple_pod_projects => true, :preserve_pod_file_structure => true inhibit_all_warnings! post_install do | installer | installer.pods_project.targets.each do |target| target.build_configurations.each do |config| puts target.name end end aggregate_target = installer.aggregate_targets[0] aggregate_build_settings_by_config = aggregate_target.xcconfigs.collect { |k, v| [k, v.to_hash] }.to_h puts aggregate_build_settings_by_config installer.pod_target_subprojects.each do |pod_subproject| pod_subproject.native_targets.each do |pod_native_target| puts pod_native_target pod_native_target.build_configurations.each do |build_configuration| aggregate_build_settings = aggregate_build_settings_by_config[build_configuration.name] build_configuration.build_settings['HEADER_SEARCH_PATHS'] = "${PODS_ROOT}/Headers/Public" build_configuration.build_settings['FRAMEWORK_SEARCH_PATHS'] = aggregate_build_settings['FRAMEWORK_SEARCH_PATHS'] build_configuration.build_settings['LIBRARY_SEARCH_PATHS'] = aggregate_build_settings['LIBRARY_SEARCH_PATHS'] end end end end target 'NKTestLibPrivacyLib-Example' do pod 'NKTestLibPrivacyLib', :path => '/Users/VZha33/GitHub/Temp/NKTestLibPrivacyLib/NKTestLibPrivacyLib.podspec' # ,:subspecs => ['CommerceUI'] # pod 'NKTestLibPrivacyLib' end`` - 新增之前的工程目錄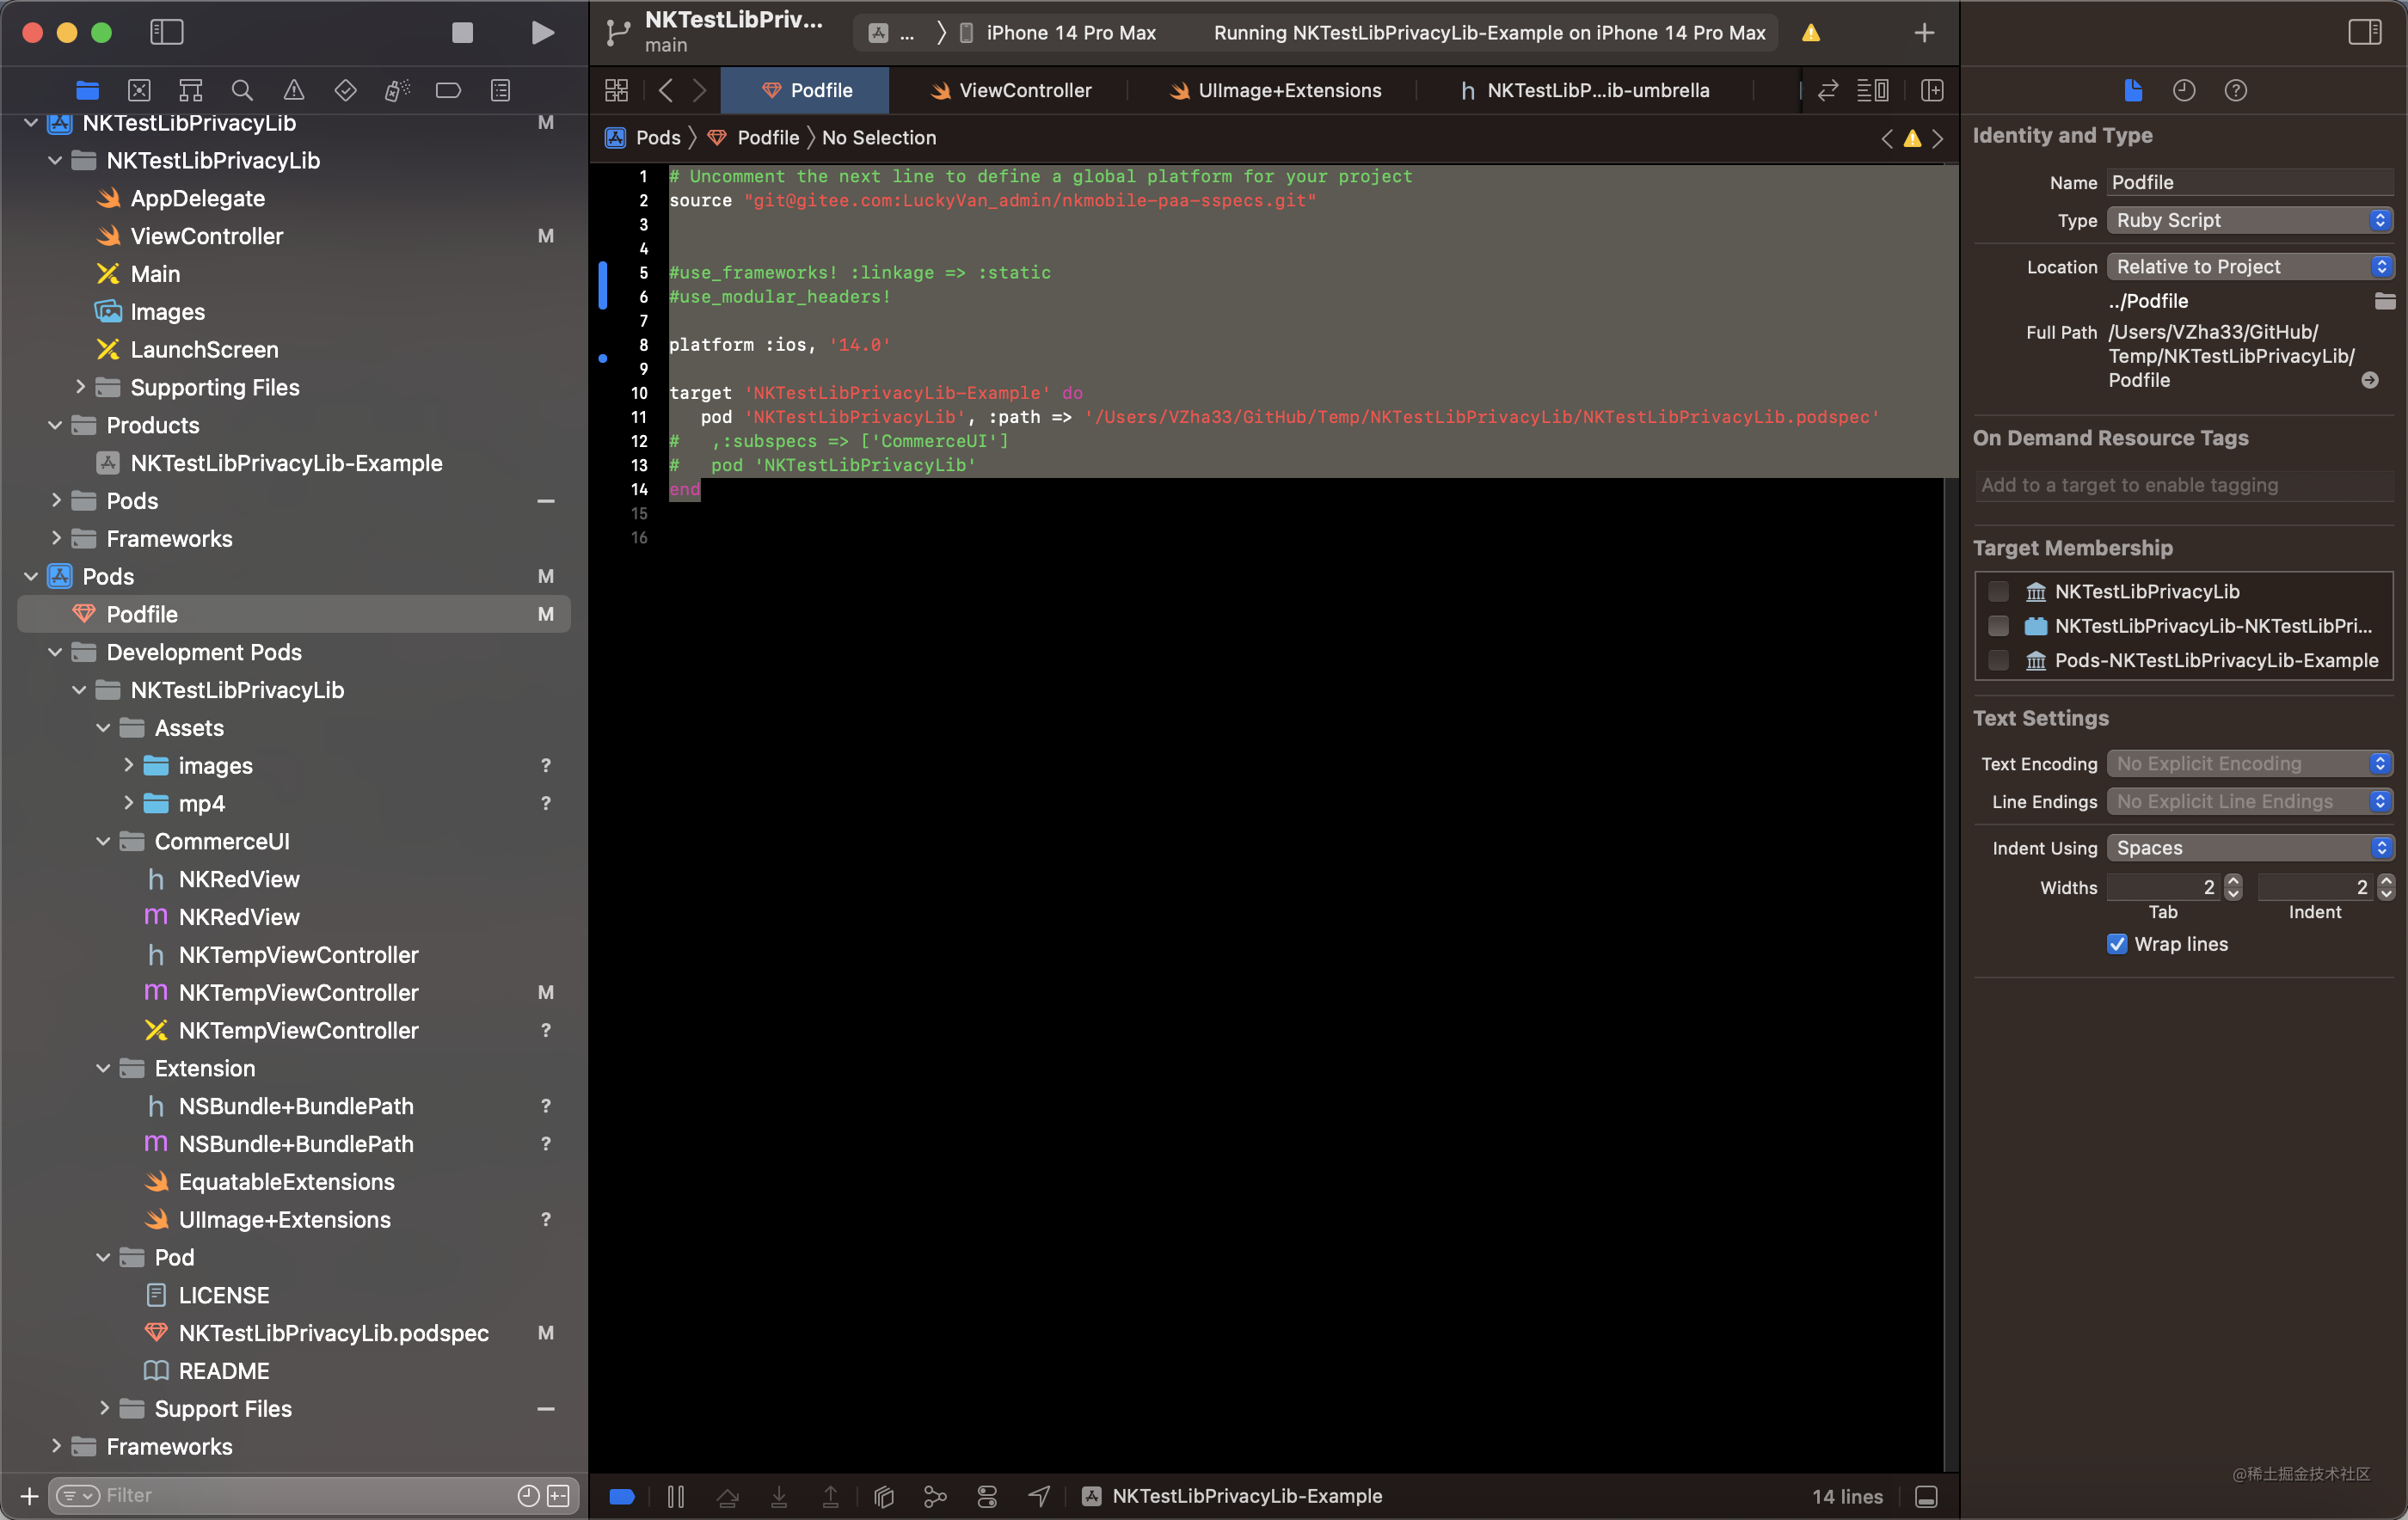 - 新增之後的工程目錄`
私有庫實踐工程的連結:http://github.com/VanZhang-CN-SZ-SN9037/NKTestLibPrivacyLib
總結
我們本次在本篇文章依次介紹了依賴包管理工具的: - 發明背景和用途 - Pod庫的分類:本地庫、主庫+子庫、遠端公有庫、遠端私有庫 - Pod庫的建立和相關的資源管理:.podspec的配置、pod庫資源管理、pod遠端庫釋出和Pod庫升級 - ...
本次並未拓展討論的話題
- 深入討論 pod庫個人模板工程的定製 以及 相關 指令碼檔案的書寫
- Cocoapods 外掛開發
- Cocoapods + Fastlane + Jenkins 實現iOS工程的持續整合
- Cocoapods 底層原理
- 推薦的Cocoapods優質開源庫
- 若是你毫無思路,歡迎閱讀我的這篇文章(建立自己的iOS知識體系),先了解一下iOS開發的過程中,各個階段需要關注什麼,從而選擇那些三方庫/朝著哪些方向去製作自己的Pod庫以實現自己公司內部的iOS移動開發套件
若我們要進一步對未討論的子話題挖掘,我們則需要掌握更多的前知識。\ 比如,pod庫個人模板工程的定製 以及 相關 指令碼檔案的書寫、Cocoapods 外掛開發、Cocoapods + Fastlane + Jenkins 實現iOS工程的持續整合、Cocoapods 底層原理等話題。則要求我們需要掌握一定的指令碼語言Ruby、Fastlane、Gem、Homebrew、Jenkins等\ 若是你有興趣,也可以和我分享你的探索經驗。歡迎Q我,讓我們相互借鑑,共同進步!!! ......
相關閱讀
專題系列文章
iOS架構設計
- 1.iOS架構設計|綜述
- 2.iOS架構設計|iOS模組化開發(
待輸出) - 3.iOS架構設計|iOS元件化開發-依賴包管理工具Cocoapods常用實踐:元件庫(本地庫、遠端庫(公有、私有))建立、模板工程、劃分、資源管理、優化等
- 4.iOS架構設計|iOS元件化開發【元件管理、元件分類、元件劃分、元件開發】(
待輸出) - 5.iOS架構設計|iOS開發包二進位制化【.a靜態庫、.framework(靜態庫、動態庫)、.dyld動態庫、.xcfameworks等】
探索iOS底層原理
- 03-iOS架構設計|iOS元件化開發-依賴包管理工具Cocoapods常用實踐:元件庫(本地庫、遠端庫(公有、私有))建立、模板工程、劃分、資源管理、優化等
- 04-iOS架構設計|iOS開發包二進位制化【.a靜態庫、,.framework(靜態庫、動態庫)、.dyld動態庫、XCFameworks等】
- 03-SwiftUI|構建列表與導航Building Lists and Navigation
- 21-探究iOS底層原理|多執行緒技術【瞭解iOS中的10個執行緒鎖,與執行緒鎖型別:自旋鎖、互斥鎖、遞迴鎖】
- 18-探究iOS底層原理|多執行緒技術【GCD原始碼分析1:dispatch_get_global_queue與dispatch_(a)sync、單例、執行緒死鎖】
- 19-探究iOS底層原理|多執行緒技術【GCD原始碼分析2:柵欄函式dispatch_barrier_(a)sync、訊號量dispatch_semaphore】
- 22-探究iOS底層原理|多執行緒技術【原子鎖atomic、gcd Timer、NSTimer、CADisplayLink】
- 20-探究iOS底層原理|多執行緒技術【GCD原始碼分析3:執行緒排程組dispatch_group、事件源dispatch Source】
- 14-探究iOS底層原理|Runtime的相關應用
- 13-探究iOS底層原理|Runtime【objc_msgSend的三個階段(訊息傳送、動態解析方法、訊息轉發)、super的本質】
- 12-探究iOS底層原理|Runtime【isa詳解、class的結構、方法快取cache_t】
- 11-探究iOS底層原理|探索Block的本質【Block的資料型別(本質)與記憶體佈局、變數捕獲、Block的種類、記憶體管理、Block的修飾符、迴圈引用】
- 04-探究iOS底層原理|ARM64彙編
- 07-探究iOS底層原理|幾種OC物件【例項物件、類物件、元類】、物件的isa指標、superclass、物件的方法呼叫、Class的底層本質
- 03-探究iOS底層原理|LLDB【命令結構、查詢命令、斷點設定、流程控制、模組查詢、記憶體讀寫、chisel外掛】
- 06-探究iOS底層原理|OC物件的本質【底層實現、記憶體佈局、繼承關係】
- 05-探究iOS底層原理|OC的本質
- 02-探究iOS底層原理|編譯器LLVM專案【Clang、SwiftC、優化器、LLVM、Xcode編譯的過程】
- 03-iOS 效能優化|效能除錯工具Instruments-Leaks工具使用
- 04-iOS 效能優化|效能除錯工具Instruments-Allocations工具使用