前端監控穩定性資料分析實踐 | 得物技術
1 背景
客服一站式工作臺集成了線上、熱線和工單三個核心應用,支撐著自營客服和 BPO 客服每天處理大量的會話資訊,工作臺的穩定性就顯得非常重要。接入前端監控以來,我們堅持每雙週跟進工作臺以及客服幾個核心應用的線上穩定性情況,圍繞頁面的訪問情況、JS 錯誤率、資源載入異常情況、API 介面成功率、自定義業務模組指標 這五大監控模組,做了詳細的資料分析,從中發現了很多問題並且通過實時告警解決了潛在的問題,也通過資料分析推進了客服職場完善工作臺的執行環境。本文主要闡述我們是如何通過監控穩定性資料分析來提升應用系統的穩定性。
2 監控的原理
客服一站式工作臺接入監控時通過多方調研最終採用了 Arms 的監控方案,並基於 Arms 的監控方案,做了二次開發,整體的監控實現如下圖所示:

Arms 提供的 SDK 功能比較齊全,為滿足一些定製化的資料上報訴求、應用資料許可權管控以及控制上報成本,客服域接入時基於 alife-logger 進行了二次封裝,對功能更加的可控, 同時定期從阿里雲平臺進行資料初始化和生成定製化報表。
3 監控的實踐
3.1 頁面 PV&UV 監控場景
PV 即頁面瀏覽量,通常是衡量一個網站甚至一個模組使用情況的主要指標。UV 即獨立訪客數,是指某站點被多少使用者訪問過,以使用者登入態作為統計依據。頁面的 PV 和 UV 很大程度上反饋了應用各頁面功能的使用情況,能為產品功能優化以及相關業務決策提供很好的資料支援 。我們針對客服域已接入監控的應用連續幾個迭代的 PV、UV 資料分析,主要在如下事項起到了很好的推進和決策作用:
-
新功能上線效果分析:通過分析頁面業務功能模組 PV 相關資料,可以分析對應上新功能的使用情況。若發現部分功能客戶觸達率較低,就可以與業務溝通確認是功能設計問題還是上線功能布達問題,快速做出運營策略調整;
-
下線無用模組:通過頁面使用情況分析,對系統中訪問量比較少的頁面做了彙總分析,同產品運營確定之後,對線上客服管理系統和工單管理系統中的 9 個頁面做了下線處理,減少了頁面的維護成本;
-
支撐技術改造優先順序策略:在技術棧遷移的過程中,可以優先對訪問量比較高的頁面進行遷移,一般頁面訪問量高的對應的需求迭代也比較頻繁,通過頁面訪問排序,按優先順序去做遷移可以提升整體投入的 ROI;
-
助力系統體驗優化:通過分析較高 PV 頁面使用者訪問鏈路,將取消訂單、建立賠付單等需要高頻但需要開啟其他頁面操作的功能整合到客服聊天頁座席助手模組,提升客服的工作效率。
3.2 JS 錯誤率監控
指令碼錯誤主要有兩類:語法錯誤、執行時錯誤。簡單來說就是使用者在一些特殊場景下瀏覽器上報 JS 的異常,甚至會造成系統卡頓、頁面不可用等極端情況,這會極大地降低使用者體驗。因此我們通過監控系統對核心系統關鍵鏈路、關鍵指標做好異常資料分析設定監控預警 ,達到設定的閾值則傳送飛書或簡訊告警,值班同學關注告警資訊能夠及時做出響應,同時針對告警錯誤內容進行專項治理,達到效果如下:
-
提升系統穩定性: 總計處理 41 個 JS 指令碼異常治理,過程中發現異常業務場景並進行專項治理,很大程度上提升系統的穩定性。
-
發現隱藏問題: 通過監控發現 JS 錯誤數增加,排查發現數量正在上升,實時聯絡一個正在觸發報錯的客服遠端,發現是接入的三方 SDK 釋出新版版本,在特殊情況會出現報錯,及時同步對應的三方同學進行改正,有效避免因外部依賴釋出帶來的隱藏問題。
3.3 API 請求優化
監控提供應用中每個 API 的呼叫情況,包括呼叫次數、呼叫成功率、返回資訊、呼叫成功或失敗的平均耗時 等資料。通過分析指定時間段內應用中所有 API 請求資料,可以深度挖掘以下業務程式碼實現和介面穩定性一些相關的問題:
-
下線不必要呼叫: 排查過程中發現部分埋點呼叫頻次很高,但是實際報表資料並未運用起來,與業務溝通後發現為歷史遺留邏輯,目前已無用,所以進行下架。減少不必要的介面呼叫,釋放更多的瀏覽器請求資源。
-
減少冗餘呼叫: 共治理介面高頻呼叫治理呼叫 5 個,通過分析發現部分非核心功能的介面呼叫量較大,程式碼走讀發現此部分介面為實時性要求不高列舉列表的介面,可以通過前端快取的方式減少介面呼叫次數,從而提高使用者切換會話效率和減少伺服器的呼叫壓力。
-
優化技術方案: 客服一站式工作臺存在長鏈和短鏈呼叫結合的情況,在我們日常監控分析中發現部分短連結口呼叫量大。經過程式碼走查和呼叫鏈路分析發現由於業務功能需要,只要客服切換會話,就會拉取當前會話最近五條訊息發起短鏈請求,造成切換會話會有卡頓感,同時很容易出現由於短鏈併發較多,頻繁切換回話後會出現串線的情況。所以與後端溝通後,將原先技術方案內的短鏈呼叫改為長鏈訊息推送,很大程度上減少介面呼叫和訊息不實時的情況,提升使用者體驗和系統穩定性。
3.4 靜態資源載入異常優化
靜態資源載入分為頁面內的圖片、CSS、JS 等 Assets 資源載入失敗。目前客服 BPO 職場均有安全管控,所以會出現運營或者其他應用上傳的靜態資源連結、圖片等資源,部分 BPO 打不開的情況,通過前端監控發現以下幾個問題:
-
圖片資源載入異常: 隨著一站式工作臺的業務拓展,陸續支援等其他租戶的客戶進線。業務上線後,我們通過監控發現資源錯誤數量出現上漲,排查後確認由於商品圖片等資源都是配置的 CDN 地址,需要 BPO 職場開通網路白名單客服才可以看到指定的圖片資源。通過監控快速定位對應的職場,同步對應的職場 IT 負責人進行處理。
-
運營配置錯誤地址修正: 通過監控資料分析,發現不少報錯的靜態資源地址中有飛書內網地址和竹間遷移遺留資源的情況,內網地址外網是無法開啟的,會給客服帶來不少困擾。經確認為運營遷移過程中存在遺漏造成,聯絡對應的運營同學進行專項治理,及時減少問題影響面。
3.5 頁面載入效能優化
頁面效能對使用者體驗而言十分關鍵。每次重構對頁面效能的提升,僅靠工程師開發裝置的測試資料是沒有說服力的,需要有大量的真實資料用於驗證;比如客服職場普遍反饋商品詳情頁面開啟慢,影響到了客服的工作效率,體驗很不好。為了明確具體載入慢的點,我們針對頁面載入到頁面可用這個過程中以下幾個時間節點進行埋點:
-
e_product_finish【總耗時 ms】: 商品詳情頁面開啟到所有資源均載入完成(包含圖片與請求)耗時
-
e_product_loadImg【載入圖片耗時 ms】: 介面請求回來到所有圖片載入完成耗時
-
e_product_loadAndfetch【請求耗時 ms】: 商品詳情頁面載入靜態資源 &&發起請求耗時
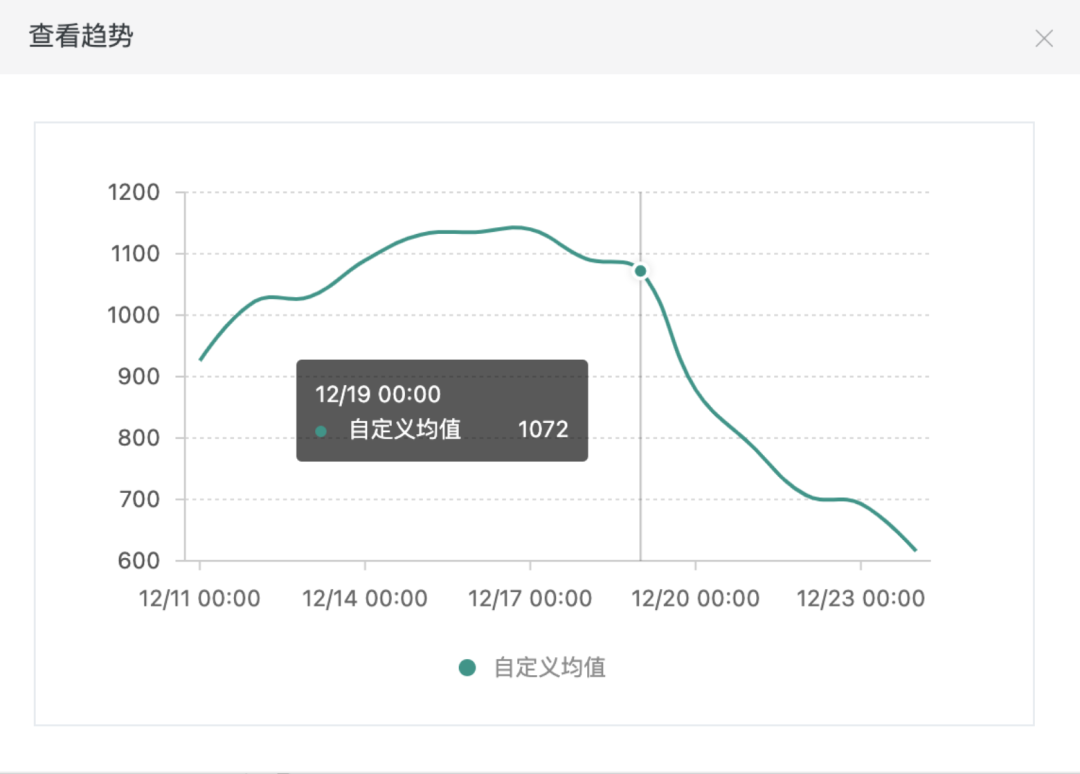
經過三天的線上資料分析發現,大部分耗時在載入圖片耗時上。分析耗時較長的商品詳情上下鏈路,發現此類商品的圖片大多為 500kb+甚至 1MB 左右的圖片 ,單個商品最多的情況下商品輪播圖近 52 張圖,加上商品細節圖、商品穿搭效果圖等,單個商品詳情頁面首次開啟竟然需要載入 80+張圖片,對於瀏覽器而言是災難性的。


所以經過和產品商量,我們針對商品詳情頁面進行了載入略縮圖替換高清大圖,同時減少首次載入圖片個數(首次只加載 5 張圖,點選檢視更多後才載入剩餘部分圖片資源)等一系列的優化策略,很大程度上提升了商品詳情頁面的頁面體驗。如圖下圖,為 12 月 19 日我們優化上線後,圖片資源載入耗時均值趨勢圖,有了很明顯的下降趨勢。
4 監控的成效
接入監控至今半年多的時間裡,章魚一站式工作臺的穩定性有了非常大的提升,通過治理和告警以及推進各職場執行環境的完善,大大減少了線上 TS 問題的反饋以及避免了線上潛在問題的發生。
4.1 線上 TS 問題的減少

接入監控以來,通過雙週穩定性週會的治理,歸因於前端的 TS 問題數量不斷的減少,在雙十一和雙十二大促期間,也持續的穩定在 5 個以下 。## 4.2 潛在問題的發現通過監控告警至少發現潛在的問題不少於 5 處 ,通過告警資訊及時解決了潛在問題的風險,避免了線上問題的發生。這裡舉一個非常典型的介面超時告警的例子:獲取使用者標籤資訊介面超時告警
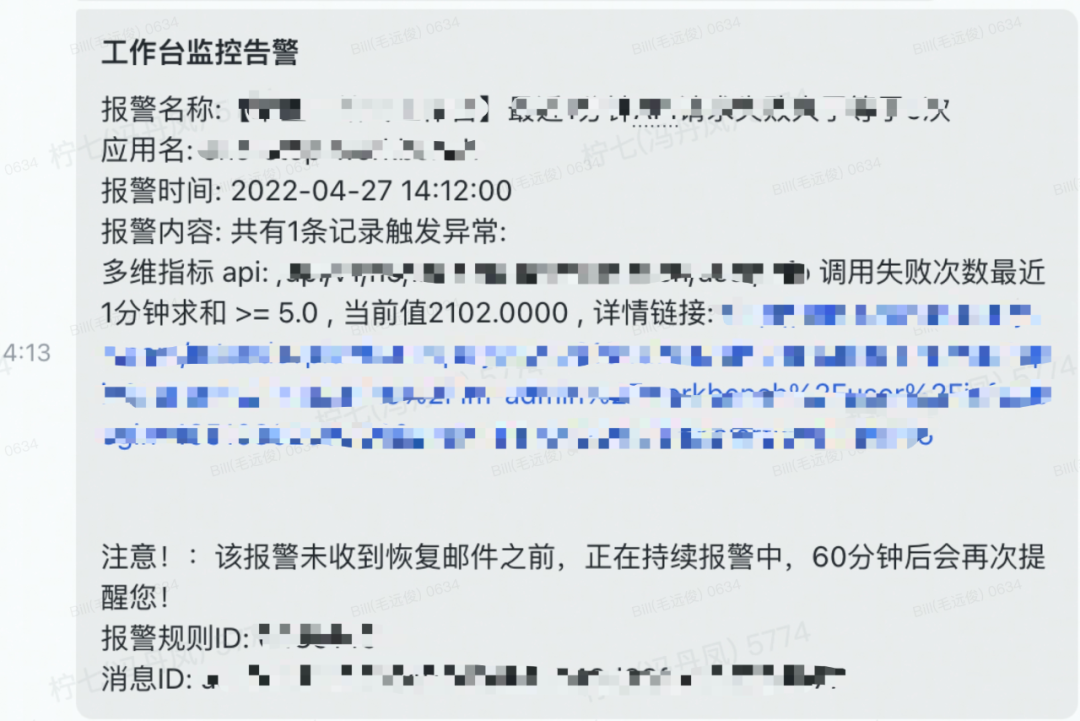
通過監控告警發現,查詢使用者標籤資訊介面 1 分鐘內 1 個使用者多次呼叫失敗 ,這個明顯是有問題的。在跟閘道器和後端對接之後,發現主要的原因是:一站式工作臺裡面的線上和離線進線的會話列表有使用者標籤的顯示,當用戶重新重新整理瀏覽器的時候,會同時呼叫線上和離線的使用者資訊,離線使用者未及時關閉的話,會導致較多的超時短鏈請求。雖然該介面為非核心鏈路介面,但大量的短鏈呼叫是一個潛在的風險,後面跟產品商量之後,將進線列表的使用者標籤刪除,取消介面請求。
4.3 推進客服職場工作臺執行環境的穩定
客服職場的環境是非常複雜的,瀏覽器使用的多樣性以及不一樣的版本都會帶來不可預知的問題,導致前期很多的客服反饋,研發同學投入了大量的時間去做問題定位,最終發現是瀏覽器版本過低導致。所以針對這個情況,我們定期彙總了瀏覽器版本的使用情況,告知給業務,讓業務推進各職場瀏覽器版本的升級和統一。

從監控資料來看,存在火狐瀏覽器、搜狗瀏覽器、QQ 瀏覽器和 android 手機瀏覽器 ,對於這些瀏覽器,基本都存在一些相容性問題,因為一站式工作臺裡面的技術升級用了較多的瀏覽器新特性來對業務模組做了重構,故對於非 chrome 瀏覽器存在相容性問題,這也是為什麼有些職場客服反饋如工單詳情打不開、訂單詳情開啟異常等問題。
chrome 瀏覽器低版本資料彙總:

在幾次推進之後,目前因瀏覽器版本反饋的問題已經大大減少,很大程度減少研發在瀏覽器版本問題排查的時間。
4.4 核心效能指標的監控
目前除了上面商品詳情頁的監控指標,我們還對工單詳情頁面和訂單詳情頁面的渲染時間以及訊息接收和傳送的耗時做了監控,當超過一定的閾值,就會上報告警資訊。目前工單詳情和訂單詳情頁面經過多次的重構,整體的渲染耗時已經穩定在 500 毫秒左右,做到了秒開,具體可以看近一週的渲染趨勢:近 7 天工單詳情頁面渲染趨勢:

近 7 天訂單詳情頁面渲染趨勢:

我們也對訊息接收與傳送耗時核心鏈路做了重構,目前也沒有反饋訊息接收和傳送耗時帶來的延遲卡頓問題。

對於接收訊息的告警我們只會對超過 700 毫秒的時候做告警,因為大部分的訊息接收和傳送都在 100 毫秒以內,客服是無感知的。
5 總結
客服各系統自接入監控至今也有半年多的時間,監控是我們系統釋出上線的定心丸,同時通過監控資料也能夠幫助我們看出不少系統存在的問題,為我們的系統穩定性提升以及系統體驗優化做出不少貢獻。好訊息是我們得物自研監控平臺也正逐步建設完善中 ,目前前端平臺、穩定性監控平臺和效率工程一起協作開發的前端監控產品初版已經完成,客服前端這邊也逐步將應用遷移至自研的監控平臺,相信隨著自研監控能力的的不斷完善,我們能夠在前端監控這一塊取得更好的成績。
- MySQL MVCC實現原理
- 為什麼專案老夭折?這份專案管理指南請收好
- “伯樂”流量調控平臺工程視角 | 得物技術
- 如何評估某活動帶來的大盤增量 | 得物技術
- 得物榜單|全鏈路生產遷移及B/C端資料儲存隔離
- 透過現象看Java AIO的本質 | 得物技術
- 時效準確率提升之承運商路由網路挖掘 | 得物技術
- 存貨庫存模型升級始末 | 得物技術
- 關於加解密、加簽驗籤的那些事 | 得物技術
- GPU推理服務效能優化之路 | 得物技術
- 得物供應鏈複雜業務實時數倉建設之路
- 從 0 到 1,億級訊息推送的穩定性保障 | 得物技術
- 前端監控穩定性資料分析實踐 | 得物技術
- 得物容器SRE探索與實踐
- 得物熱點探測技術架構設計與實踐
- 今年很火的 AI 繪畫怎麼玩
- 得物社群計數系統設計與實現
- 得物商家客服桌面端Electron技術實踐
- 得物商家客服桌面端Electron技術實踐
- 得物染色環境落地實踐