學習分享(第 2 期):從原始碼層面看 Redis 節省記憶體的設計
這裡記錄每週的學習分享,週一/週二發表,文章維護在 Github:studeyang/leanrning-share。
回顧
在文章《Redis 的 String 型別,原來這麼佔記憶體》中,我們學習了 SDS 的底層結構,發現 SDS 儲存了很多的元資料,再加上全域性雜湊表的實現,使得 Redis String 型別在記憶體佔用方面並不理想。
然後在文章《學習分享(第1期)之Redis:巧用Hash型別節省記憶體》中,我們學習了另一種節省記憶體的方案,使用 ziplist 結構的 Hash 型別,記憶體佔用減少了一半,效果顯著。
雖然我們在使用 String 型別後,佔用了較多記憶體,但其實 Redis 是對 SDS 做了節省記憶體設計的。除此之外,Redis 在其他方面也都考慮了記憶體開銷,今天我們就從原始碼層面來看看都做了哪些節省記憶體的設計。
文中程式碼版本為 6.2.4。
一、redisObject 的位域定義法
我們知道,redisObject 是底層資料結構如 SDS, ziplist 的封裝,因此,redisObject 如果能做優化,最終也能帶來節省記憶體的使用者體驗。在原始碼 server.h 中定義了 redisObject 的結構體,如下面程式碼所示:
#define LRU_BITS 24

typedef struct redisObject {
    unsigned type:4;//物件型別(4位=0.5位元組)
    unsigned encoding:4;//編碼(4位=0.5位元組)
    unsigned lru:LRU_BITS;//記錄物件最後一次被應用程式訪問的時間(24位=3位元組)
    int refcount;//引用計數。等於0時表示可以被垃圾回收(32位=4位元組)
    void *ptr;//指向底層實際的資料儲存結構,如:sds等(8位元組)
} robj;
type, encoding, lru, refcount 都是 redisObject 的元資料,redisObject 的結構如下圖所示。

從程式碼中我們可以看到,在 type、encoding 和 lru 三個變數後面都有一個冒號,並緊跟著一個數值,表示該元資料佔用的位元數。這種變數後使用冒號和數值的定義方法,實際上是 C 語言中的位域定義方法,可以用來有效地節省記憶體開銷。
這種方法比較適用的場景是,當一個變數佔用不了一個數據型別的所有 bits 時,就可以使用位域定義方法,把一個數據型別中的 bits(32 bits),劃分成多個(3 個)位域,每個位域佔一定的 bit 數。這樣一來,一個數據型別的所有 bits 就可以定義多個變量了,從而也就有效節省了記憶體開銷。
另外,SDS 的設計中,也有記憶體優化的設計,我們具體來看看有哪些。
二、SDS 的設計
在 Redis 3.2 版本之後,SDS 由一種資料結構變成了 5 種資料結構。分別是 sdshdr5、sdshdr8、sdshdr16、sdshdr32 和 sdshdr64,其中 sdshdr5 只被應用在了 Redis 中的 key 中,另外 4 種不同型別的結構頭可以適配不同大小的字串。
以 sdshdr8 為例,它的結構定義如下所示:
struct __attribute__ ((__packed__)) sdshdr8 {
    uint8_t len; /* used */
    uint8_t alloc; /* excluding the header and null terminator */
    unsigned char flags; /* 3 lsb of type, 5 unused bits */
    char buf[];
};
不知道你有沒有注意到,在 struct 和 sdshdr8 之間使用了 __attribute__ ((__packed__))。這是 SDS 的一個節省記憶體的設計--緊湊型字串。
2.1 緊湊型字串
什麼是緊湊型字串呢?
它的作用就是告訴編譯器,在編譯 sdshdr8 結構時,不要使用位元組對齊的方式,而是採用緊湊的方式分配記憶體。預設情況下,編譯器會按照 8 位元組對齊的方式,給變數分配記憶體。也就是說,即使一個變數的大小不到 8 個位元組,編譯器也會給它分配 8 個位元組。
舉個例子。假設我定義了一個結構體 st1,它有兩個成員變數,型別分別是 char 和 int,如下所示:
#include <stdio.h>
int main() {
    struct st1 {
        char a;
        int b;
    } ts1;
    printf("%lu\n", sizeof(ts1));
    return 0;
}
我們知道,char 型別佔用 1 個位元組,int 型別佔用 4 個位元組,但是如果你執行這段程式碼,就會發現打印出來的結果是 8。這就是因為在預設情況下,編譯器會按照 8 位元組對齊的方式,給 st1 結構體分配 8 個位元組的空間,但是這樣就有 3 個位元組被浪費掉了。
那我用 __attribute__ ((__packed__)) 屬性重新定義結構體 st2,同樣包含 char 和 int 兩個型別的成員變數,程式碼如下所示:
#include <stdio.h>
int main() {
    struct __attribute__((packed)) st2{
        char a;
        int b;
    } ts2;
    printf("%lu\n", sizeof(ts2));
    return 0;
}
當你執行這段程式碼時,可以看到列印的結果是 5,這就是緊湊型記憶體分配,st2 結構體只佔用 5 個位元組的空間。
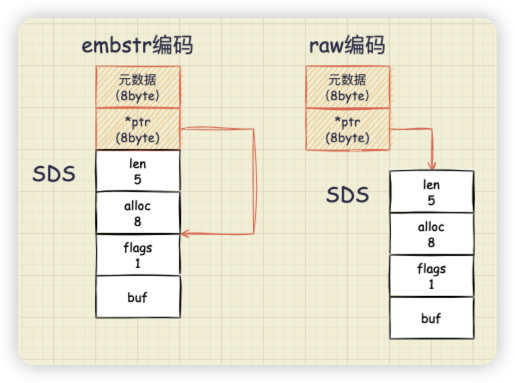
除此之外,Redis 還做了這樣的優化:當儲存的字串小於等於 44 位元組時,RedisObject 中的元資料、指標和 SDS 是一塊連續的記憶體區域,這種佈局方式被稱為 embstr 編碼方式;當字串大於 44 位元組時,SDS 和 RedisObject 就分開佈局了,這種佈局方式被稱為 raw 編碼模式。
這部分的程式碼在 object.c 檔案中:
#define OBJ_ENCODING_EMBSTR_SIZE_LIMIT 44
robj *createStringObject(const char *ptr, size_t len) {
    // 當字串長度小於等於44位元組,建立嵌入式字串
    if (len <= OBJ_ENCODING_EMBSTR_SIZE_LIMIT)
        return createEmbeddedStringObject(ptr,len);
    //字串長度大於44位元組,建立普通字串
    else
        return createRawStringObject(ptr,len);
}
當 len 的長度小於等於 OBJ_ENCODING_EMBSTR_SIZE_LIMIT (預設為 44 位元組)時, createStringObject 函式就會呼叫 createEmbeddedStringObject 函式。這是 SDS 第二個節省記憶體的設計--嵌入式字串。
在講述嵌入式字串之前,我們還是先來看看,當 len 的長度大於 OBJ_ENCODING_EMBSTR_SIZE_LIMIT (預設為 44 位元組)時,這種普通字串的建立過程。
2.2 RawString 普通字串
對於 createRawStringObject 函式來說,它在建立 String 型別的值的時候,會呼叫 createObject 函式。createObject 函式主要是用來建立 Redis 的資料物件的。程式碼如下所示。
robj *createRawStringObject(const char *ptr, size_t len) {
    return createObject(OBJ_STRING, sdsnewlen(ptr,len));
}
createObject 函式有兩個引數,一個是用來表示所要建立的資料物件型別,另一個是指向 SDS 物件的指標,這個指標是通過 sdsnewlen 函式建立的。
robj *createObject(int type, void *ptr) {
    // 【1】給redisObject結構體分配記憶體空間
    robj *o = zmalloc(sizeof(*o));
    //設定redisObject的型別
    o->type = type;
    //設定redisObject的編碼型別
    o->encoding = OBJ_ENCODING_RAW;
    // 【2】將傳入的指標賦值給redisObject中的指標
    o->ptr = ptr;
    …
    return o;
}
呼叫 sdsnewlen 函式建立完 SDS 物件的指標後,也分配了一塊 SDS 的記憶體空間。接著,createObject 函式會給 redisObject 結構體分配記憶體空間,如上示程式碼【1】處。然後再把將傳入的指標賦值給 redisObject 中的指標,如上示程式碼【2】處。
我們接著來看嵌入式字串。
2.3 EmbeddedString 嵌入式字串
通過上文我們知道,當儲存的字串小於等於 44 位元組時,RedisObject 中的元資料、指標和 SDS 是一塊連續的記憶體區域。那麼 createEmbeddedStringObject 函式是如何把 redisObject 和 SDS 的記憶體區域放置在一起的呢?
robj *createEmbeddedStringObject(const char *ptr, size_t len) {
    // 【1】
    robj *o = zmalloc(sizeof(robj)+sizeof(struct sdshdr8)+len+1);
    ...
    if (ptr == SDS_NOINIT)
        sh->buf[len] = '\0';
    else if (ptr) {
        // 【2】
        memcpy(sh->buf,ptr,len);
        sh->buf[len] = '\0';
    } else {
        memset(sh->buf,0,len+1);
    }
    return o;
}
首先,createEmbeddedStringObject 函式會分配一塊連續的記憶體空間,這塊記憶體空間的大小等於 redisObject 結構體的大小 + SDS 結構頭 sdshdr8 的大小 + 字串大小的總和, 並且再加上 1 位元組結束字元“\0”。這部分程式碼如上【1】處。
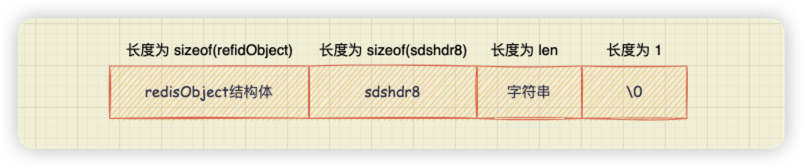
先分配了一塊連續的記憶體空間,從而避免了記憶體碎片。
然後,createEmbeddedStringObject 函式會把引數中傳入的指標 ptr 所指向的字串,拷貝到 SDS 結構體中的字元陣列,並在陣列最後新增結束字元。這部分程式碼如上【2】處。
好了,以上就是 Redis 在設計 SDS 結構上節省記憶體的兩個優化點,不過除了嵌入式字串之外,Redis 還設計了壓縮列表,這也是一種緊湊型的記憶體資料結構,下面我們再來學習下它的設計思路。
三、壓縮列表的設計
為了方便理解壓縮列表的設計與實現,我們先來看看它的建立函式 ziplistNew,這部分程式碼在 ziplist.c 檔案中,如下所示:
unsigned char *ziplistNew(void) {
    // 初始分配的大小
    unsigned int bytes = ZIPLIST_HEADER_SIZE+ZIPLIST_END_SIZE;
    unsigned char *zl = zmalloc(bytes);
    …
    // 將列表尾設定為ZIP_END
    zl[bytes-1] = ZIP_END;
    return zl;
}
可以看到,ziplistNew 函式的邏輯很簡單,就是建立一塊連續的記憶體空間,大小為 ZIPLIST_HEADER_SIZE 和 ZIPLIST_END_SIZE 的總和,然後再把該連續空間的最後一個位元組賦值為 ZIP_END,表示列表結束。
另外,在 ziplist.c 檔案中也定義了 ZIPLIST_HEADER_SIZE、 ZIPLIST_END_SIZE 和 ZIP_END 的值,它們分別表示 ziplist 的列表頭大小、列表尾大小和列表尾位元組內容,如下所示。
//ziplist的列表頭大小
#define ZIPLIST_HEADER_SIZE (sizeof(uint32_t)*2 + sizeof(uint16_t))
//ziplist的列表尾大小
#define ZIPLIST_END_SIZE (sizeof(uint8_t))
//ziplist的列表尾位元組內容
#define ZIP_END 255
列表頭包括 2 個 32 bits 整數和 1 個 16 bits 整數,分別表示壓縮列表的總位元組數 zlbytes,列表最後一個元素離列表頭的偏移 zltail,以及列表中的元素個數 zllen;列表尾包括 1 個 8 bits 整數,表示列表結束。執行完 ziplistNew 函式建立一個 ziplist 後,記憶體佈局就如下圖所示。

注意,此時 ziplist 中還沒有實際的資料,所以圖中並沒有畫出來。
然後,當我們往 ziplist 中插入資料後,完整的記憶體佈局如下圖所示。
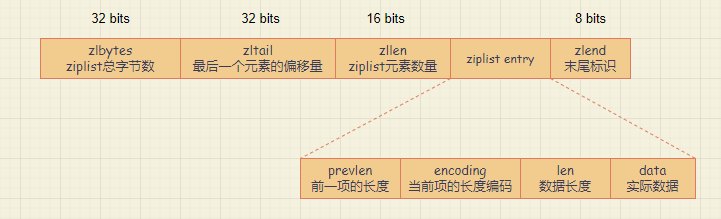
ziplist entry 包括三部分內容,分別是前一項的長度(prevlen)、當前項長度資訊的編碼結果(encoding),以及當前項的實際資料(data)。
當我們往 ziplist 中插入資料時,ziplist 會根據資料是字串還是整數,以及它們的大小進行不同的編碼,這種根據資料大小進行相應編碼的設計思想,正是 Redis 為了節省記憶體而採用的。
unsigned char *__ziplistInsert(unsigned char *zl, unsigned char *p, unsigned char *s, unsigned int slen) {
    ...
    /* Write the entry */
    p += zipStorePrevEntryLength(p,prevlen);
    p += zipStoreEntryEncoding(p,encoding,slen);
    if (ZIP_IS_STR(encoding)) {
        memcpy(p,s,slen);
    } else {
        zipSaveInteger(p,value,encoding);
    }
    ZIPLIST_INCR_LENGTH(zl,1);
    return zl;
}
此處原始碼在下文中還會提及,為了講述方便,這裡標識為【原始碼A處】。
此外,每個列表項 entry 中都會記錄前一項的長度,因為每個列表項的長度不一樣, Redis 會根據資料長度選擇不同大小的位元組來記錄 prevlen。
3.1 使用不同大小的位元組來記錄 prevlen
舉個例子,假設我們統一使用 4 位元組記錄 prevlen,如果前一個列表項只是一個 5 位元組的字串“redis”,那我們用 1 個位元組(8 bits)就能表示 0~256 位元組長度的字串了。此時,prevlen 用 4 位元組記錄,就有 3 位元組浪費掉了。
下面我們就來看看 Redis 是如何根據資料長度選擇不同大小的位元組來記錄 prevlen 的。
通過上面的 __ziplistInsert 函式即【原始碼A處】可以看到,ziplist 在對 prevlen 編碼時,會先呼叫 zipStorePrevEntryLength 函式,該函式程式碼如下所示:
unsigned int zipStorePrevEntryLength(unsigned char *p, unsigned int len) {
    if (p == NULL) {
        return (len < ZIP_BIG_PREVLEN) ? 1 : sizeof(uint32_t) + 1;
    } else {
        //判斷prevlen的長度是否小於ZIP_BIG_PREVLEN
        if (len < ZIP_BIG_PREVLEN) {
            //如果小於254位元組,那麼返回prevlen為1位元組
            p[0] = len;
            return 1;
        } else {
            //否則,呼叫zipStorePrevEntryLengthLarge進行編碼
            return zipStorePrevEntryLengthLarge(p,len);
        }
    }
}
可以看到,zipStorePrevEntryLength 函式會判斷前一個列表項是否小於 ZIP_BIG_PREVLEN(ZIP_BIG_PREVLEN 的值是 254)。如果是的話,那麼 prevlen 就使用 1 位元組表示;否則,zipStorePrevEntryLength 函式就呼叫 zipStorePrevEntryLengthLarge 函式進一步編碼。
zipStorePrevEntryLengthLarge 函式會先將 prevlen 的第 1 位元組設定為 254,然後使用記憶體拷貝函式 memcpy,將前一個列表項的長度值拷貝至 prevlen 的第 2 至第 5 位元組。最後,zipStorePrevEntryLengthLarge 函式返回 prevlen 的大小,為 5 位元組。
int zipStorePrevEntryLengthLarge(unsigned char *p, unsigned int len) {
    uint32_t u32;
    if (p != NULL) {
        //將prevlen的第1位元組設定為ZIP_BIG_PREVLEN,即254
        p[0] = ZIP_BIG_PREVLEN;
        u32 = len;
        //將前一個列表項的長度值拷貝至prevlen的第2至第5位元組,其中sizeof(u32)的值為4
        memcpy(p+1,&u32,sizeof(u32));
        ...
    }
    //返回prevlen的大小,為5位元組
    return 1 + sizeof(uint32_t);
}
好了,在瞭解了 prevlen 使用 1 位元組和 5 位元組兩種編碼方式後,我們再來學習下 encoding 的編碼方法。
3.2 使用不同大小的位元組來記錄 encoding 編碼
我們回到上面的 __ziplistInsert 函式即【原始碼A處】,可以看到執行完 zipStorePrevEntryLength 函式邏輯後,緊接著會呼叫 zipStoreEntryEncoding 函式。
ziplist 在 zipStoreEntryEncoding 函式中,針對整數和字串,就分別使用了不同位元組長度的編碼結果。
unsigned int zipStoreEntryEncoding(unsigned char *p, unsigned char encoding, unsigned int rawlen) {
    //預設編碼結果是1位元組
    unsigned char len = 1;
    //如果是字串資料
    if (ZIP_IS_STR(encoding)) {
        //如果字串長度小於等於63位元組(16進製為0x3f)
        if (rawlen <= 0x3f) {
            //預設編碼結果是1位元組
            if (!p) return len;
            ...
        }
        //字串長度小於等於16383位元組(16進製為0x3fff)
        else if (rawlen <= 0x3fff) {
            //編碼結果是2位元組
            len += 1;
            if (!p) return len;
            ...
        }
        //字串長度大於16383位元組
        else {
            //編碼結果是5位元組
            len += 4;
            if (!p) return len;
            ...
        }
    } else {
        /* 如果資料是整數,編碼結果是1位元組 */
        if (!p) return len;
        ...
    }
}
可以看到當資料是不同長度字串或是整數時,編碼結果的長度 len 大小不同。
總之,針對不同長度的資料,使用不同位元組大小的元資料資訊 prevlen 和 encoding 來記錄, 這種方法可以有效地節省記憶體開銷。

封面

參考資料
- 極客時間《Redis原始碼剖析與實戰》
- redis 原始碼 v6.2.4:http://github.com/redis/redis/tree/6.2.4
相關文章
也許你對下面文章也感興趣。