各開發語言DNS快取配置建議
作者:翟賀龍
一、背景
在計算機領域,涉及效能優化動作時首先應被考慮的原則之一便是使用快取,合理的資料快取機制能夠帶來以下收益:
從 CPU 硬體的多級快取設計,到瀏覽器快速展示頁面,再到大行其道的 CDN、雲端儲存閘道器等商業產品,處處應用了快取理念。
在公網領域,如作業系統、瀏覽器和移動端 APP 等成熟產品所具備的快取機制,極大的消解了網路提供商如電信移動聯通、內容提供商如各大門戶平臺和 CDN 廠商直面的服務壓力,運營商的 DNS 才能從容面對每秒億萬級的 DNS 解析,網路裝置叢集才能輕鬆承擔每秒 Tbit 級的網際網路頻寬,CDN 平臺才能快速處理每秒億萬次的請求。
面對公司目前龐大且仍在不斷增長的的域名接入規模,筆者所在團隊在不斷優化叢集架構、提升 DNS 軟體效能的同時,也迫切需要推動各類客戶端環境進行域名解析請求機制的優化,因此,特組織團隊成員調研、編寫了這篇指南文章,以期為公司、客戶及合作方的前端開發運維人員給出合理建議,優化 DNS 整體請求流程,為業務增效。
本文主要圍繞不同業務和開發語言背景下,客戶端本地如何實現 DNS 解析記錄快取進行探討,同時基於筆者所在團隊對 DNS 本身及公司網路環境的掌握,給出一些其他措施,最終致力於客戶端一側的 DNS 解析請求規範化。
二、名詞解釋
1. 客戶端
本文所述客戶端,泛指所有主動發起網路請求的物件,包括但不限於伺服器、PC、移動終端、作業系統、命令列工具、指令碼、服務軟體、使用者 APP 等。
2. DNS
Domain Name System(Server/Service),域名系統(伺服器/服務),可理解為一種類資料庫服務;
客戶端同服務端進行網路通訊,是靠 IP 地址識別對方;而作為客戶端的使用者,人類很難記住大量 IP 地址,所以發明了易於記憶的域名如 www.jd.com,將域名和 IP 地址的對映關係,儲存到 DNS 可供客戶端查詢;
客戶端只有通過向 DNS 發起域名解析請求從而獲取到服務端的 IP 地址後,才能向 IP 地址發起網路通訊請求,真正獲取到域名所承載的服務或內容。
3. LDNS
Local DNS,本地域名伺服器;公網接入環境通常由所在網路供應商自動分配(供應商有控制權,甚至可作 DNS 劫持,即篡改解析域名得到的 IP),內網環境由 IT 部門設定自動分配;
通常 Unix、類Unix、MacOS系統可通過 /etc/resolv.conf 檢視自己的 LDNS,在 nameserver 後宣告,該檔案亦支援使用者自助編輯修改,從而指定 LDNS,如公網常見的公共 DNS 如谷歌 DNS、114DNS 等;純內網環境通常不建議未諮詢IT部門的情況下擅自修改,可能導致服務不可用;可參考 man resolv.conf 指令結果。
當域名解析出現異常時,同樣應考慮 LDNS 服務異常或發生解析劫持情況的可能。
4. hosts
DNS 系統可以動態的提供域名和IP的對映關係,普遍存在於各類作業系統的hosts檔案則是域名和IP對映關係的靜態記錄檔案,且通常 hosts 記錄優先於 DNS 解析,即本地無快取或快取未命中時,則優先通過 hosts 查詢對應域名記錄,若 hosts 無相關對映,則繼續發起 DNS 請求。關於 Linux 環境下此邏輯的控制,請參考下文 C/C++ 語言 DNS 快取介紹部分。
所以在實際工作中,常利用上述預設特性,將特定域名和特定 IP 對映關係寫到 hosts 檔案中(俗稱“固定 hosts”),用於繞開 DNS 解析過程,對目標 IP 作針對性訪問(其效果與 curl 的-x選項,或 wget 的 -e 指定 proxy 選項,異曲同工);
5. TTL
Time-To-Live,生存時間值,此概念在多領域適用且可能有不同意義。
本文涉及到 TTL 描述均針對資料快取而言,可直白理解為已快取資料的“有效期”,從資料被快取開始計,在快取中存在時長超過 TTL 規定時長的資料被視為過期資料,資料被再次呼叫時會立刻同權威資料來源進行有效性確認或重新獲取。
因快取機制通常是被動觸發和更新,故在客戶端的快取有效期內,後端原始權威資料若發生變更,客戶端不會感知,表現為業務上一定程度的資料更新延遲、快取資料與權威資料短時不一致。
對於客戶端側 DNS 記錄的快取 TTL,我們建議值為 60s;同時如果是低敏感度業務比如測試、或域名解析調整不頻繁的業務,可適當延長,甚至達到小時或天級別;
三、DNS 解析優化建議
1. 各語言網路庫對 DNS 快取的支援調研
以下調研結果,推薦開發人員參考,以實現自研客戶端 DNS 快取。各開發語言對 DNS 快取支援可能不一樣,在此逐個分析一下。
C/C++ 語言
(1)glibc 的 getaddrinfo 函式
Linux環境下的 glibc 庫提供兩個域名解析的函式:gethostbyname 函式和 getaddrinfo 函式,gethostbyname 是曾經常用的函式,但是隨著向 IPv6 和執行緒化程式設計模型的轉移,getaddrinfo 顯得更有用,因為它既解析 IPv6 地址,又符合執行緒安全,推薦使用 getaddrinfo 函式。
函式原型:
int getaddrinfo( const char *node,
                 const char *service,
                 const struct addrinfo *hints,
                 struct addrinfo **res);
getaddrinfo 函式是比較底層的基礎庫函式,很多開發語言的域名解析函式都依賴這個函式,因此我們在此介紹一下這個函式的處理邏輯。通過 strace 命令跟蹤這個函式系統呼叫。
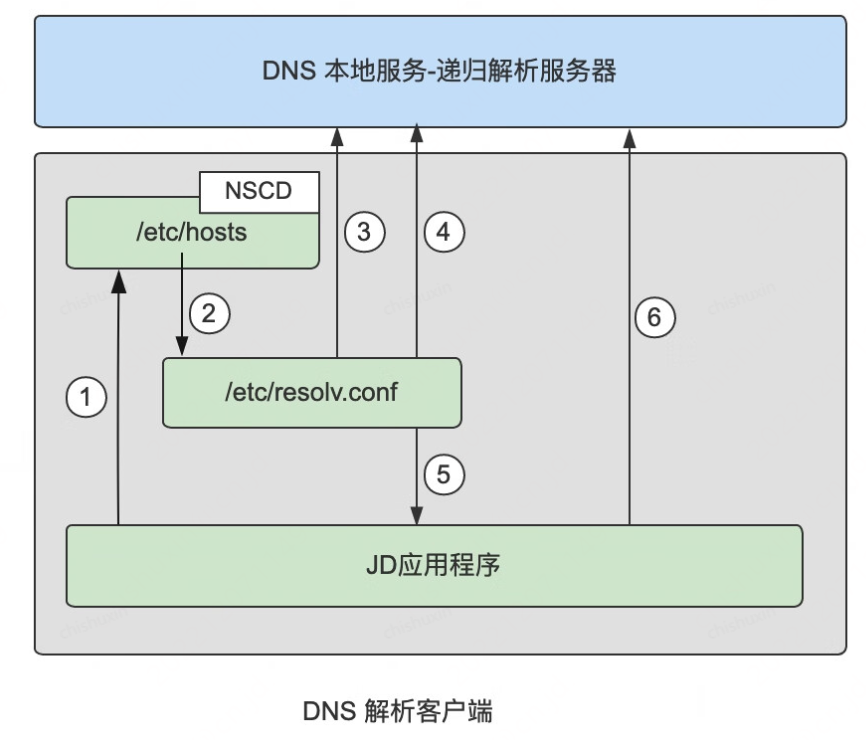
1)查詢 nscd 快取(nscd 介紹見後文)
我們在 linux 環境下通過 strace 命令可以看到如下的系統呼叫
//連線nscd
socket(PF_LOCAL, SOCK_STREAM|SOCK_CLOEXEC|SOCK_NONBLOCK, 0) = 3
connect(3, {sa_family=AF_LOCAL, sun_path="/var/run/nscd/socket"}, 110) = -1 ENOENT (No such file or directory)
close(3)
通過 unix socket 介面"/var/run/nscd/socket"連線nscd服務查詢DNS快取。
2)查詢 /etc/hosts 檔案
如果nscd服務未啟動或快取未命中,繼續查詢hosts檔案,我們應該可以看到如下的系統呼叫
//讀取 hosts 檔案
open("/etc/host.conf", O_RDONLY)        = 3
fstat(3, {st_mode=S_IFREG|0644, st_size=9, ...}) = 0
...
open("/etc/hosts", O_RDONLY|O_CLOEXEC)  = 3
fcntl(3, F_GETFD)                       = 0x1 (flags FD_CLOEXEC)
fstat(3, {st_mode=S_IFREG|0644, st_size=178, ...}) = 0
3)查詢 DNS 服務
從 /etc/resolv.conf 配置中查詢到 DNS 伺服器(nameserver)的IP地址,然後做 DNS 查詢獲取解析結果。我們可以看到如下系統呼叫
//獲取 resolv.conf 中 DNS 服務 IP
open("/etc/resolv.conf", O_RDONLY)      = 3
fstat(3, {st_mode=S_IFREG|0644, st_size=25, ...}) = 0
mmap(NULL, 4096, PROT_READ|PROT_WRITE, MAP_PRIVATE|MAP_ANONYMOUS, -1, 0) = 0x7fef2abee000
read(3, "nameserver 114.114.114.114\n\n", 4096) = 25
...
//連到 DNS 服務,開始 DNS 查詢
connect(3, {sa_family=AF_INET, sin_port=htons(53), sin_addr=inet_addr("114.114.114.114")}, 16) = 0
poll([{fd=3, events=POLLOUT}], 1, 0)    = 1 ([{fd=3, revents=POLLOUT}])
而關於客戶端是優先查詢 /etc/hosts 檔案,還是優先從 /etc/resolv.conf 中獲取 DNS 伺服器作查詢解析,是由 /etc/nsswitch.conf 控制:
#/etc/nsswitch.conf 部分配置
...
#hosts:     db files nisplus nis dns
hosts:      files dns
...
實際通過 strace 命令可以看到,系統呼叫 nscd socket 之後,讀取 /etc/resolv.conf 之前,會讀取該檔案
newfstatat(AT_FDCWD, "/etc/nsswitch.conf", {st_mode=S_IFREG|0644, st_size=510, ...}, 0) = 0
...
openat(AT_FDCWD, "/etc/nsswitch.conf", O_RDONLY|O_CLOEXEC) = 3
4)驗證
#include <sys/socket.h>
#include <netdb.h>
#include <stdio.h>
#include <stdlib.h>
#include <string.h>
#include <arpa/inet.h>
#include <unistd.h>

int gethostaddr(char * name);

int main(int argc, char *argv[])
{
    if (argc != 2)
    {
        fprintf(stderr, "%s $host", argv[0]);
        return -1;
    }

    int i = 0;
    for(i = 0; i < 5; i++)
    {
        int ret = -1;
        ret = gethostaddr(argv[1]);
        if (ret < 0)
        {
            fprintf(stderr, "%s $host", argv[0]);
            return -1;
        }
        //sleep(5);
    }

    return 0;
}

int gethostaddr(char* name)
{
    struct addrinfo hints;
    struct addrinfo *result;
    struct addrinfo *curr;
    int ret = -1;
    char ipstr[INET_ADDRSTRLEN];
    struct sockaddr_in  *ipv4;

    memset(&hints, 0, sizeof(struct addrinfo));
    hints.ai_family = AF_INET;
    hints.ai_socktype = SOCK_STREAM;

    ret = getaddrinfo(name, NULL, &hints, &result);
    if (ret != 0)
    {
        fprintf(stderr, "getaddrinfo: %s\n", gai_strerror(ret));
        return ret;
    }

    for (curr = result; curr != NULL; curr = curr->ai_next)
    {
        ipv4 = (struct sockaddr_in *)curr->ai_addr;
        inet_ntop(curr->ai_family, &ipv4->sin_addr, ipstr, INET_ADDRSTRLEN);
        printf("ipaddr:%s\n", ipstr);
    }

    freeaddrinfo(result);
    return 0;
}
綜上分析,getaddrinfo 函式結合 nscd ,是可以實現 DNS 快取的。
(2)libcurl 庫的域名解析函式
libcurl 庫是 c/c++ 語言下,客戶端比較常用的網路傳輸庫,curl 命令就是基於這個庫實現。這個庫也是呼叫 getaddrinfo 庫函式實現 DNS 域名解析,也是支援 nscd DNS 快取的。
int
Curl_getaddrinfo_ex(const char *nodename,
                    const char *servname,
                    const struct addrinfo *hints,
                    Curl_addrinfo **result)
{
    ...
    error = getaddrinfo(nodename, servname, hints, &aihead);
    if(error)
        return error;
    ...
}
Java
Java 語言是很多公司業務系統開發的主要語言,通過編寫簡單的 HTTP 客戶端程式測試驗證 Java 的網路庫是否支援 DNS 快取。測試驗證了 Java 標準庫中 HttpURLConnection 和 Apache httpcomponents-client 這兩個元件。
(1)Java 標準庫 HttpURLConnection
import java.io.BufferedReader;
import java.io.InputStream;
import java.io.InputStreamReader;
import java.io.OutputStream;
import java.net.HttpURLConnection;
import java.net.URL;


public class HttpUrlConnectionDemo {

    public static void main(String[] args) throws Exception {
        String urlString = "http://example.my.com/";

        int num = 0;
        while (num < 5) {
            URL url = new URL(urlString);
            HttpURLConnection conn = (HttpURLConnection) url.openConnection();
            conn.setRequestMethod("GET");
            conn.setDoOutput(true);

            OutputStream os = conn.getOutputStream();
            os.flush();
            os.close();

            if (conn.getResponseCode() == HttpURLConnection.HTTP_OK) {
                InputStream is = conn.getInputStream();
                BufferedReader reader = new BufferedReader(new InputStreamReader(is));
                StringBuilder sb = new StringBuilder();
                String line;
                while ((line = reader.readLine()) != null) {
                    sb.append(line);
                }
                System.out.println("rsp:" + sb.toString());
            } else {
                System.out.println("rsp code:" + conn.getResponseCode());
            }
            num++;
        }
    }
}
測試結果顯示 Java 標準庫 HttpURLConnection 是支援 DNS 快取,5 次請求中只有一次 DNS 請求。
(2)Apache httpcomponents-client
import java.util.ArrayList;
import java.util.List;

import org.apache.hc.client5.http.classic.methods.HttpGet;
import org.apache.hc.client5.http.entity.UrlEncodedFormEntity;
import org.apache.hc.client5.http.impl.classic.CloseableHttpClient;
import org.apache.hc.client5.http.impl.classic.CloseableHttpResponse;
import org.apache.hc.client5.http.impl.classic.HttpClients;
import org.apache.hc.core5.http.HttpEntity;
import org.apache.hc.core5.http.NameValuePair;
import org.apache.hc.core5.http.io.entity.EntityUtils;
import org.apache.hc.core5.http.message.BasicNameValuePair;

public class QuickStart {
    public static void main(final String[] args) throws Exception {
        int num = 0;
        while (num < 5) {
            try (final CloseableHttpClient httpclient = HttpClients.createDefault()) {
                final HttpGet httpGet = new HttpGet("http://example.my.com/");
                try (final CloseableHttpResponse response1 = httpclient.execute(httpGet)) {
                    System.out.println(response1.getCode() + " " + response1.getReasonPhrase());
                    final HttpEntity entity1 = response1.getEntity();
                    EntityUtils.consume(entity1);
                }
            }
        num++;
        }
    }
}
測試結果顯示 Apache httpcomponents-client 支援 DNS 快取,5 次請求中只有一次 DNS 請求。
從測試中發現 Java 的虛擬機器實現一套 DNS 快取,即實現在 java.net.InetAddress 的一個簡單的 DNS 快取機制,預設為快取 30 秒,可以通過 networkaddress.cache.ttl 修改預設值,快取範圍為 JVM 虛擬機器程序,也就是說同一個 JVM 程序中,30秒內一個域名只會請求DNS伺服器一次。同時 Java 也是支援 nscd 的 DNS 快取,估計底層呼叫 getaddrinfo 函式,並且 nscd 的快取級別比 Java 虛擬機器的 DNS 快取高。
# 預設快取 ttl 在 jre/lib/security/java.security 修改,其中 0 是不快取,-1 是永久快取
networkaddress.cache.ttl=10

# 這個引數 sun.net.inetaddr.ttl 是以前預設值,目前已經被 networkaddress.cache.ttl 取代
Go
隨著雲原生技術的發展,Go 語言逐漸成為雲原生的第一語言,很有必要驗證一下 Go 的標準庫是否支援 DNS 快取。通過我們測試驗證發現 Go 的標準庫 net.http 是不支援 DNS 快取,也是不支援 nscd 快取,應該是沒有呼叫 glibc 的庫函式,也沒有實現類似 getaddrinfo 函式的功能。這個跟 Go語言的自舉有關係,Go 從 1.5 開始就基本全部由 Go(.go) 和彙編 (.s) 檔案寫成的,以前版本的 C(.c) 檔案被全部重寫。不過有一些第三方 Go 版本 DNS 快取庫,可以自己在應用層實現,還可以使用 fasthttp 庫的 httpclient。
(1)標準庫net.http
package main

import (
        "flag"
        "fmt"
        "io/ioutil"
        "net/http"
        "time"
)

var httpUrl string

func main() {
    flag.StringVar(&httpUrl, "url", "", "url")
    flag.Parse()
    getUrl := fmt.Sprintf("http://%s/", httpUrl)

    fmt.Printf("url: %s\n", getUrl)
    for i := 0; i < 5; i++ {
        _, buf, err := httpGet(getUrl)
        if err != nil {
            fmt.Printf("err: %v\n", err)
            return
        }
        fmt.Printf("resp: %s\n", string(buf))
        time.Sleep(10 * time.Second)    # 等待10s發起另一個請求
    }
}

func httpGet(url string) (int, []byte, error) {
    client := createHTTPCli()
    resp, err := client.Get(url)
    if err != nil {
        return -1, nil, fmt.Errorf("%s err [%v]", url, err)
    }
    defer resp.Body.Close()

    buf, err := ioutil.ReadAll(resp.Body)
    if err != nil {
        return resp.StatusCode, buf, err
    }

    return resp.StatusCode, buf, nil
}
func createHTTPCli() *http.Client {
    readWriteTimeout := time.Duration(30) * time.Second
    tr := &http.Transport{
        DisableKeepAlives: true,  //設定短連線
        IdleConnTimeout:   readWriteTimeout,
    }
    client := &http.Client{
        Timeout:   readWriteTimeout,
        Transport: tr,
    }
    return client
}
從測試結果來看,net.http 每次都去 DNS 查詢,不支援 DNS 快取。
(2)fasthttp 庫
fasthttp 庫是 Go 版本高效能 HTTP 庫,通過極致的效能優化,效能是標準庫 net.http 的 10 倍,其中一項優化就是支援 DNS 快取,我們可以從其原始碼看到
//主要在fasthttp/tcpdialer.go中
type TCPDialer struct {
    ...
    // This may be used to override DNS resolving policy, like this:
    // var dialer = &fasthttp.TCPDialer{
    // 	Resolver: &net.Resolver{
    // 		PreferGo:     true,
    // 		StrictErrors: false,
    // 		Dial: func (ctx context.Context, network, address string) (net.Conn, error) {
    // 			d := net.Dialer{}
    // 			return d.DialContext(ctx, "udp", "8.8.8.8:53")
    // 		},
    // 	},
    // }
    Resolver Resolver

    // DNSCacheDuration may be used to override the default DNS cache duration (DefaultDNSCacheDuration)
    DNSCacheDuration time.Duration
    ...
}
可以參考如下方法使用 fasthttp client 端
func main() {
	// You may read the timeouts from some config
	readTimeout, _ := time.ParseDuration("500ms")
	writeTimeout, _ := time.ParseDuration("500ms")
	maxIdleConnDuration, _ := time.ParseDuration("1h")
	client = &fasthttp.Client{
		ReadTimeout:                   readTimeout,
		WriteTimeout:                  writeTimeout,
		MaxIdleConnDuration:           maxIdleConnDuration,
		NoDefaultUserAgentHeader:      true, // Don't send: User-Agent: fasthttp
		DisableHeaderNamesNormalizing: true, // If you set the case on your headers correctly you can enable this
		DisablePathNormalizing:        true,
		// increase DNS cache time to an hour instead of default minute
		Dial: (&fasthttp.TCPDialer{
			Concurrency:      4096,
			DNSCacheDuration: time.Hour,
		}).Dial,
	}
	sendGetRequest()
	sendPostRequest()
}
(3)第三方DNS快取庫
這個是 github 中的一個 Go 版本 DNS 快取庫
可以參考如下程式碼,在HTTP庫中支援DNS快取
r := &dnscache.Resolver{}
t := &http.Transport{
    DialContext: func(ctx context.Context, network string, addr string) (conn net.Conn, err error) {
        host, port, err := net.SplitHostPort(addr)
        if err != nil {
            return nil, err
        }
        ips, err := r.LookupHost(ctx, host)
        if err != nil {
            return nil, err
        }
        for _, ip := range ips {
            var dialer net.Dialer
            conn, err = dialer.DialContext(ctx, network, net.JoinHostPort(ip, port))
            if err == nil {
                break
            }
        }
        return
    },
}
Python
(1)requests 庫
#!/bin/python

import requests

url = 'http://example.my.com/'

num = 0
while num < 5:
    headers={"Connection":"close"}     # 開啟短連線
    r = requests.get(url,headers = headers)
    print(r.text)
    num +=1
(2)httplib2 庫
#!/usr/bin/env python
import httplib2
http = httplib2.Http()
url = 'http://example.my.com/'

num = 0
while num < 5:
    loginHeaders={
        'User-Agent': 'Mozilla/5.0 (Windows NT 5.1) AppleWebKit/537.36 (KHTML, like Gecko) Maxthon/4.0 Chrome/30.0.1599.101 Safari/537.36',
        'Connection': 'close'  # 開啟短連線
    }
    response, content = http.request(url, 'GET', headers=loginHeaders)
    print(response)
    print(content)
    num +=1
(3)urllib2 庫
#!/bin/python

import urllib2
import cookielib

httpHandler = urllib2.HTTPHandler(debuglevel=1)
httpsHandler = urllib2.HTTPSHandler(debuglevel=1)
opener = urllib2.build_opener(httpHandler, httpsHandler)
urllib2.install_opener(opener)

loginHeaders={
    'User-Agent': 'Mozilla/5.0 (Windows NT 5.1) AppleWebKit/537.36 (KHTML, like Gecko) Maxthon/4.0 Chrome/30.0.1599.101 Safari/537.36',
    'Connection': 'close' # 開啟短連線
}

num = 0
while num < 5:
    request=urllib2.Request('http://example.my.com/',headers=loginHeaders)
    response = urllib2.urlopen(request)
    page=''
    page= response.read()
    print response.info()
    print page
    num +=1
Python 測試三種庫都是支援 nscd 的 DNS 快取的(推測底層也是呼叫 getaddrinfo 函式),以上測試時使用 HTTP 短連線,都在 python2 環境測試。
總結
針對 HTTP 客戶端來說,可以優先開啟 HTTP 的 keep-alive 模式,可以複用 TCP 連線,這樣可以減少 TCP 握手耗時和重複請求域名解析,然後再開啟 nscd 快取,除了 Go 外,C/C++、Java、Python 都可支援 DNS 快取,減少 DNS查詢耗時。
這裡只分析了常用 C/C++、Java、Go、Python 語言,歡迎熟悉其他語言的小夥伴補充。
2. Unix/類 Unix 系統常用 dns 快取服務:
在由於某些特殊原因,自研或非自研客戶端本身無法提供 DNS 快取支援的情況下,建議管理人員在其所在系統環境中部署DNS快取程式;
現介紹 Unix/類 Unix 系統適用的幾款常見輕量級 DNS 快取程式。而多數桌面作業系統如 Windows、MacOS 和幾乎所有 Web 瀏覽器均自帶 DNS 快取功能,本文不再贅述。
P.S. DNS 快取服務請務必確保隨系統開機啟動;
nscd
name service cache daemon 即裝即用,通常為 linux 系統預設安裝,相關介紹可參考其 manpage:man nscd;man nscd.conf
(1)安裝方法:通過系統自帶軟體包管理程式安裝,如 yum install nscd
(2)快取管理(清除):
service nscd restart 重啟服務清除所有快取;
nscd -i hosts 清除 hosts 表中的域名快取(hosts 為域名快取使用的 table 名稱,nscd 有多個快取 table,可參考程式相關 manpage)
dnsmasq
較為輕量,可選擇其作為 nscd 替代,通常需單獨安裝
(1)安裝方法:通過系統自帶軟體包管理程式安裝,如 yum install dnsmasq
(2)核心檔案介紹(基於 Dnsmasq version 2.86,較低版本略有差異,請參考對應版本文件如 manpage 等)
(3)/etc/default/dnsmasq 提供六個變數定義以支援六種控制類功能
(4)/etc/dnsmasq.d/ 此目錄含 README 檔案,可參考;目錄內可以存放自定義配置檔案
(5)/etc/dnsmasq.conf 主配置檔案,如僅配置 dnsmasq 作為快取程式,可參考以下配置
listen-address=127.0.0.1                #程式監聽地址,務必指定本機內網或迴環地址,避免暴露到公網環境
port=53                                 #監聽埠
resolv-file=/etc/dnsmasq.d/resolv.conf  #配置dnsmasq向自定義檔案內的 nameserver 轉發 dns 解析請求
cache-size=150                          #快取記錄條數,預設 150 條,可按需調整、適當增大
no-negcache                             #不快取解析失敗的記錄,主要是 NXDOMAIN,即域名不存在
log-queries=extra                       #開啟日誌記錄,指定“=extra”則記錄更詳細資訊,可僅在問題排查時開啟,平時關閉
log-facility=/var/log/dnsmasq.log       #指定日誌檔案

#同時需要將本機 /etc/resolv.conf 第一個 nameserver 指定為上述監聽地址,這樣本機系統的 dns 查詢請求才會通過 dnsmasq 代為轉發並快取響應結果。
#另 /etc/resolv.conf 務必額外配置 2 個 nameserver,以便 dnsmasq 服務異常時支援系統自動重試,注意 resolv.conf 僅讀取前 3 個 nameserver
(6)快取管理(清除):
kill -s HUP `pidof dnsmasq` 推薦方式,無需重啟服務
kill -s TERM `pidof dnsmasq` 或 service dnsmasq stop
service dnsmasq force-reload 或 service dnsmasq restart
(7)官方文件:http://thekelleys.org.uk/dnsmasq/doc.html
3. 純內網業務取消查詢域名的AAAA記錄的請求
以 linux 作業系統為例,常用的網路請求命令列工具常常通過呼叫 getaddrinfo() 完成域名解析過程,如 ping、telnet、curl、wget 等,但其可能出於通用性的考慮,均被設計為對同一個域名每次解析會發起兩個請求,分別查詢域名 A 記錄(即 IPV4 地址)和 AAAA 記錄(即 IPV6 地址)。
因目前大部分公司的內網環境及雲上內網環境還未使用 ipv6 網路,故通常 DNS 系統不為內網域名新增 AAAA 記錄,徒勞請求域名的 AAAA 記錄會造成前端應用和後端 DNS 服務不必要的資源開銷。因此,僅需請求內網域名的業務,如決定自研客戶端,建議開發人員視實際情況,可將其設計為僅請求內網域名 A 記錄,尤其當因故無法實施本地快取機制時。
4. 規範域名處理邏輯
客戶端需嚴格規範域名/主機名的處理邏輯,避免產生大量對不存在域名的解析請求(確保域名從權威渠道獲取,避免故意或意外使用隨機構造的域名、主機名),因此類請求的返回結果(NXDOMAIN)通常不被快取或快取時長較短,且會觸發客戶端重試,對後端 DNS 系統造成一定影響。
- 應用健康度隱患刨析解決系列之資料庫時區設定
- 對於Vue3和Ts的心得和思考
- 一文詳解擴散模型:DDPM
- zookeeper的Leader選舉原始碼解析
- 一文帶你搞懂如何優化慢SQL
- 京東金融Android瘦身探索與實踐
- 微前端框架single-spa子應用載入解析
- cookie時效無限延長方案
- 聊聊前端效能指標那些事兒
- Spring竟然可以建立“重複”名稱的bean?—一次專案中存在多個bean名稱重複問題的排查
- 京東金融Android瘦身探索與實踐
- Spring原始碼核心剖析
- 深入淺出RPC服務 | 不同層的網路協議
- 安全測試之探索windows遊戲掃雷
- 關於資料庫分庫分表的一點想法
- 對於Vue3和Ts的心得和思考
- Bitmap、RoaringBitmap原理分析
- 京東小程式CI工具實踐
- 測試用例設計指南
- 當你對 redis 說你中意的女孩是 Mia