前端监控稳定性数据分析实践 | 得物技术
1 背景
客服一站式工作台集成了在线、热线和工单三个核心应用,支撑着自营客服和 BPO 客服每天处理大量的会话信息,工作台的稳定性就显得非常重要。接入前端监控以来,我们坚持每双周跟进工作台以及客服几个核心应用的线上稳定性情况,围绕页面的访问情况、JS 错误率、资源加载异常情况、API 接口成功率、自定义业务模块指标 这五大监控模块,做了详细的数据分析,从中发现了很多问题并且通过实时告警解决了潜在的问题,也通过数据分析推进了客服职场完善工作台的运行环境。本文主要阐述我们是如何通过监控稳定性数据分析来提升应用系统的稳定性。
2 监控的原理
客服一站式工作台接入监控时通过多方调研最终采用了 Arms 的监控方案,并基于 Arms 的监控方案,做了二次开发,整体的监控实现如下图所示:

Arms 提供的 SDK 功能比较齐全,为满足一些定制化的数据上报诉求、应用数据权限管控以及控制上报成本,客服域接入时基于 alife-logger 进行了二次封装,对功能更加的可控, 同时定期从阿里云平台进行数据初始化和生成定制化报表。
3 监控的实践
3.1 页面 PV&UV 监控场景
PV 即页面浏览量,通常是衡量一个网站甚至一个模块使用情况的主要指标。UV 即独立访客数,是指某站点被多少用户访问过,以用户登录态作为统计依据。页面的 PV 和 UV 很大程度上反馈了应用各页面功能的使用情况,能为产品功能优化以及相关业务决策提供很好的数据支持 。我们针对客服域已接入监控的应用连续几个迭代的 PV、UV 数据分析,主要在如下事项起到了很好的推进和决策作用:
-
新功能上线效果分析:通过分析页面业务功能模块 PV 相关数据,可以分析对应上新功能的使用情况。若发现部分功能客户触达率较低,就可以与业务沟通确认是功能设计问题还是上线功能布达问题,快速做出运营策略调整;
-
下线无用模块:通过页面使用情况分析,对系统中访问量比较少的页面做了汇总分析,同产品运营确定之后,对在线客服管理系统和工单管理系统中的 9 个页面做了下线处理,减少了页面的维护成本;
-
支撑技术改造优先级策略:在技术栈迁移的过程中,可以优先对访问量比较高的页面进行迁移,一般页面访问量高的对应的需求迭代也比较频繁,通过页面访问排序,按优先级去做迁移可以提升整体投入的 ROI;
-
助力系统体验优化:通过分析较高 PV 页面用户访问链路,将取消订单、创建赔付单等需要高频但需要打开其他页面操作的功能集成到客服聊天页座席助手模块,提升客服的工作效率。
3.2 JS 错误率监控
脚本错误主要有两类:语法错误、运行时错误。简单来说就是用户在一些特殊场景下浏览器上报 JS 的异常,甚至会造成系统卡顿、页面不可用等极端情况,这会极大地降低用户体验。因此我们通过监控系统对核心系统关键链路、关键指标做好异常数据分析设置监控预警 ,达到设定的阈值则发送飞书或短信告警,值班同学关注告警信息能够及时做出响应,同时针对告警错误内容进行专项治理,达到效果如下:
-
提升系统稳定性: 总计处理 41 个 JS 脚本异常治理,过程中发现异常业务场景并进行专项治理,很大程度上提升系统的稳定性。
-
发现隐藏问题: 通过监控发现 JS 错误数增加,排查发现数量正在上升,实时联系一个正在触发报错的客服远程,发现是接入的三方 SDK 发布新版版本,在特殊情况会出现报错,及时同步对应的三方同学进行改正,有效避免因外部依赖发布带来的隐藏问题。
3.3 API 请求优化
监控提供应用中每个 API 的调用情况,包括调用次数、调用成功率、返回信息、调用成功或失败的平均耗时 等数据。通过分析指定时间段内应用中所有 API 请求数据,可以深度挖掘以下业务代码实现和接口稳定性一些相关的问题:
-
下线不必要调用: 排查过程中发现部分埋点调用频次很高,但是实际报表数据并未运用起来,与业务沟通后发现为历史遗留逻辑,目前已无用,所以进行下架。减少不必要的接口调用,释放更多的浏览器请求资源。
-
减少冗余调用: 共治理接口高频调用治理调用 5 个,通过分析发现部分非核心功能的接口调用量较大,代码走读发现此部分接口为实时性要求不高枚举列表的接口,可以通过前端缓存的方式减少接口调用次数,从而提高用户切换会话效率和减少服务器的调用压力。
-
优化技术方案: 客服一站式工作台存在长链和短链调用结合的情况,在我们日常监控分析中发现部分短链接口调用量大。经过代码走查和调用链路分析发现由于业务功能需要,只要客服切换会话,就会拉取当前会话最近五条消息发起短链请求,造成切换会话会有卡顿感,同时很容易出现由于短链并发较多,频繁切换回话后会出现串线的情况。所以与后端沟通后,将原先技术方案内的短链调用改为长链消息推送,很大程度上减少接口调用和消息不实时的情况,提升用户体验和系统稳定性。
3.4 静态资源加载异常优化
静态资源加载分为页面内的图片、CSS、JS 等 Assets 资源加载失败。目前客服 BPO 职场均有安全管控,所以会出现运营或者其他应用上传的静态资源链接、图片等资源,部分 BPO 打不开的情况,通过前端监控发现以下几个问题:
-
图片资源加载异常: 随着一站式工作台的业务拓展,陆续支持等其他租户的客户进线。业务上线后,我们通过监控发现资源错误数量出现上涨,排查后确认由于商品图片等资源都是配置的 CDN 地址,需要 BPO 职场开通网络白名单客服才可以看到指定的图片资源。通过监控快速定位对应的职场,同步对应的职场 IT 负责人进行处理。
-
运营配置错误地址修正: 通过监控数据分析,发现不少报错的静态资源地址中有飞书内网地址和竹间迁移遗留资源的情况,内网地址外网是无法打开的,会给客服带来不少困扰。经确认为运营迁移过程中存在遗漏造成,联系对应的运营同学进行专项治理,及时减少问题影响面。
3.5 页面加载性能优化
页面性能对用户体验而言十分关键。每次重构对页面性能的提升,仅靠工程师开发设备的测试数据是没有说服力的,需要有大量的真实数据用于验证;比如客服职场普遍反馈商品详情页面打开慢,影响到了客服的工作效率,体验很不好。为了明确具体加载慢的点,我们针对页面加载到页面可用这个过程中以下几个时间节点进行埋点:
-
e_product_finish【总耗时 ms】: 商品详情页面打开到所有资源均加载完成(包含图片与请求)耗时
-
e_product_loadImg【加载图片耗时 ms】: 接口请求回来到所有图片加载完成耗时
-
e_product_loadAndfetch【请求耗时 ms】: 商品详情页面加载静态资源 &&发起请求耗时
经过三天的线上数据分析发现,大部分耗时在加载图片耗时上。分析耗时较长的商品详情上下链路,发现此类商品的图片大多为 500kb+甚至 1MB 左右的图片 ,单个商品最多的情况下商品轮播图近 52 张图,加上商品细节图、商品穿搭效果图等,单个商品详情页面首次打开竟然需要加载 80+张图片,对于浏览器而言是灾难性的。


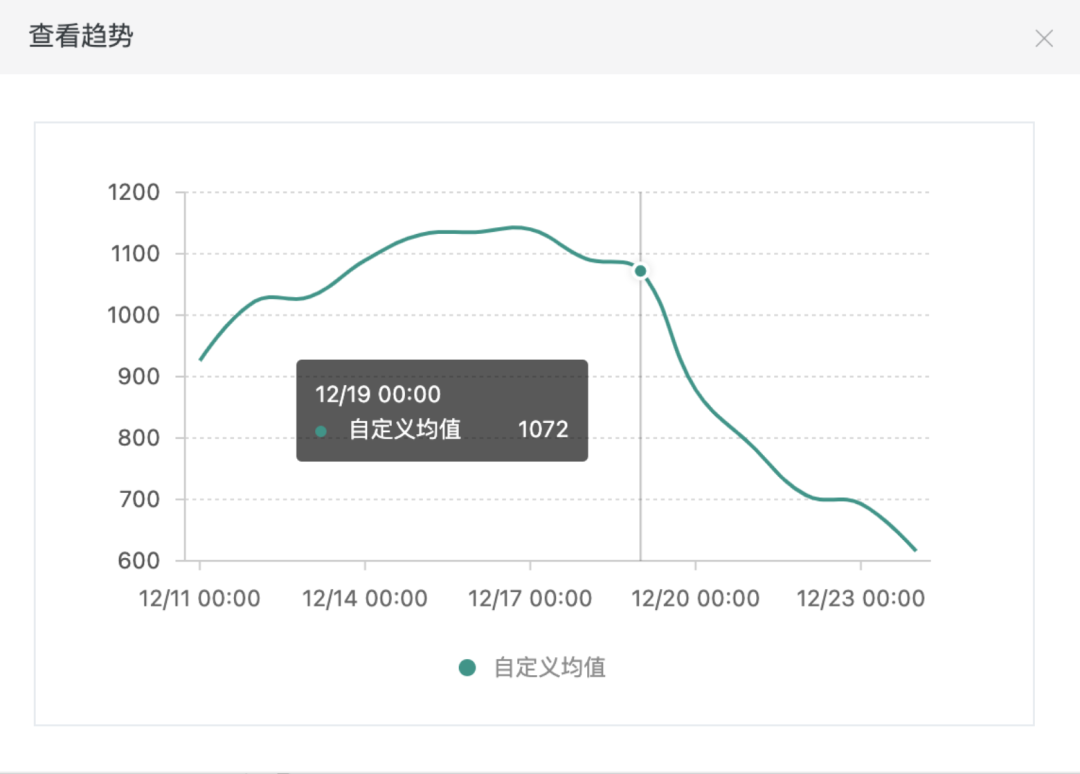
所以经过和产品商量,我们针对商品详情页面进行了加载略缩图替换高清大图,同时减少首次加载图片个数(首次只加载 5 张图,点击查看更多后才加载剩余部分图片资源)等一系列的优化策略,很大程度上提升了商品详情页面的页面体验。如图下图,为 12 月 19 日我们优化上线后,图片资源加载耗时均值趋势图,有了很明显的下降趋势。
4 监控的成效
接入监控至今半年多的时间里,章鱼一站式工作台的稳定性有了非常大的提升,通过治理和告警以及推进各职场运行环境的完善,大大减少了线上 TS 问题的反馈以及避免了线上潜在问题的发生。
4.1 线上 TS 问题的减少

接入监控以来,通过双周稳定性周会的治理,归因于前端的 TS 问题数量不断的减少,在双十一和双十二大促期间,也持续的稳定在 5 个以下 。## 4.2 潜在问题的发现通过监控告警至少发现潜在的问题不少于 5 处 ,通过告警信息及时解决了潜在问题的风险,避免了线上问题的发生。这里举一个非常典型的接口超时告警的例子:获取用户标签信息接口超时告警
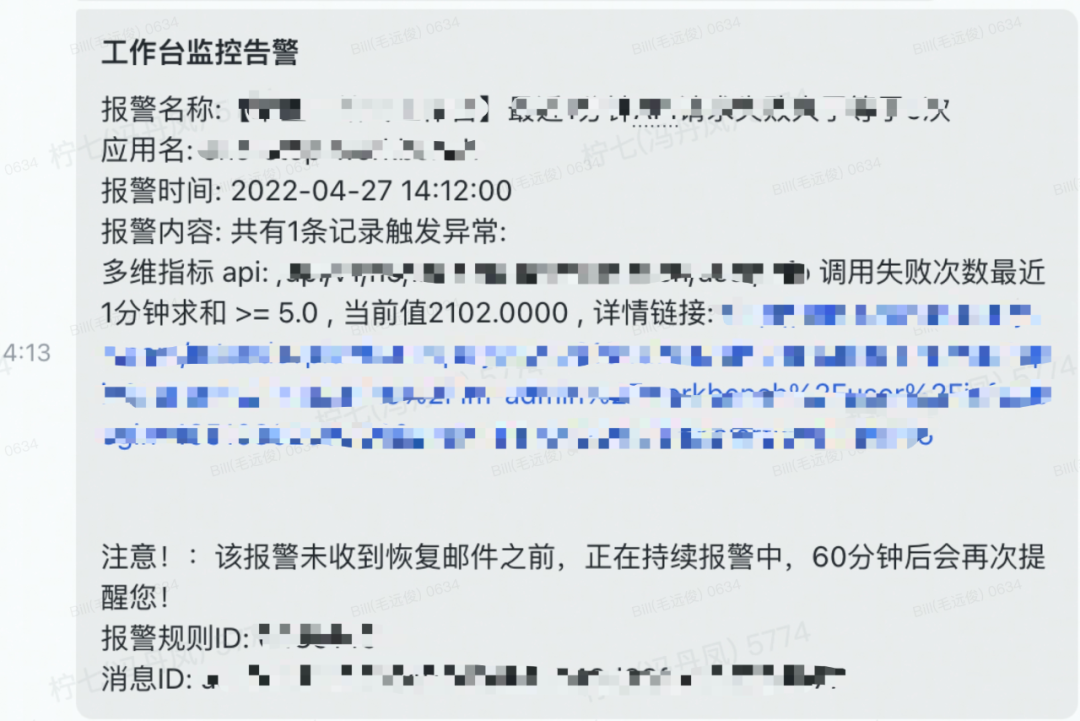
通过监控告警发现,查询用户标签信息接口 1 分钟内 1 个用户多次调用失败 ,这个明显是有问题的。在跟网关和后端对接之后,发现主要的原因是:一站式工作台里面的在线和离线进线的会话列表有用户标签的显示,当用户重新刷新浏览器的时候,会同时调用在线和离线的用户信息,离线用户未及时关闭的话,会导致较多的超时短链请求。虽然该接口为非核心链路接口,但大量的短链调用是一个潜在的风险,后面跟产品商量之后,将进线列表的用户标签删除,取消接口请求。
4.3 推进客服职场工作台运行环境的稳定
客服职场的环境是非常复杂的,浏览器使用的多样性以及不一样的版本都会带来不可预知的问题,导致前期很多的客服反馈,研发同学投入了大量的时间去做问题定位,最终发现是浏览器版本过低导致。所以针对这个情况,我们定期汇总了浏览器版本的使用情况,告知给业务,让业务推进各职场浏览器版本的升级和统一。

从监控数据来看,存在火狐浏览器、搜狗浏览器、QQ 浏览器和 android 手机浏览器 ,对于这些浏览器,基本都存在一些兼容性问题,因为一站式工作台里面的技术升级用了较多的浏览器新特性来对业务模块做了重构,故对于非 chrome 浏览器存在兼容性问题,这也是为什么有些职场客服反馈如工单详情打不开、订单详情打开异常等问题。
chrome 浏览器低版本数据汇总:

在几次推进之后,目前因浏览器版本反馈的问题已经大大减少,很大程度减少研发在浏览器版本问题排查的时间。
4.4 核心性能指标的监控
目前除了上面商品详情页的监控指标,我们还对工单详情页面和订单详情页面的渲染时间以及消息接收和发送的耗时做了监控,当超过一定的阈值,就会上报告警信息。目前工单详情和订单详情页面经过多次的重构,整体的渲染耗时已经稳定在 500 毫秒左右,做到了秒开,具体可以看近一周的渲染趋势:近 7 天工单详情页面渲染趋势:

近 7 天订单详情页面渲染趋势:

我们也对消息接收与发送耗时核心链路做了重构,目前也没有反馈消息接收和发送耗时带来的延迟卡顿问题。

对于接收消息的告警我们只会对超过 700 毫秒的时候做告警,因为大部分的消息接收和发送都在 100 毫秒以内,客服是无感知的。
5 总结
客服各系统自接入监控至今也有半年多的时间,监控是我们系统发布上线的定心丸,同时通过监控数据也能够帮助我们看出不少系统存在的问题,为我们的系统稳定性提升以及系统体验优化做出不少贡献。好消息是我们得物自研监控平台也正逐步建设完善中 ,目前前端平台、稳定性监控平台和效率工程一起协作开发的前端监控产品初版已经完成,客服前端这边也逐步将应用迁移至自研的监控平台,相信随着自研监控能力的的不断完善,我们能够在前端监控这一块取得更好的成绩。
- MySQL MVCC实现原理
- 为什么项目老夭折?这份项目管理指南请收好
- “伯乐”流量调控平台工程视角 | 得物技术
- 如何评估某活动带来的大盘增量 | 得物技术
- 得物榜单|全链路生产迁移及B/C端数据存储隔离
- 透过现象看Java AIO的本质 | 得物技术
- 时效准确率提升之承运商路由网络挖掘 | 得物技术
- 存货库存模型升级始末 | 得物技术
- 关于加解密、加签验签的那些事 | 得物技术
- GPU推理服务性能优化之路 | 得物技术
- 得物供应链复杂业务实时数仓建设之路
- 从 0 到 1,亿级消息推送的稳定性保障 | 得物技术
- 前端监控稳定性数据分析实践 | 得物技术
- 得物容器SRE探索与实践
- 得物热点探测技术架构设计与实践
- 今年很火的 AI 绘画怎么玩
- 得物社区计数系统设计与实现
- 得物商家客服桌面端Electron技术实践
- 得物商家客服桌面端Electron技术实践
- 得物染色环境落地实践